DownUnder CTF 2021 Writeup
OSINT
(back) On the rails
We intercepted further communications between the two. This text was sent shortly before we lost track of one of the suspects, with an image attached. Can you work out what they’re talking about?
Okay, please promise not to judge me, but I might have ended up catching the wrong train again. Though I think I’m still in Australia this time (at least it isn’t like that time in Norway LOL). I managed to snap a picture before we went past this station… you have any ideas where I might be?
Please tell us the name of the station, with any spaces replaced by underscores.
Flag format: DUCTF{station_name}
Author: xXl33t_h@x0rXx
For this OSINT challenge, we are given a single image and are tasked with finding the name of the train station where the photo was taken. Before looking at the image, I should preface that all OSINT challenges are restricted to locations in Australia. This narrows down our search quite a bit but not enough to make this easy–Australia is still massive. Now then, let’s look at the image.
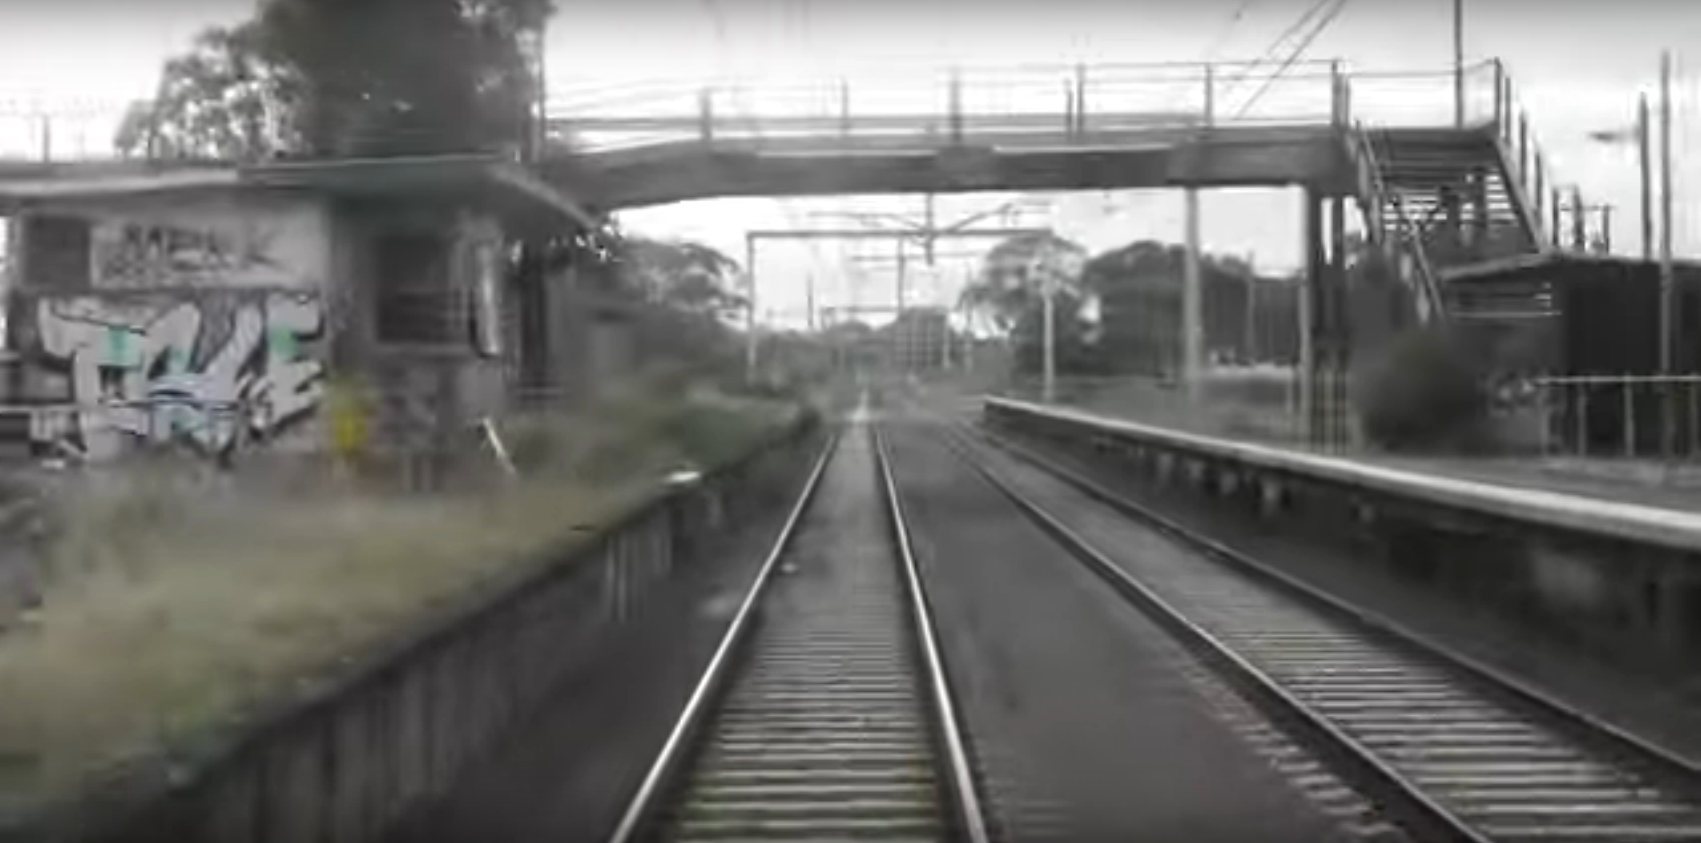
The image doesn’t have the greatest resolution, but there should be enough details to figure out which station this is. Most notably, the station looks fairly beat down and some unique graffiti can be found decorating the building on the left of the image. Searching for rundown train stations in Australia seemed like a good next step. However, before starting the search, we tried inputting the image into Google Lens to see if it could match the location.
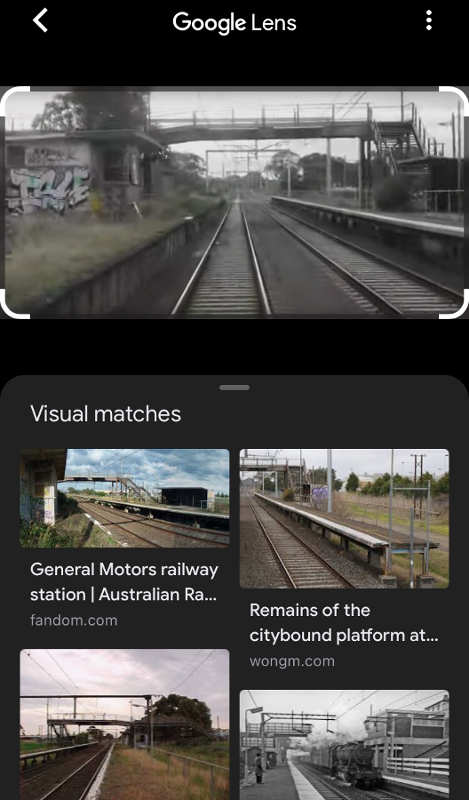
Google Lens quickly returns a result that is worth further investigation, General Motors Station in Melbourne. A quick search reveals that General Motors Station is likely to be the right station. The station is not only permanently closed but is also covered in graffiti. The second link from the results in Figure 1-2 reveals some interesting photographs of the station.
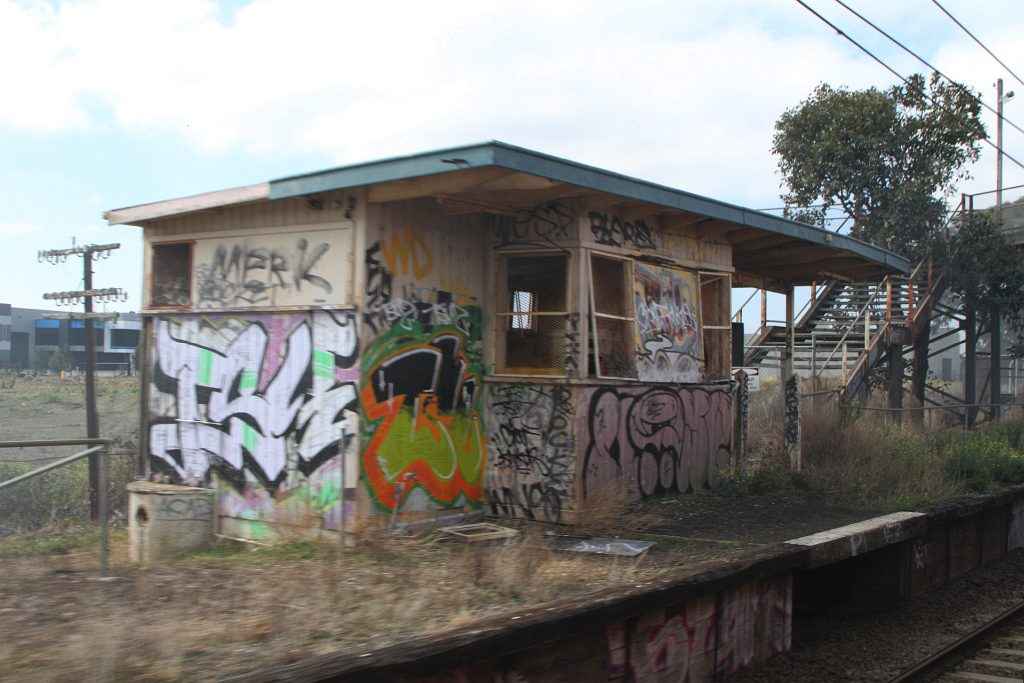
This photo taken from Wongm’s Rail Gallery shows the exact graffiti and building as shown in the original image. There is no doubt about it, this is the correct train station.
DUCTF{general_motors_station}
Heart of the nation
We found some files on the website (not really), the caption was “Right at the heart of the nation, no piece of the bush inside the circle remains untouched by us”.
We believe this is one of their meeting places, can you help us find the location of the photo truncated (not rounded) to three decimal places?
Flag format is DUCTF{lon,lat}
Author: xXl33t_h@x0rXx
For Heart of the nation, we are given a single photo and need to find the location’s coordinates. Once again, this location is restricted to Australia so that narrows the search down a little bit. Here is the image we start with.
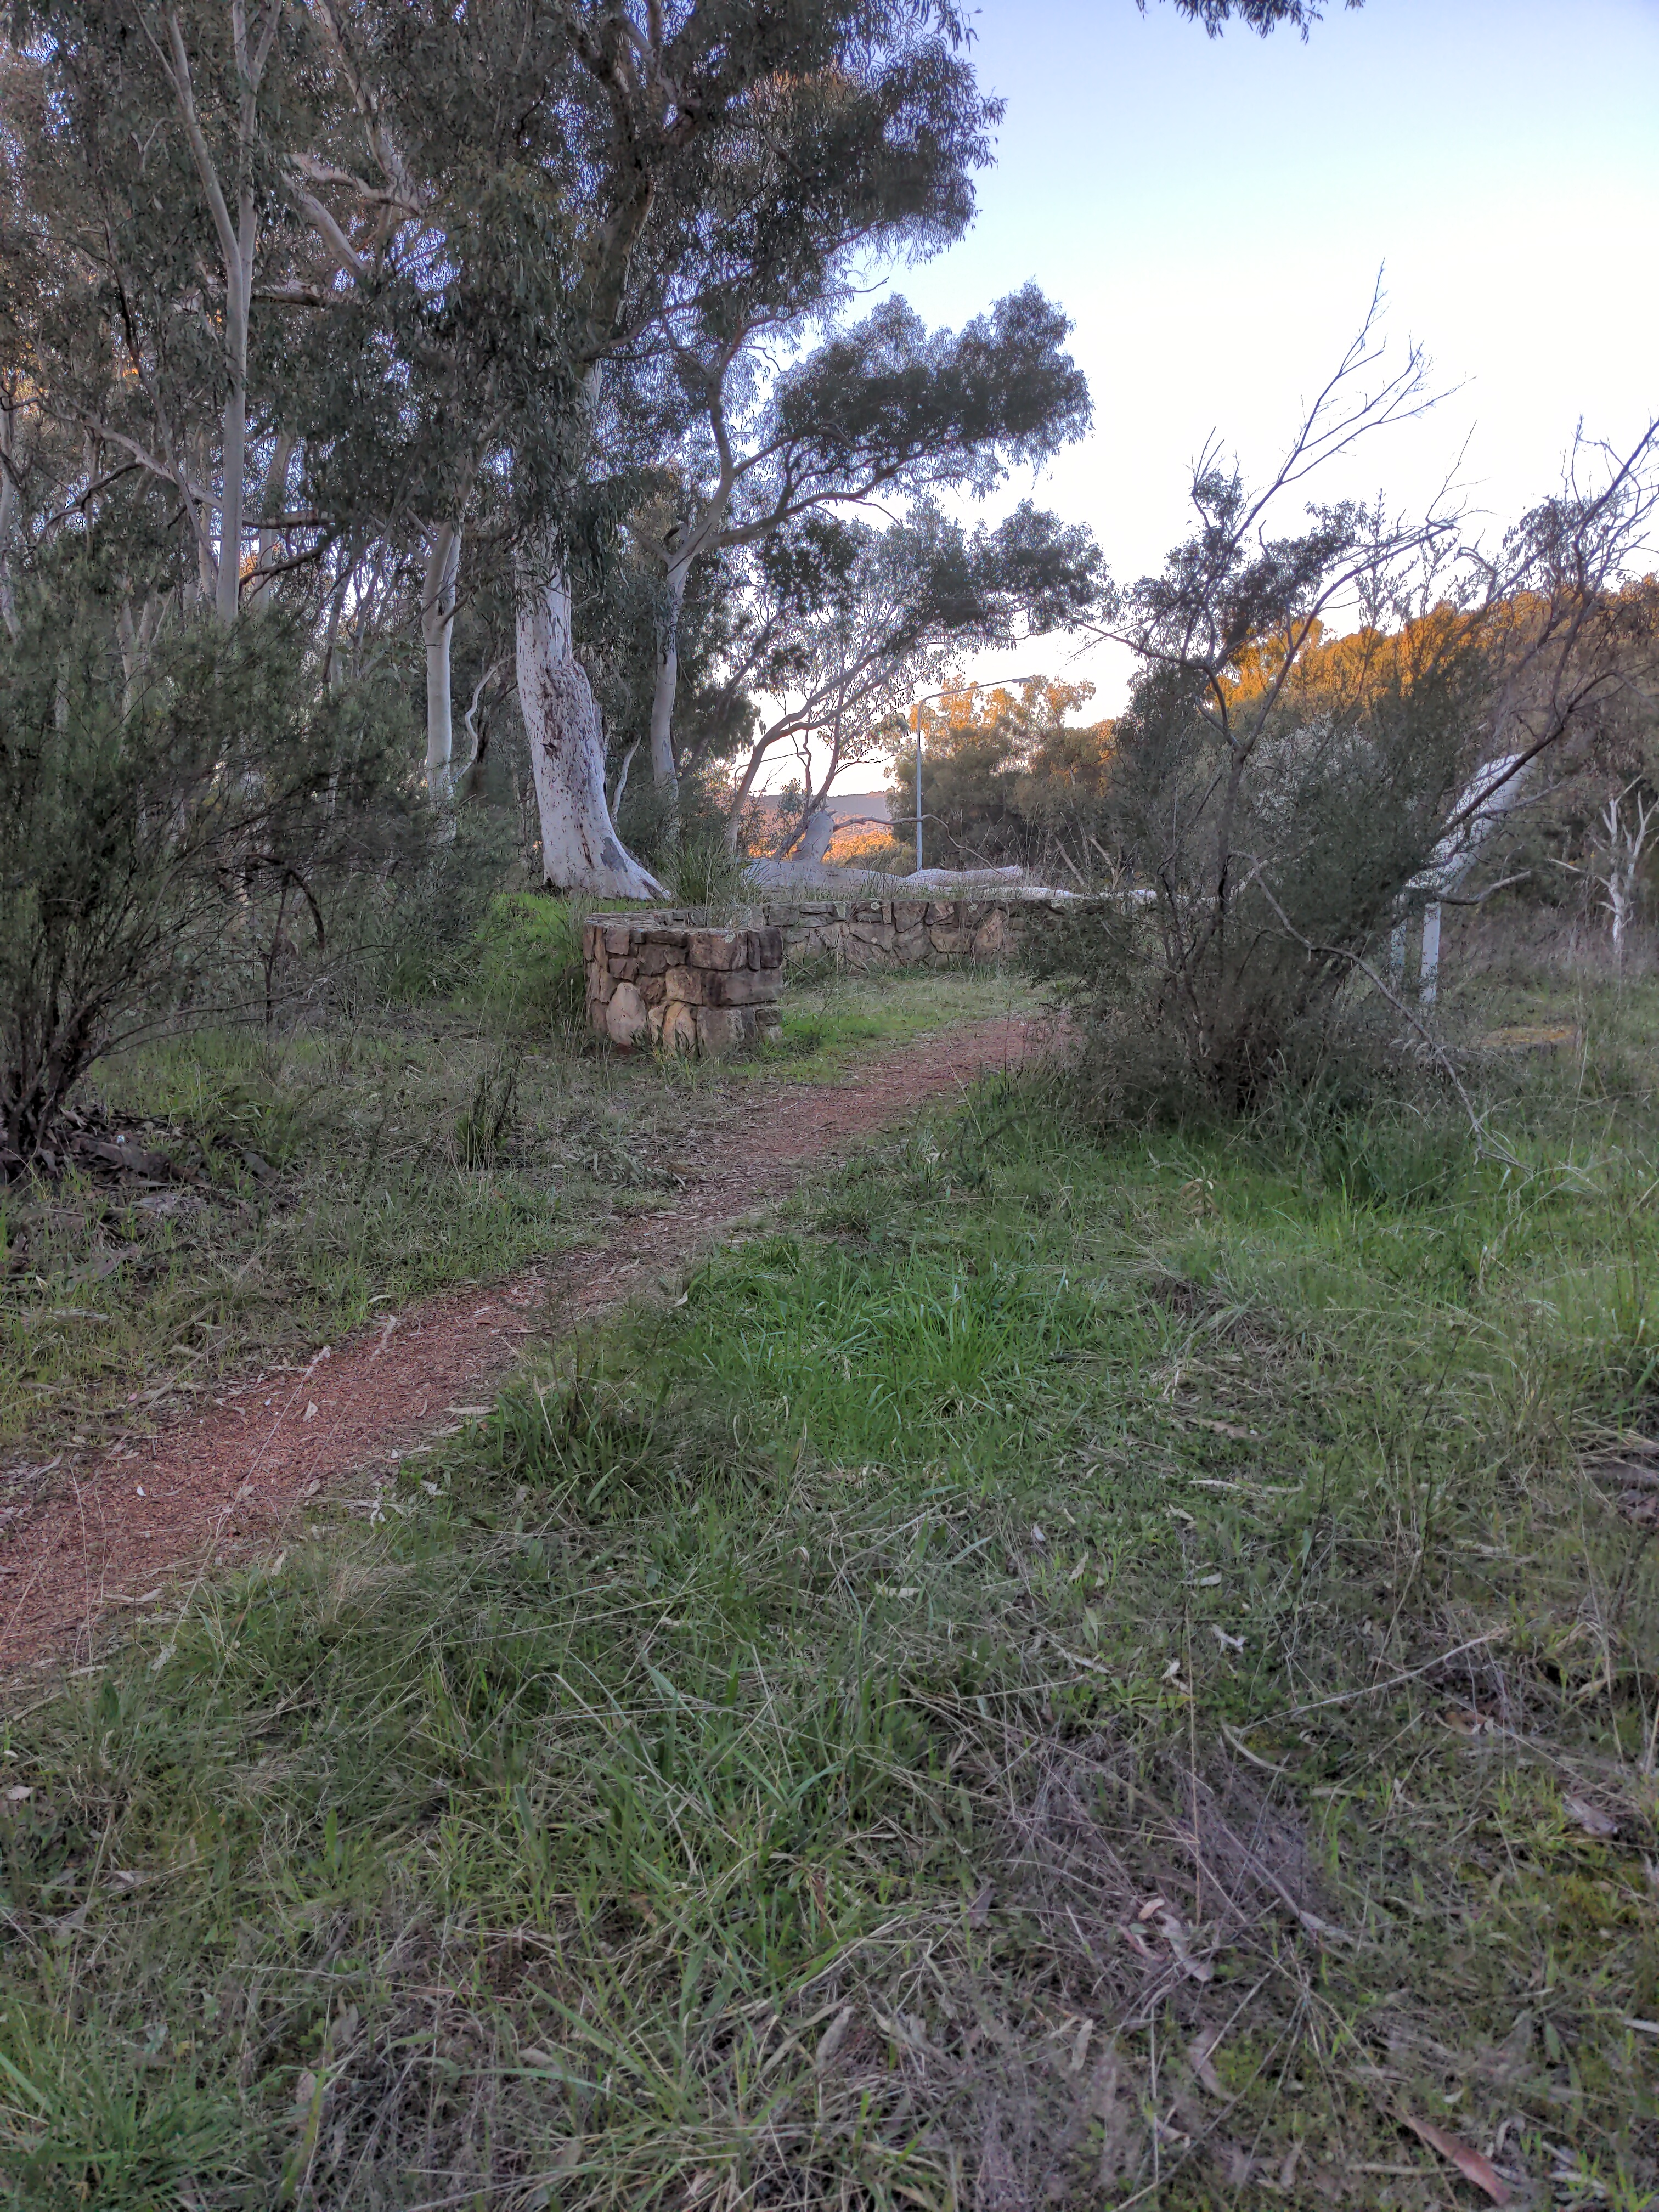
Given Figure 2-1, it must be almost impossible to find this location unless you had been there before. There are a few minor details in the image that seemed worth checking out.
- The information sign located on the right side of the image
- The specific trees throughout the area
- A streetlight nearby the location
- A stone semi-circle in the middle of the image
Using some of these details we can narrow down the possible locations further. Since there is a streetlight close by, this photo must have been taken in a city or near a road. The sign points to this location being a historical site, national park, etc.
To start our search, we wasted a ton of time looking through various national parks, historic sites, and even tried correlating the specific type of tree to a single location. Later on, we found that the challenge description was the key to solving this challenge.
“Right at the heart of the nation, no piece of the bush inside the circle remains untouched by us”.
The caption from the description provides a riddle that describes the location in the photo. By breaking this riddle into parts we were able to figure out the exact location.
First, “Right at the heart of the nation” could refer to several things, the physical heart of the nation, or maybe some sort of spiritual heart. The physical heart was an easy starting place. We began our search right in the middle of Australia for places that fit the bill.

Alice Springs was the first and only area we checked. At first, Alice Springs seemed like a good fit. However, as we searched Alice Springs and the surrounding area, there was a big problem. The foliage did not match at all, the Outback did not have the same amount of trees or greenery as the photo. Meaning the riddle was likely not pointing to the physical heart of Australia.
For our next venture, we looked at the political heart of Australia, which had to be the capital city, Canberra. Canberra is home to Australia’s parliament, senate, and a slew of embassies. Now if we were looking for the true political heart, starting at the parliament seems like the best bet.
Weirdly enough, the parliament building is located in the middle of a giant circular road. This matches the second half of the riddle, “no piece of the bush inside the circle remains untouched by us”. Next, while looking through the area surrounding Parliament, we found an interesting spot.
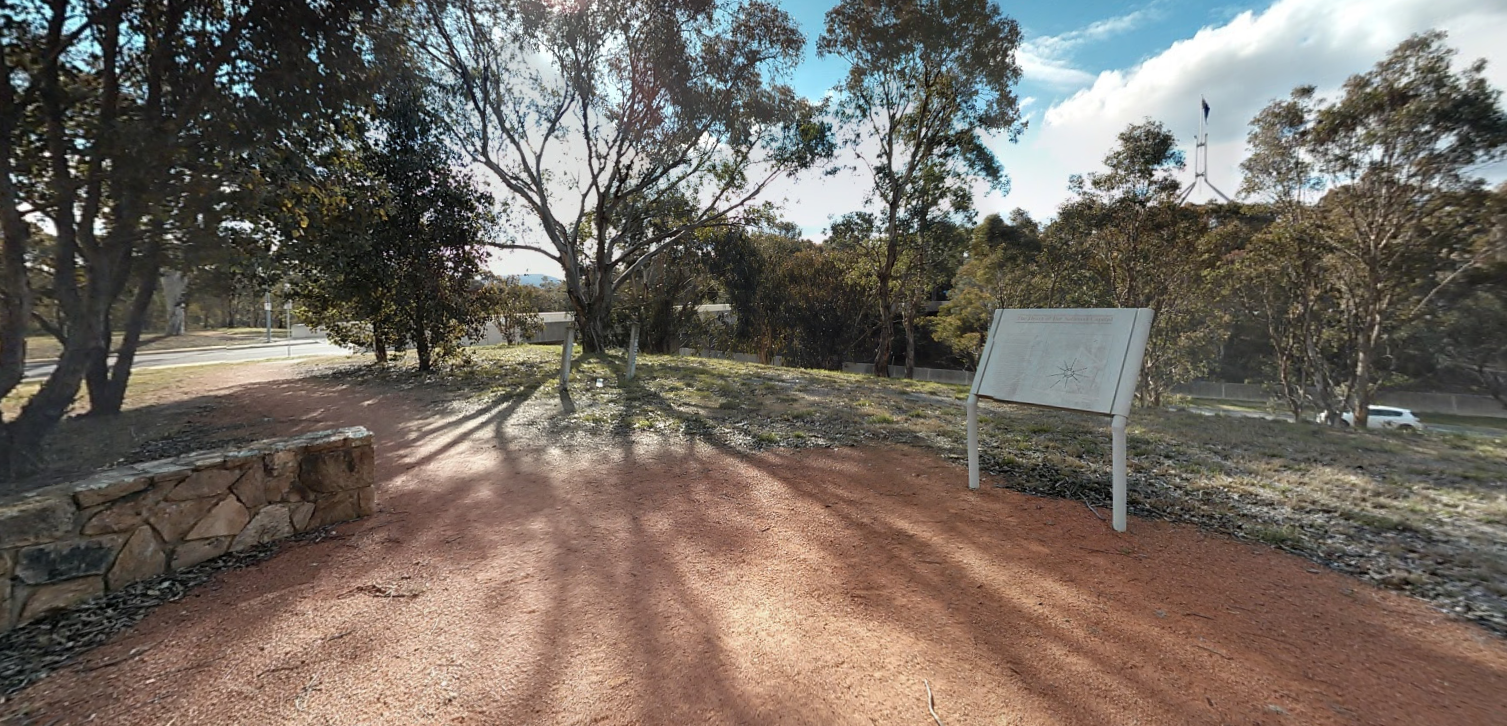
The sign was an exact match to the one from Figure 2-1. However, a glance around revealed that this wasn’t the right spot. It was close but not quite right. A few more seconds of searching inside the circle revealed the solution.
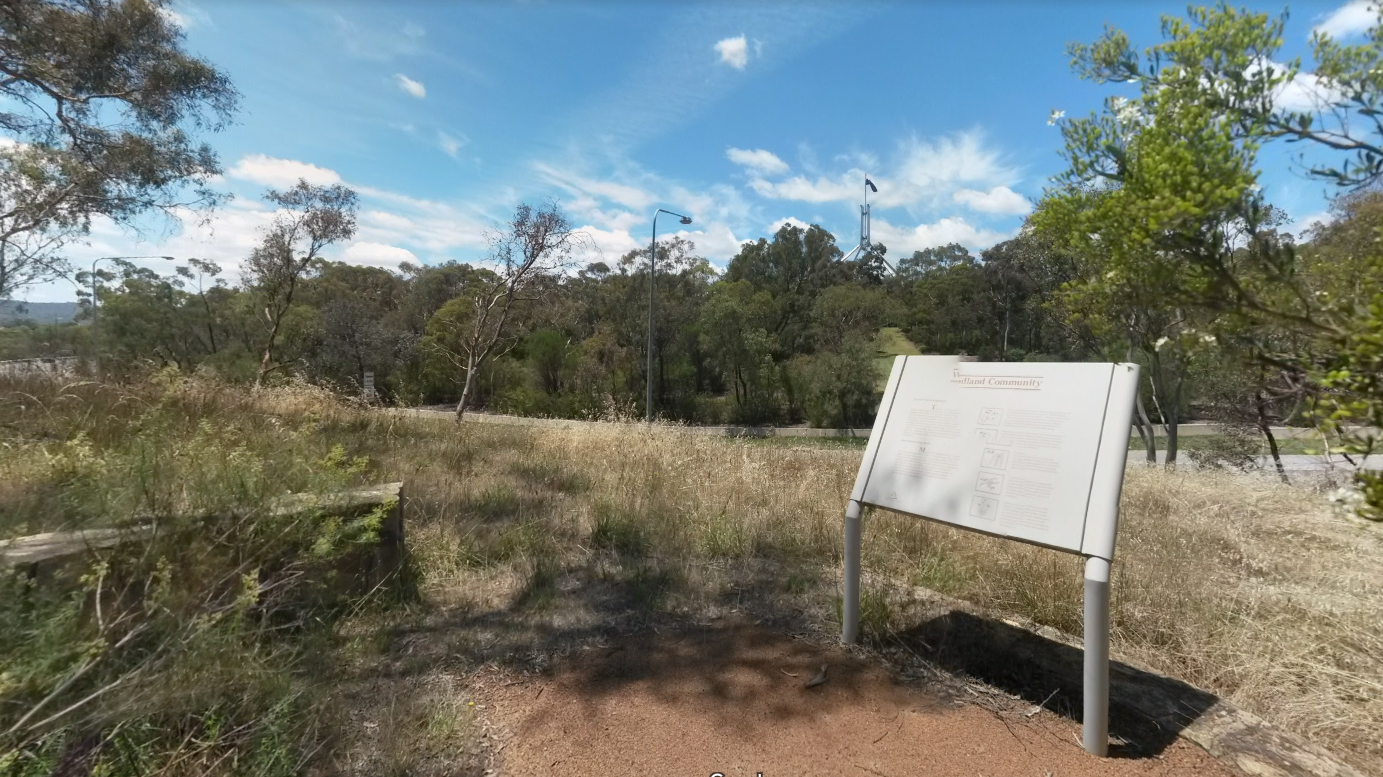
Finally, we had the right area, with the right sign and the right streetlight. The final step was to record the coordinates from Google Maps and submit the flag.
DUCTF{-35.306,149.120}
Forensics
Do the loop!
Do the loop doop doop…
Flag format: The STRING you end up with after solving challenge, case insensitive. Author: QUT_WH
For this forensics challenge, we are given an audio file and need to find a string hidden in it. The given audio file sounds like a jingle for the Sydney Metro Monorail, but it has some strange beeping behind the main audio.
Click here to listen to the audio
The beeping seems to be a Morse code sequence, we just need to separate it from the singing and decode it. To continue, we popped the audio file into Audacity and switched to the spectrogram view.
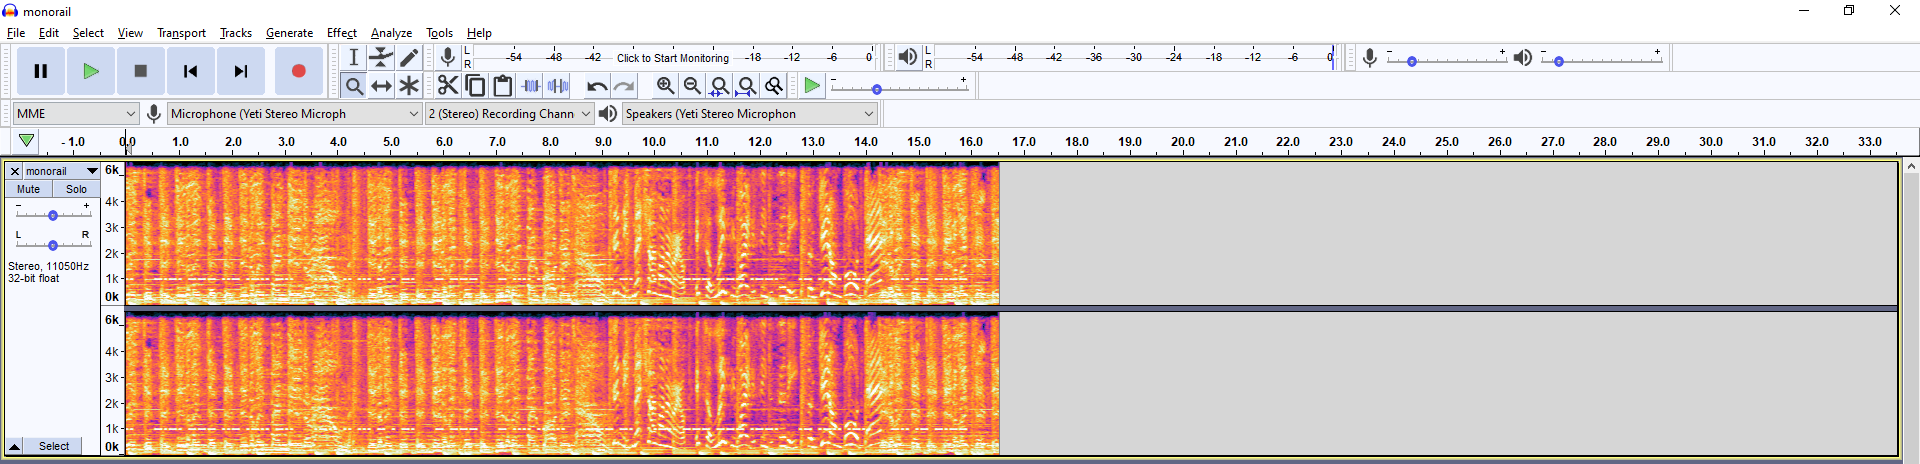
The spectrogram view details the exact dots and dashes of the Morse code sequence. To get a better look at the sequence, we can “zoom in” by changing the frequency range in the spectrogram settings menu.
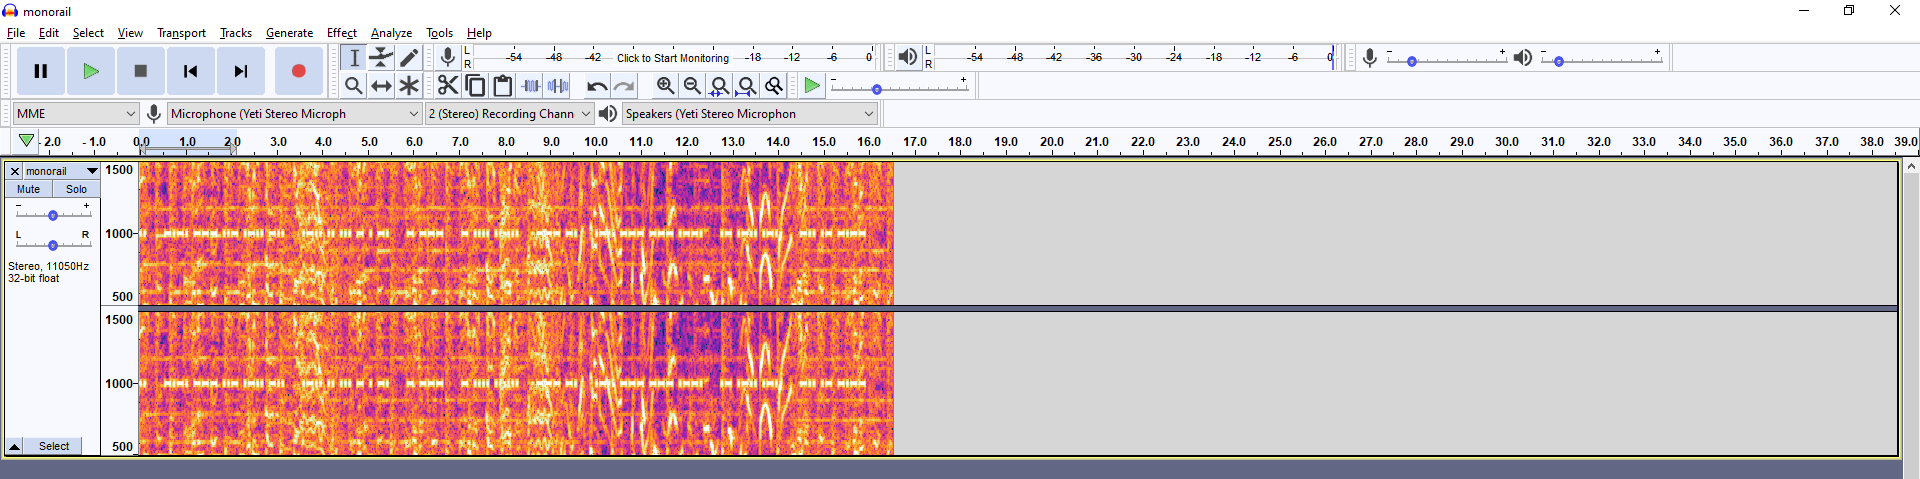
Finally, all that’s left is to record the sequence and decode it. The resulting text should be the flag. To decode, it is simplest to use a decoding site.
.. -.-. — ..- .-.. -.. .-.. .. … - . -. - — - …. .. … — -. .-.. — — .–. .- .-.. .-.. -.. .- -.–
ICOULDLISTENTOTHISONLOOPALLDAY
That’s Not My Name!
I think some of my data has been stolen, can you help me?
Author: Conletz#5420
That’s Not My Name! is all about examining a packet capture for some hidden data. First off, let’s load the capture into Wireshark and examine the protocol hierarchy.
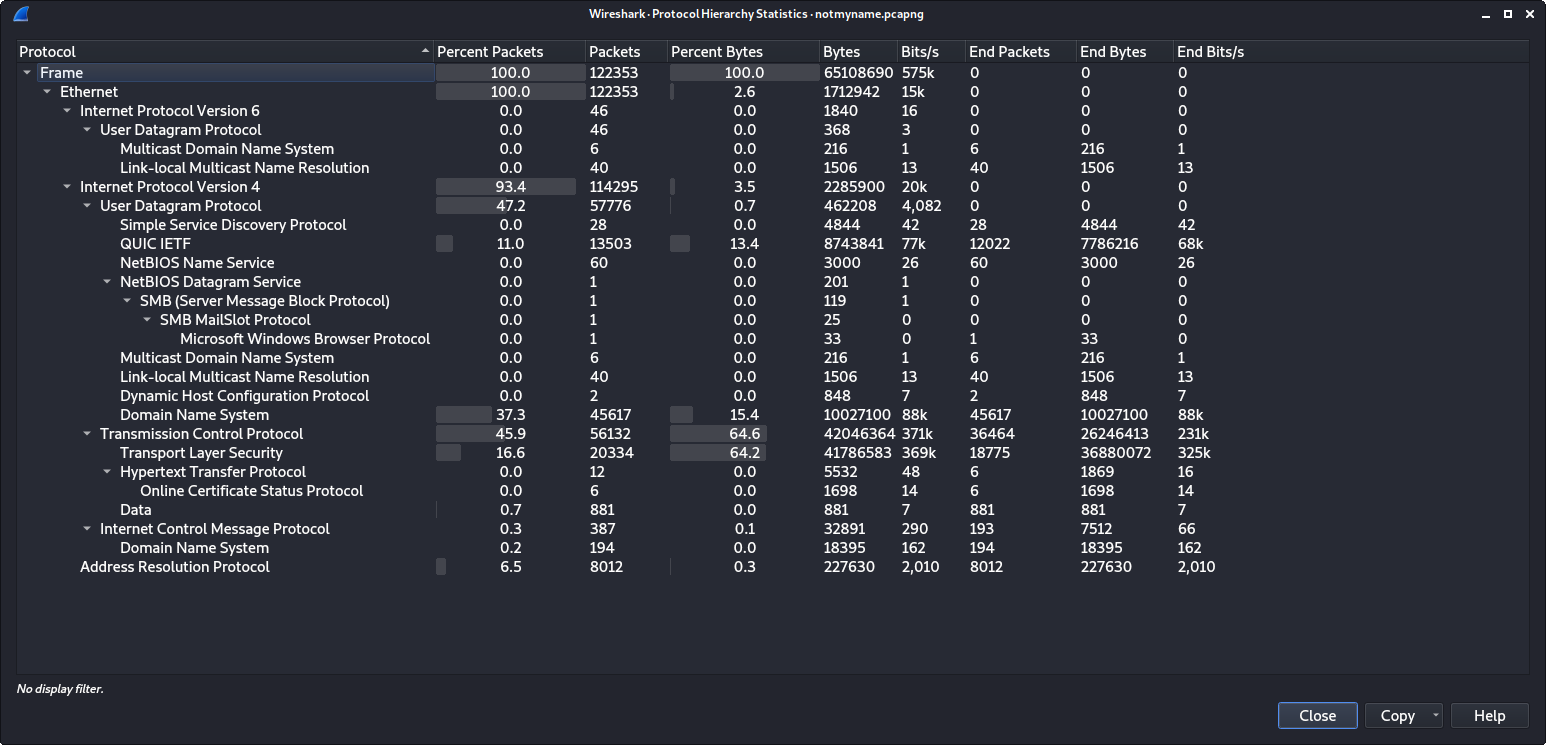
This capture has a ton of packets in it, so we need to filter down some of the chaff. Since we have no way of decrypting the TLS traffic yet, we decided to filter out TLS traffic first.
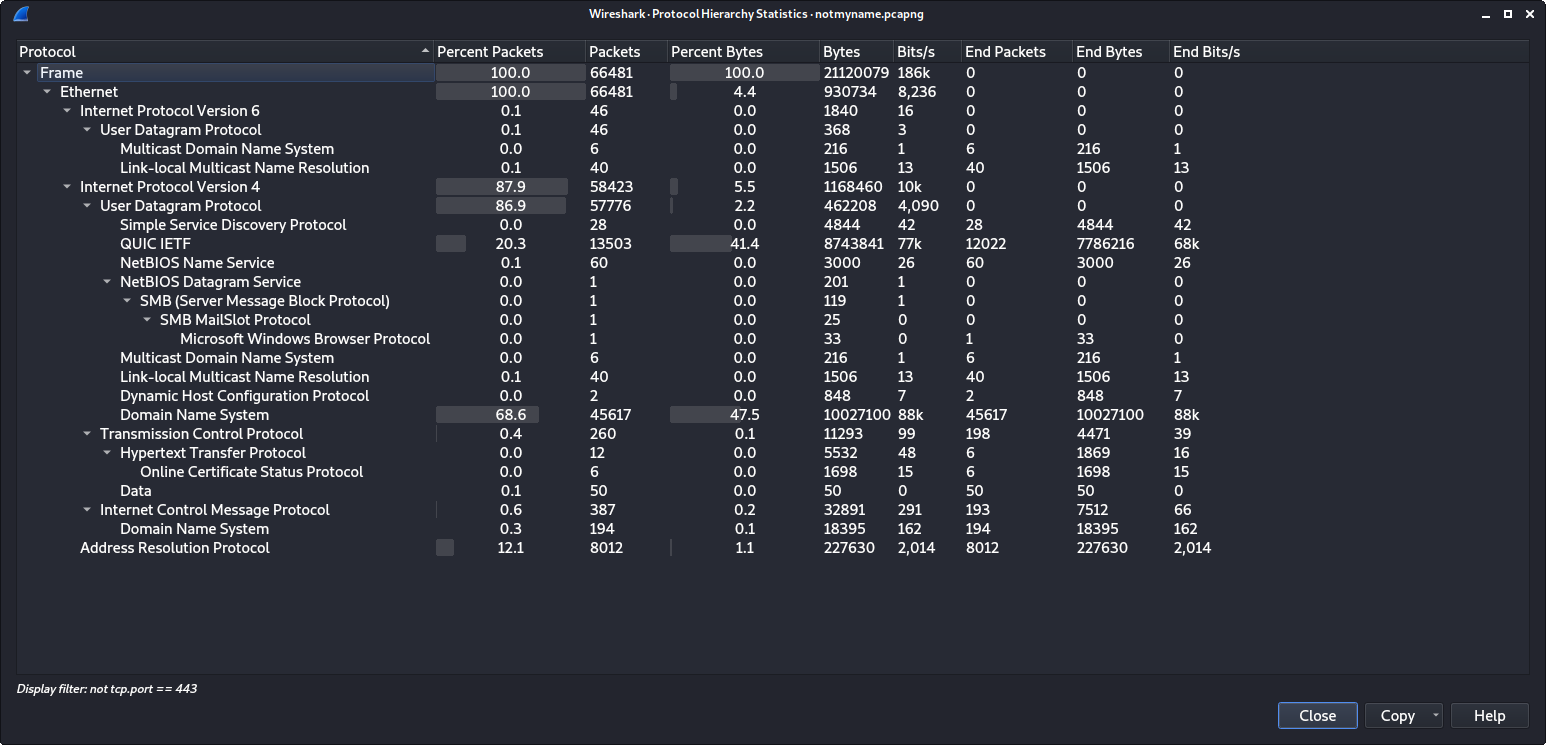
Figure 4-2 shows the results of the filter on the packet counts. Filtering out TLS essentially cut down the search area by half! From the remaining protocols, as highlighted in Figure 4-2, we can see that DNS has the next greatest amount of traffic at 45617 packets. We next applied a new filter to examine only DNS traffic.
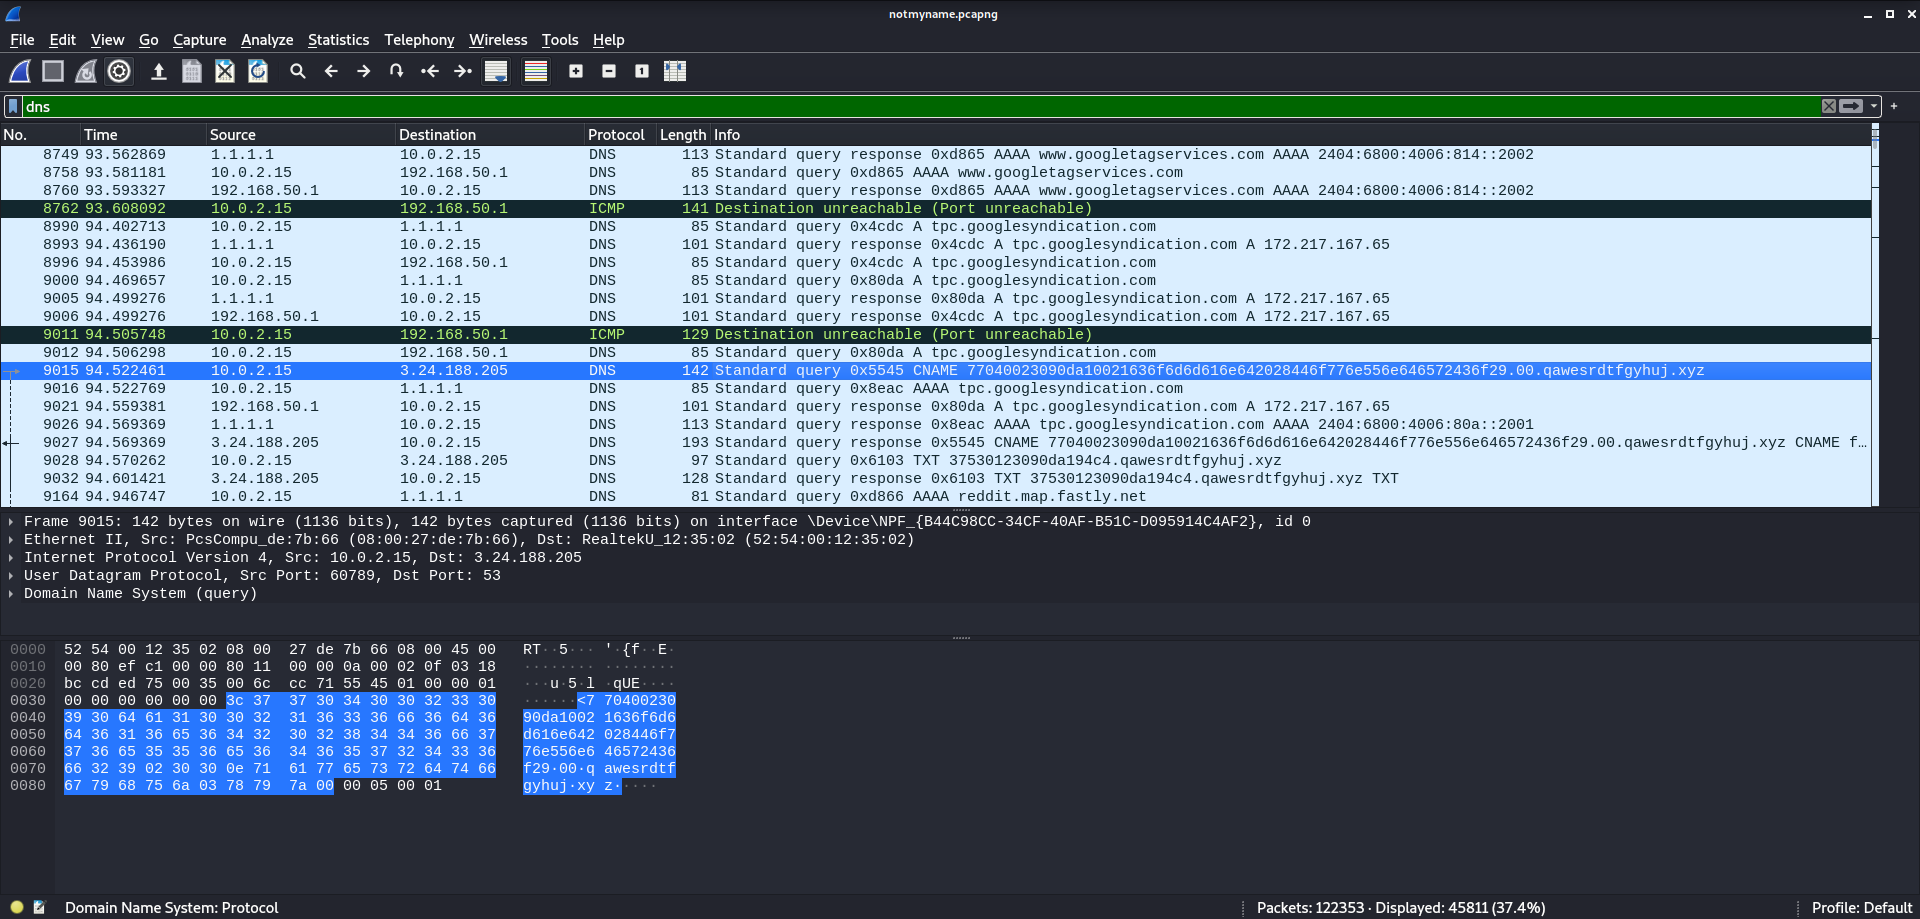
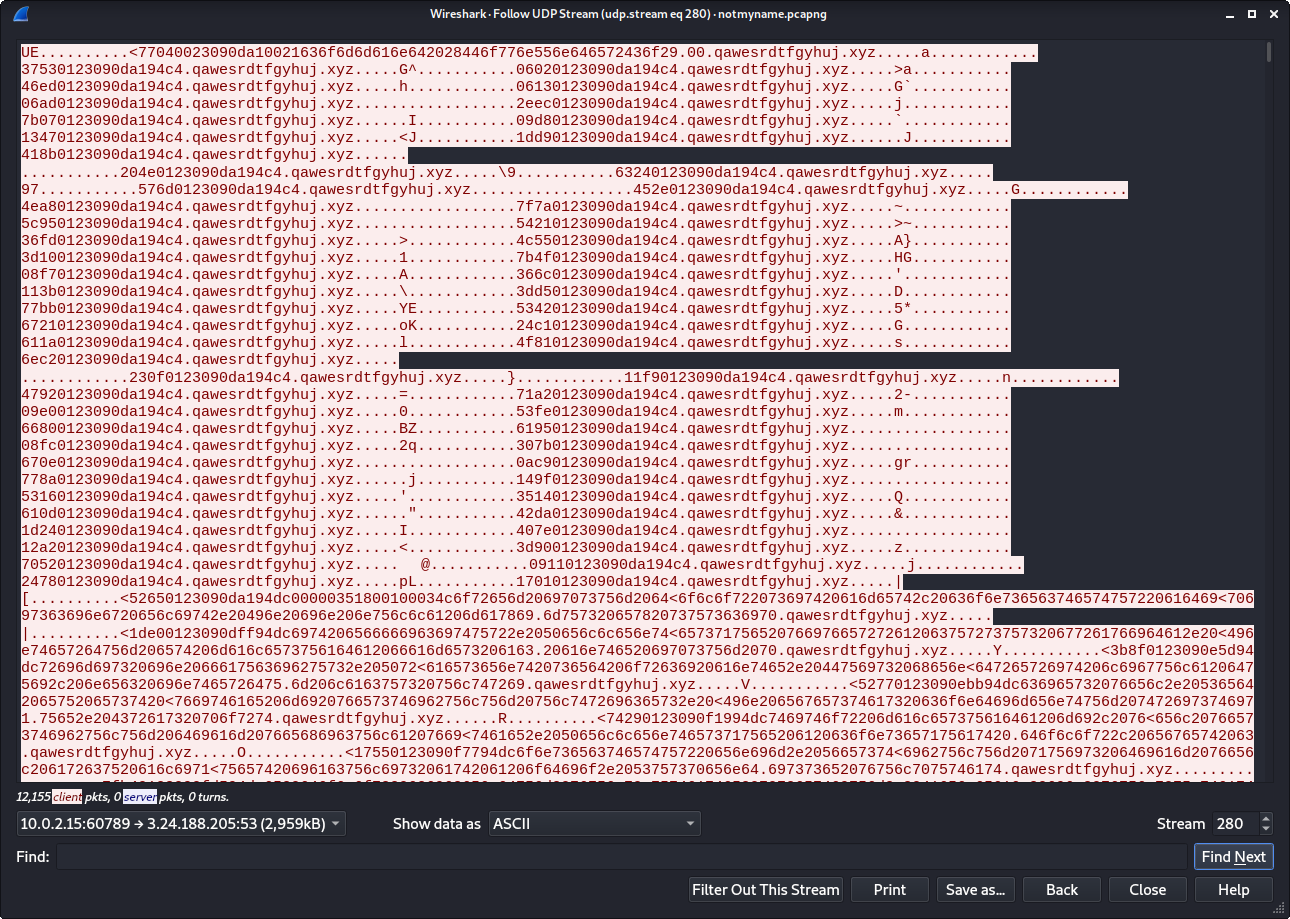
After a bit of scrolling through packets, we came across a suspicious-looking entry. There is a DNS query for “77040023090da10021636f6d6d616e642028446f776e556e646572436f29.00.qawesrdtfgyhuj.xyz” among the several normal queries. The first section of the query looked like a sequence of hexadecimal, so we tried decoding it to see what popped out.
w..# ¡.!command (DownUnderCo)
Weirdly enough, some intelligible text popped out. We then tried to see if there were any more weird DNS queries like this one. By following the UDP stream of this query packet, Wireshark detailed about 24000 similar packets.
As Figure 4-4 shows, we also filtered the stream down to only client packets to keep only the DNS requests. Next using the “Save as…” option in the stream window, we exported the query data to attempt to decode all the hex. We used CyberChef to quickly strip some unnecessary text and decode the hex.
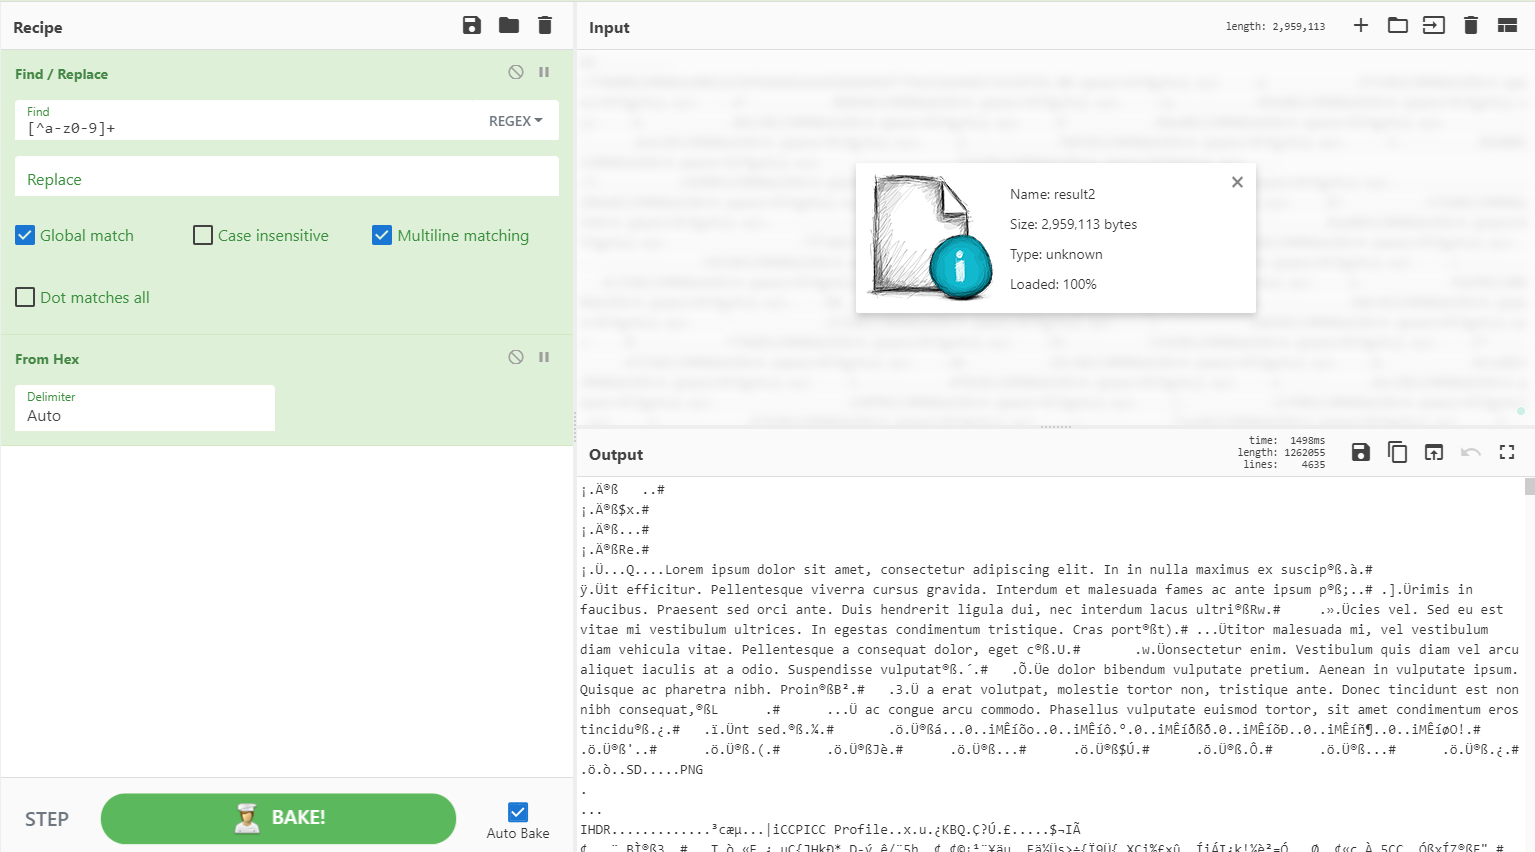
Using regular expressions, we filtered out all the non-hex characters and then applied the “From Hex” tool to translate the remaining data. The results were mostly nonsense, with some moments of clarity. Scrolling through the output, we could see several instances of Lorem Ipsum. From here we tried a Hail Mary and searched the translated text for the DUCTF flag format.
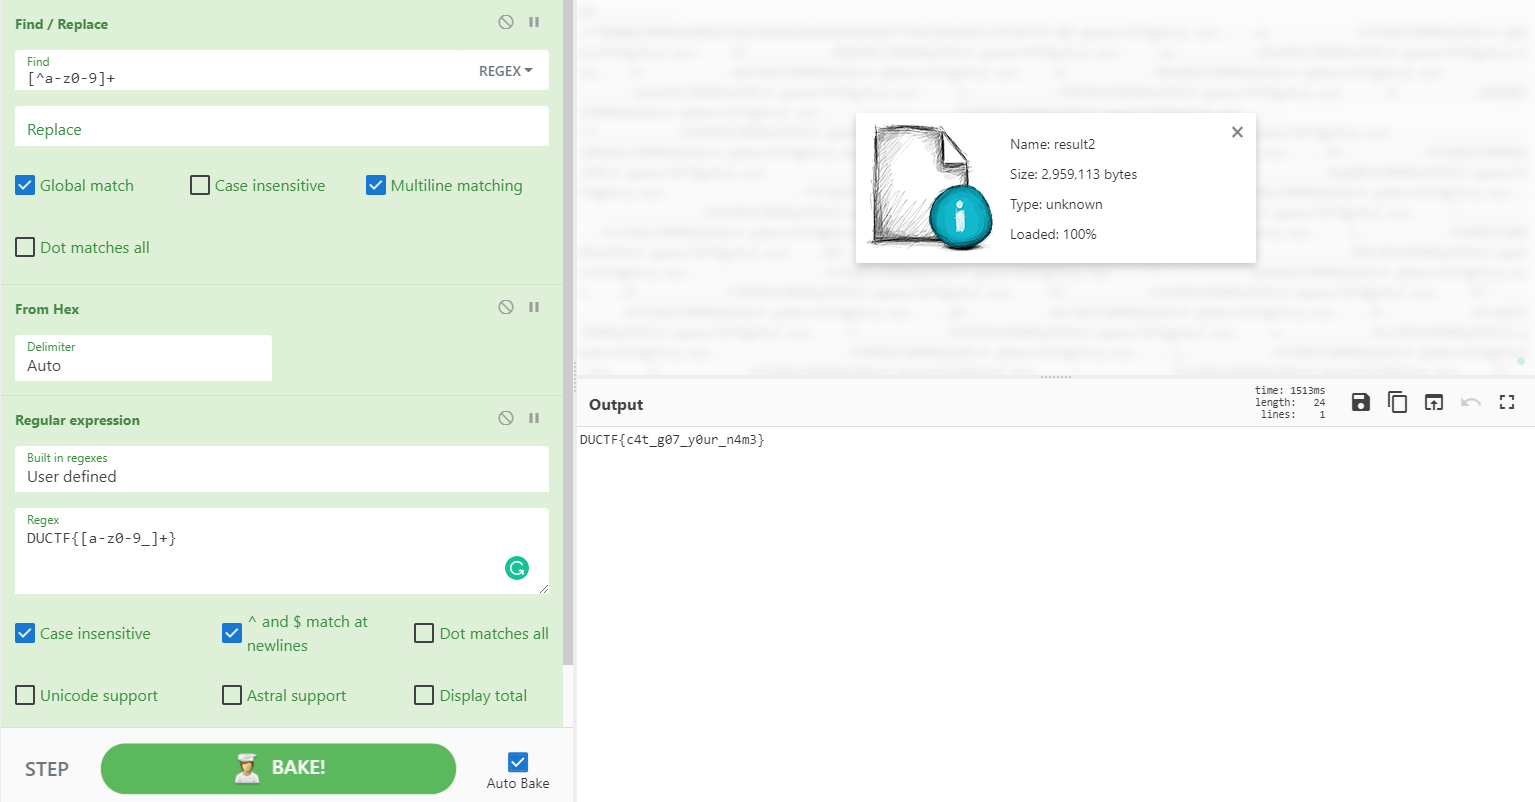
With the “Regular Expression” tool, we found that the flag was hidden within the decoded output.
DUCTF{c4t_g07_y0ur_n4m3}
Want to Play a Game?
My PC has been infected! I need help finding out what happened. I managed to get a memory dump, not sure if that can help you?
In order to recover from this infection, I need the following information:
What is the name of the malware that infected my PC? What is the name of the persistence mechanism? What folder did the infection originate from? Flag format: DUCTF{lowerCaseMalwareName_persistenceName_originatingFolderName}
You can download the memory dump here.
The file is password protected. The password is I83xOkTzeljDmpMmZWTi.
Author: Conletz#5420
For this forensics challenge, we are tasked with finding some traces of malware within a memory capture. We must find out 3 things about the malware to create the flag.
- The name of the malware
- Which persistence mechanism the malware uses
- The folder where the infection originated
To start, we decided to look at the running processes. To examine the memory capture we used Volatility 3.
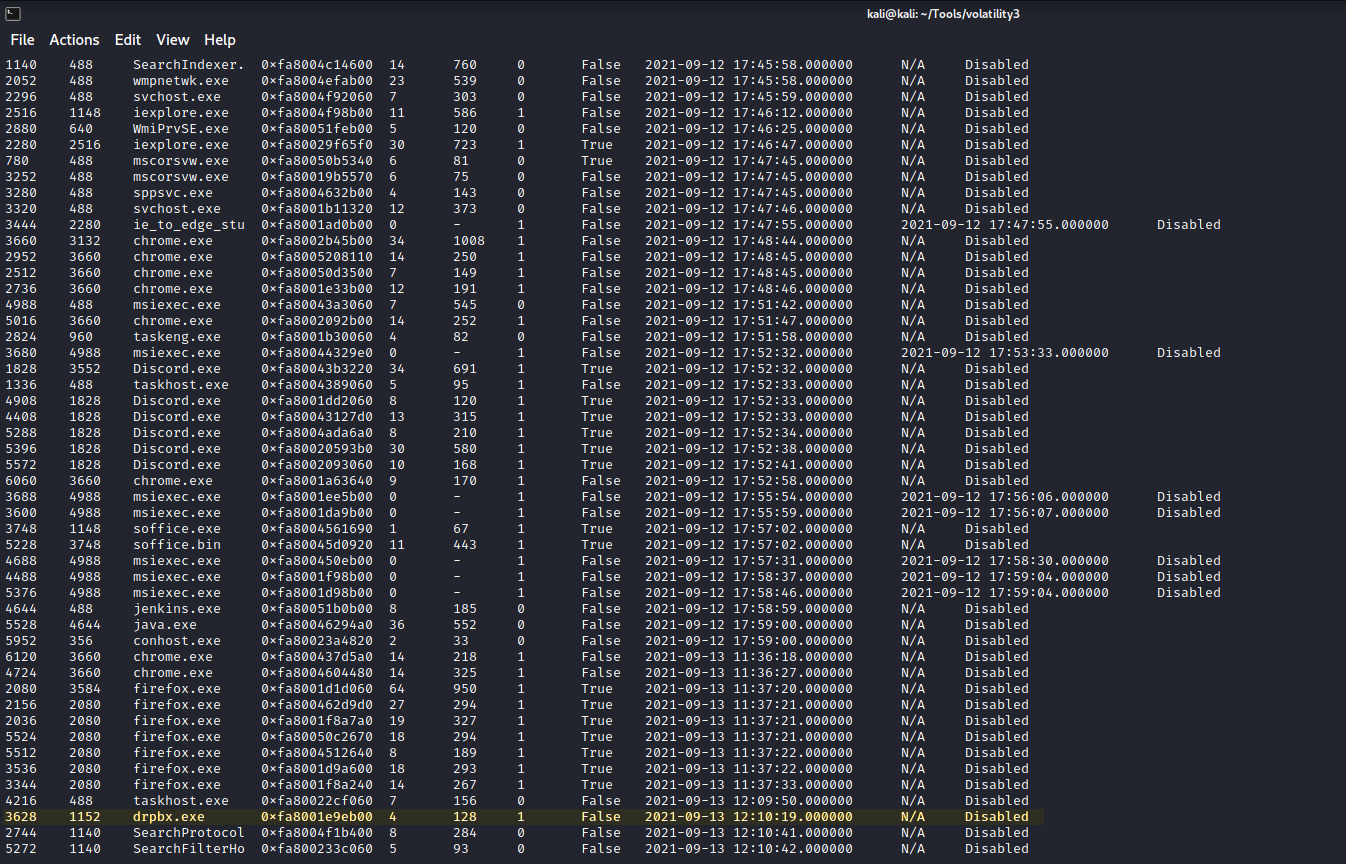
In Figure 5-1 we can see some of the results of the windows.pslist plugin. The results show a number of normal-looking processes and a single odd-looking one, “drpbx.exe”. To continue, we looked at the recent command line history using the windows.cmdline plugin.
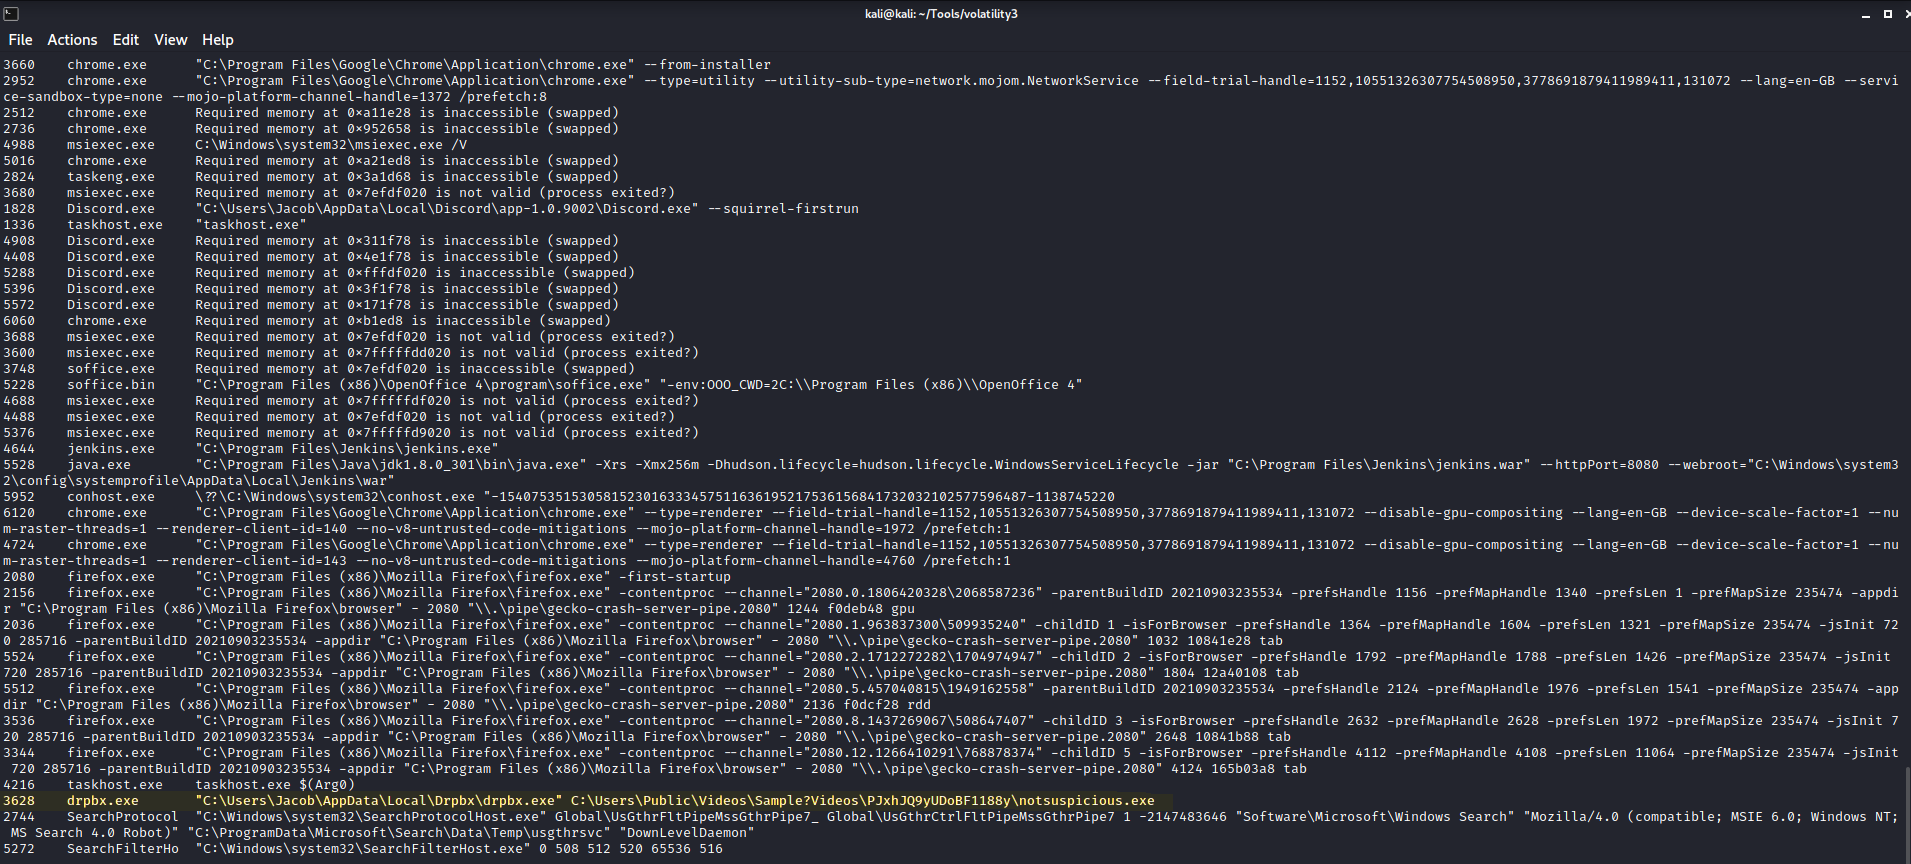
Near the bottom of the plugin results, the drpbx executable makes a return, this time invoking a file called “notsuspicious.exe”. Contrary to its name, notsuspicious.exe is pretty suspicious. To investigate further, we tried to retrieve the file and see if there were any red flags.
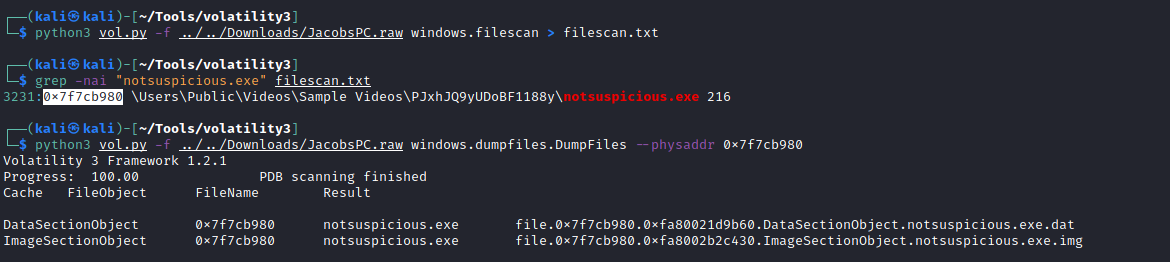
With windows.filescan we were able to find the physical address of the file in memory and then use windows.dumpfiles to get a copy of the data.
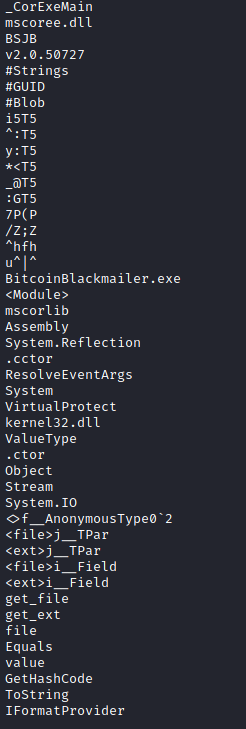
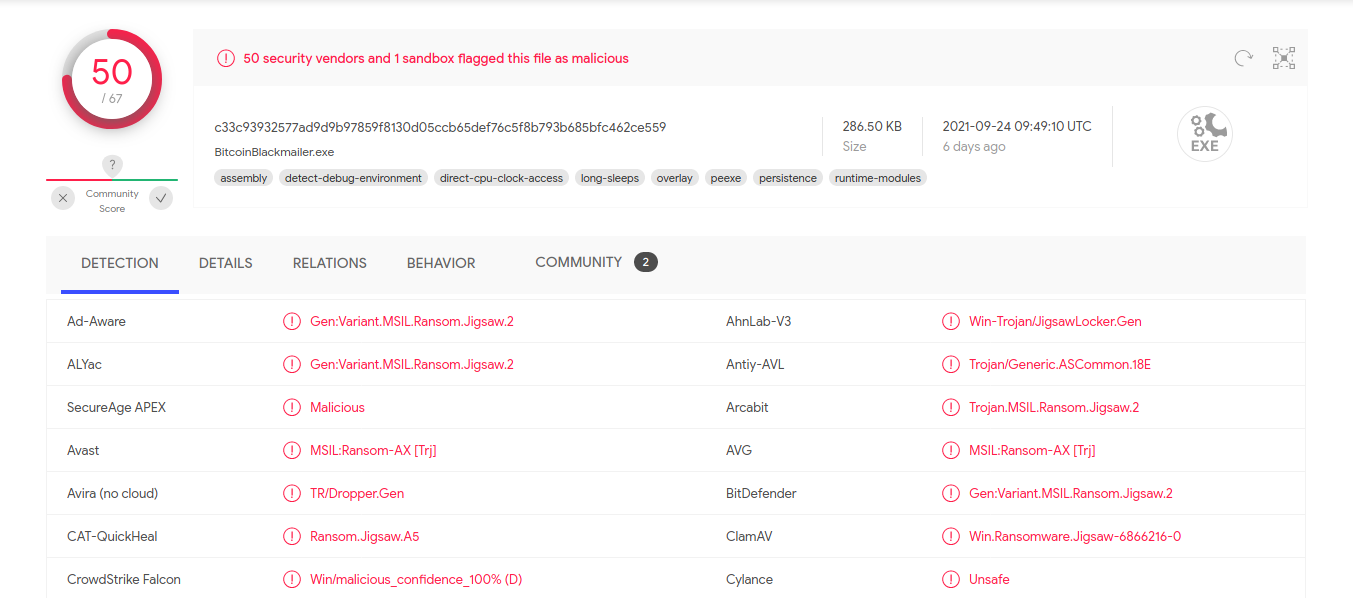
Finally, we used strings to see if there were any weird lines of text in the file data. As Figure 5-4 shows, there was a highly suspicious line with “BitcoinBlackmailer.exe” in it. At this point, we had found the malware. We could also source this malware to the folder “PJxhJQ9yUDoBF1188y”. To continue, we needed to do a little research into BitcoinBlackmailer.
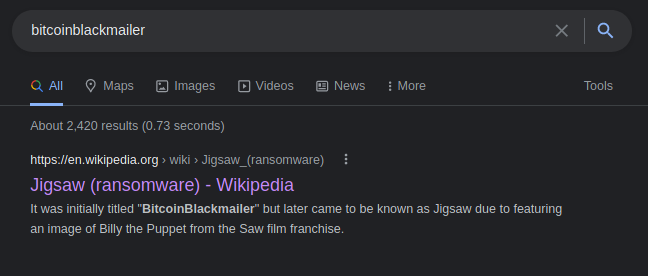
Our initial google search revealed that the proper name for this malware is Jigsaw. Jigsaw is a piece of ransomware that encrypts and gradually deletes files on the infected machine. While threatening the user, the ransomware displays the iconic puppet from the Saw movie series, hence the name, Jigsaw. Jigsaw masquerades as legitimate processes with both the names “drpbx.exe” and “firefox.exe”. The malware creates new folders for both processes and even edits some registry keys to ensure persistence at startup.
Uploading notsuspicious.exe to VirusTotal instantly results in a match and confirms the details we saw earlier. VirusTotal even provides a similar execution path to the one we saw in Figure 5-2. You can find the full VirusTotal report here.
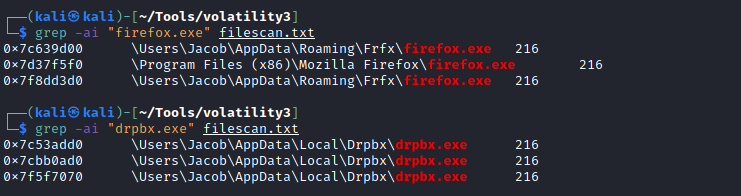
Looking back at the memory capture, we can see the presence of firefox.exe in an atypical directory named “FrFx”. Typically, the Jigsaw ransomware will edit this malicious executable into a Run registry key to enable persistence. This means we have our persistence mechanism as well and with a bit of trial and error, we can complete the flag.
DUCTF{jigsaw_firefox.exe_PJxhJQ9yUDoBF1188y}
Web
Inside Out
You’re hot then you’re cold.
You’re yes then you’re no.
You’re out but somehow in…
Wait is that right?
Author: Solopie
Inside Out is an introductory source-less web challenge where we must find a flag hidden on the provided website. Let’s explore the website a bit.
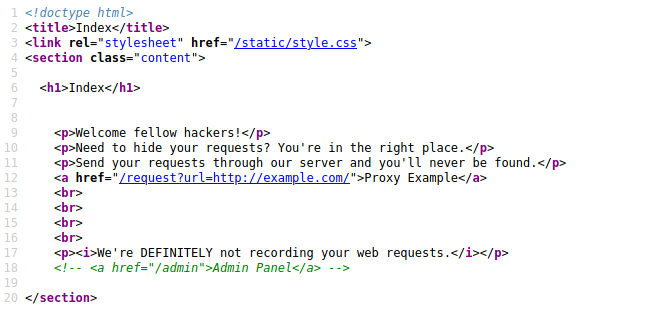
The index does not feature much at first glance, only a link to another page. However, the source code reveals the presence of an admin panel. Let’s try accessing it.
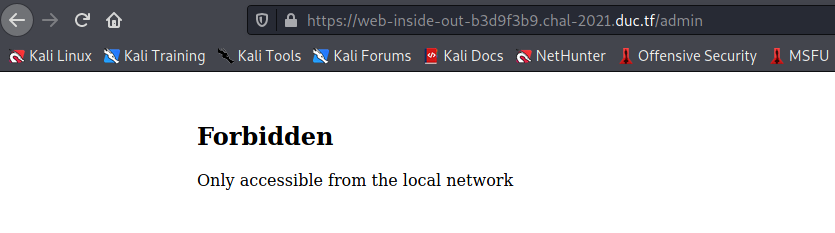
The server responds with a “Forbidden” warning and informs us that we need to be on the local network to access the admin panel. Next, we decided to backtrack a bit and check out the link from earlier.

After following the link, we can see that the main function of the site is to act as a proxy of sorts. The user first inputs another site into the URL parameter and then the server retrieves the data from that URL. However, what happens when we try to query the localhost? Perhaps we can use this page to perform a Server Side Request Forgery (SSRF) and access that admin panel.
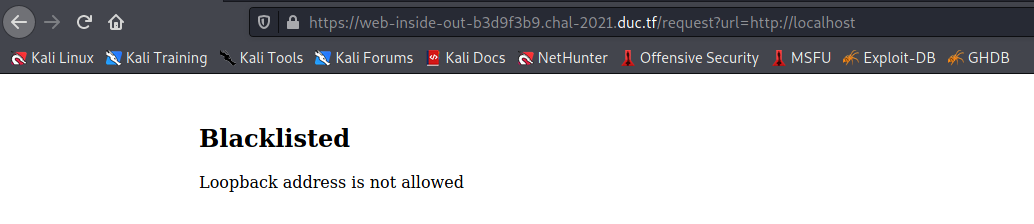
Upon trying to query localhost, the server returns a warning that says the loopback address is blacklisted. To continue, we tested just how thorough the blacklist was. On hacktrickz we found a huge list of potential bypasses to try.

After a bit of trial and error, we found that using “http://0” would bypass the filter and return some familiar details. Just like the source code on the index page, we see the reference to the admin panel at /admin. Let’s try accessing it now.

The server promptly returns the admin panel to us and with it the flag.
DUCTF{very_spooky_request}
Conclusion
Lessons Learned
- Using Google Lens for OSINT
- DNS Traffic Analysis with Wireshark
- Basic Malware Trace Analysis with Volatility 3
- Basic Server Side Request Forgery